Introduction
There is a quiet intimacy to wire wrapping that sets it apart from other jewelry-making techniques.
Where soldering demands heat and metal clay requires a kiln, wire wrapping asks only for your hands, a few simple tools, and a willingness to slow down.
Each twist of the wire becomes a deliberate mark, each loop a decision about balance and form.
It is jewelry making at its most elemental — and its most meditative.
Wire wrapping is one of the oldest methods of creating jewelry, with examples dating back thousands of years to ancient Egypt, Rome, and Scandinavia.
Artisans would shape precious metals by hand, wrapping them around gemstones and beads to create wearable art.
Today, the technique has been revived by modern makers who appreciate its accessibility and the organic, sculptural quality of hand-wrapped pieces.
In this guide, we will explore the fundamentals of wire wrapping for jewelry. You will learn about the different types of wire, the essential tools, and two core projects: a simple wrapped pendant and a delicate adjustable ring.
These projects require no soldering, no torch, and no expensive equipment — just copper or silver wire, a few cabochons or beads, and focused attention.
The Materials: Understanding Wire
Wire is the foundation of everything you will make, so choosing the right type matters. Here is what you need to know before you buy your first spool.
Wire Gauge
Wire thickness is measured in gauge — the lower the number, the thicker the wire. For wire wrapping, the most useful gauges are 20, 22, and 24.
- 20-gauge wire is thick and sturdy. It holds its shape well and is ideal for the structural framework of pendants and the shank of rings. It requires more hand strength to bend and is best for the backbone of your piece.
- 22-gauge wire is the most versatile all-purpose gauge. It offers a good balance of strength and flexibility, making it suitable for wrapping, weaving, and creating decorative loops. Most of your projects will use 22-gauge wire for the main wrapping work.
- 24-gauge wire is thinner and more flexible. It is perfect for fine detail work, weaving between structural wires, and securing small beads or stones. Use it for the finishing touches that give your piece a polished, intricate look.
For beginners, start with 22-gauge wire in copper or craft brass. These metals are affordable and forgiving — you can practice bends and loops without worrying about wasting expensive materials. A 25-foot spool costs about eight to ten dollars and will last through dozens of practice pieces.
Wire Hardness
Wire also comes in different hardness levels: dead-soft, half-hard, and full-hard. Dead-soft wire is the easiest to bend and shape, making it the best choice for beginners.
Half-hard wire holds its shape better but requires more force to bend. Full-hard wire is difficult to work with by hand and is typically used for structural components that must not bend.
For wire wrapping, dead-soft wire is the standard. It allows you to create smooth curves and tight wraps without excessive hand fatigue. As you gain experience, you may incorporate half-hard wire for specific applications where extra rigidity is desired.
Metal Types
- Copper. Warm, rich, and affordable. Copper is the ideal metal for beginners. It is soft enough to shape easily, develops a beautiful patina over time, and costs a fraction of silver or gold. Practice your techniques on copper before investing in precious metals.
- Brass. Brighter and more golden than copper. Brass is slightly harder and requires a bit more strength to bend, but it holds its shape well. It pairs beautifully with turquoise, lapis lazuli, and other blue gemstones.
- Sterling silver. The traditional choice for fine jewelry. Sterling silver is more expensive and softer than copper, making it a pleasure to work with. Save it for finished pieces you intend to gift or sell.
- Gold-filled and gold-plated. For the look of gold without the price of solid gold. Gold-filled wire has a thick layer of gold bonded to a brass core and is durable enough for regular wear. Gold-plated wire is thinner and may wear off over time.
- Colored craft wire. Coated copper wire available in a wide range of colors. This is a fun option for costume jewelry and children's projects, though the coating can scratch or peel with heavy wear.
Essential Tools
Wire wrapping requires remarkably few tools. With just three pairs of pliers and a few accessories, you can create a wide range of jewelry.
- Round-nose pliers. These have tapered, conical jaws that allow you to create loops and curves of varying sizes. The closer to the tip you work, the smaller the loop. Essential for forming wire loops for pendants, ear wires, and jump rings.
- Chain-nose pliers. Flat on the inside and tapered on the outside, these are used for gripping wire, making sharp bends, and manipulating small components. They are your all-purpose workhorse tool. Look for a pair with smooth jaws — textured jaws can mark the wire.
- Flat-nose pliers. Wide, flat jaws useful for gripping and holding wire without marring the surface. They are also helpful for straightening wire and creating crisp right-angle bends.
- Wire cutters. Flush cutters designed specifically for jewelry wire. Do not use regular scissors or household wire cutters, which will crush the wire ends rather than cutting them cleanly. Flush cutters leave a flat, clean edge that will not scratch the wearer.
- A ruler or measuring tape. Wire wrapping often requires precise lengths. A small metal ruler with millimeter markings is ideal.
- A mandrel or ring sizer. If you plan to make rings, a metal mandrel with marked sizes is invaluable. A set of graduated ring mandrels costs about fifteen dollars and ensures consistent sizing.
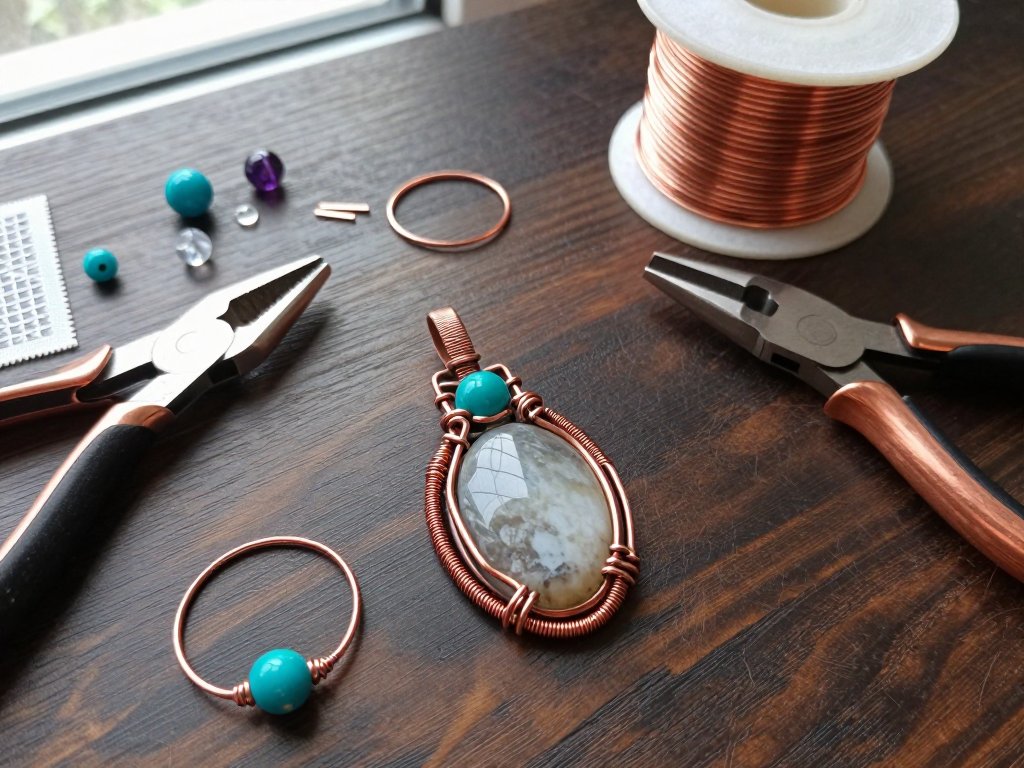
Project 1: Simple Wire Wrapped Pendant
This project is the perfect introduction to wire wrapping. You will learn how to secure a stone or cabochon in a wire frame and create a bail for the chain or cord.
The technique is called a "basic cage wrap" and is the foundation for hundreds of more complex pendant designs.
What You Will Need
- A teardrop or oval cabochon (flat on one side, domed on the other) about one inch in length. Regular smooth pebbles from a craft store or beach also work beautifully. Avoid stones with sharp edges that could cut the wire.
- 24 inches of 22-gauge dead-soft copper or silver wire
- 12 inches of 24-gauge wire for fine wrapping
- Round-nose pliers, chain-nose pliers, wire cutters
Instructions
Step 1: Prepare the frame wire. Cut two pieces of 22-gauge wire, each about ten inches long. Hold them together side by side and straighten them gently with your flat-nose pliers. The two parallel wires will form the structural backbone of your pendant.
Step 2: Create the initial bend. Place your cabochon between the two wires, centering it so there is an equal length of wire extending past the top and bottom.
Gently bend the wires around the stone, pressing them against the dome side. The wires should follow the curve of the stone snugly but not tightly — you should be able to slide the stone in and out with light pressure.
Step 3: Secure the bottom. Bring the wires together at the bottom point of the cabochon and cross them over each other.
Using your chain-nose pliers, make a small loop at the bottom by wrapping one wire around the other two or three times.
This creates a cradle that prevents the stone from sliding downward. Trim any excess wire with your flush cutters and press the cut end flat against the frame.
Step 4: Wrap the sides. Take your 24-gauge wire and begin wrapping it around one of the frame wires, starting at the bottom and working upward.
Each wrap should sit snugly against the previous one, like the coils of a spring.
Wrap for about half an inch, then switch to the other side and wrap the opposite frame wire symmetrically.
These side wraps add visual interest and reinforce the structure.
Step 5: Create the top bail. Once the side wraps reach the top of the stone, bring the two frame wires together above the stone's apex.
Using your round-nose pliers, form a loop with both wires together — this will serve as the bail through which you will thread your chain or cord.
Wrap the wire tails around the base of the loop two or three times to secure it.
Trim and tuck the ends.
Step 6: Finish and polish. Examine your pendant from all angles. Gently adjust any wires that are not sitting flush against the stone.
If any wire ends are sharp or protruding, file them with a fine jewelry file or sandpaper.
Buff the wire lightly with a polishing cloth to remove any finger oils and bring out the metal's natural luster.
Thread your pendant onto a cord, leather thong, or chain, and it is ready to wear.
Project 2: Adjustable Wire Wrapped Ring
Once you have mastered the pendant, a wrapped ring is the natural next step. This project uses a single continuous piece of wire to create a delicate, adjustable ring that fits almost any finger. The design is minimal and modern, showcasing the beauty of the wire itself.
What You Will Need
- 14 inches of 20-gauge dead-soft wire (copper or silver)
- A bead or small cabochon with a hole large enough to fit the wire (4 to 6 millimeter beads work well)
- Round-nose pliers, chain-nose pliers, wire cutters
- A ring mandrel or a cylindrical object roughly the diameter of your finger
Instructions
Step 1: Thread the bead. Slide your bead onto the center of the wire. Position it exactly at the midpoint so the two ends of the wire are equal in length. This symmetry is important for a balanced ring.
Step 2: Create the wrap around the bead. Using your chain-nose pliers, bend each wire end upward and cross them over the top of the bead.
Wrap each wire around the base of the bead once, then bring them back to the underside.
The wraps should be tight enough to hold the bead securely but not so tight that they distort the wire.
Repeat this crossing pattern two or three times until the bead is firmly cradled.
Step 3: Form the ring shank. Hold the bead in the center of your ring mandrel (or your finger) and bring the two wire ends around the back.
The wires should follow the curve of the mandrel and meet on the opposite side from the bead.
Cross the wires once at the back of the ring to create a structural connection point.
Step 4: Wrap the shank. Take one wire end and wrap it around the other wire two or three times, close to where they cross.
This creates a decorative coil that also secures the shank. Trim the wrapped wire flush and press the cut end flat.
Take the remaining wire and wrap it two or three more times around the base of the bead on the underside, then trim and tuck.
Step 5: Adjust and finish. Slide the ring off the mandrel and try it on your finger.
Because the ring is wrapped with a single continuous wire, the shank can be gently spread apart or squeezed together to adjust the size.
This makes your ring adjustable by about one to two full sizes in either direction.
Polish the wire with a soft cloth and check for any sharp edges. If the cut ends feel rough, file them gently with a fine jewelry file.
The beauty of this ring design is its versatility. By changing the bead size, color, or metal type, you can create an entirely different look each time.
A small turquoise bead with copper wire evokes a Southwestern feel. A clear crystal with silver wire is elegant and understated.
A matte black bead with brass wire reads modern and architectural.
Design Principles for Wire Wrapped Jewelry
As you gain confidence with the techniques, these design considerations will help you create pieces that are not just functional but beautiful.
Balance and symmetry. While asymmetrical designs can be striking, most wire-wrapped pieces benefit from a sense of visual balance.
The stone or bead should feel centered, and the wraps on either side should be roughly equal in density.
If you are intentionally creating an asymmetrical piece, make the imbalance look deliberate by emphasizing it with thicker wraps or contrasting wire colors.
Negative space. Do not cover every inch of wire with wraps. Leaving some sections of bare wire visible creates visual breathing room and highlights the purity of the metal. The contrast between wrapped and unwrapped sections adds depth and sophistication to your piece.
Texture and finish. A polished, shiny wire has a very different personality from a wire with a matte or hammered finish.
Hammering your wire lightly with a jewelry hammer before wrapping adds a subtle texture that catches the light in interesting ways.
A polished finish, on the other hand, emphasizes the smooth curves and reflective quality of the metal.
Stone selection. The stone or bead you choose sets the entire tone of the piece.
Rough, uncut stones pair well with rustic, organic wraps. Polished cabochons with clean edges call for precise, symmetrical wirework.
Consider the stone's color, shape, and energy when planning your design. A deep amethyst demands a different treatment than a pale moonstone.
Troubleshooting
- My wire keeps kinking and bending unevenly. Wire naturally develops kinks if you bend it too sharply or in the same spot repeatedly. Work slowly and use smooth, continuous curves. If a kink appears, you can often straighten it by gently pulling the wire through your chain-nose pliers with light pressure. For stubborn kinks, cut the wire and start that section fresh.
- My wraps are loose and slide around. Each wrap must be seated snugly against the previous one. As you wrap, use your thumb or chain-nose pliers to push each coil into place immediately after forming it. Consistent tension throughout the wrapping process prevents gaps. If the wraps are already loose, you may need to remove them and re-wrap with tighter tension.
- The stone is wobbling in the frame. The frame wires may not be tight enough against the stone. Remove the stone, squeeze the frame wires slightly closer together, and reinsert the stone. The wires should grip the stone with light, even pressure. If the frame is too loose, add an extra wrap of fine wire around the bottom cradle for additional security.
- My wire ends are sharp and scratchy. Flush cutters should leave a clean, flat end, but sometimes a tiny burr remains. Use a fine jewelry file or 600-grit sandpaper to gently round the tips of any cut wires. A quick buff with a polishing cloth afterward will smooth the surface. Always check for sharp ends before gifting or wearing your piece.
Finding Your Rhythm
Wire wrapping is not a technique you master in an afternoon. It is a skill that unfolds slowly, revealing itself with each piece you make.
Your first pendant will have uneven wraps and a slightly crooked bail. Your fifth will be noticeably better.
Your twentieth will be something you are proud to wear in public.
The key is to embrace the learning process. Each piece teaches you something about how wire behaves at different angles, how much tension to apply, and where to position your tools for the best leverage.
Pay attention to these lessons. Keep your early pieces so you can see how far you have come.
One of the most rewarding aspects of wire wrapping is that finished pieces make thoughtful, personal gifts.
A hand-wrapped pendant or ring carries a meaning that no store-bought piece can match. The time and care you invested in each wrap is visible in the finished piece, and the recipient will feel that care every time they wear it.
Final Thoughts
Wire wrapping connects you to one of humanity's oldest creative practices. With nothing more than metal and your hands, you can create jewelry that is both beautiful and meaningful.
There is no soldering, no casting, no complex machinery — just the quiet satisfaction of shaping wire into something that holds a stone, catches the light, and makes someone feel special when they wear it.
Start with a simple pendant. Once you have the basic wrap technique down, try the adjustable ring.
Experiment with different stones, different wire colors, different wrapping patterns. Each variation teaches you something new about the material and your own creative instincts.
Before long, you will be designing your own pieces and developing a style that is entirely your own.