Introduction
I spent forty dollars on art supplies once and produced exactly one drawing that looked like a smudged potato. The charcoal was everywhere — my hands, my clothes, my cat. And yes, the cat was not impressed. That was the day I realized charcoal drawing wasn't about having expensive materials. It was about knowing a few basic techniques and working with what you actually need.
If you have ever wanted to try charcoal drawing but felt overwhelmed by the choices at the art supply store, I understand. There are soft charcoals, hard charcoals, compressed sticks, vine sticks, blending stumps, and fixatives. It is a lot for a beginner. But here is the truth: you can start with less than fifteen dollars worth of supplies and make drawings that surprise you.
Let me show you what actually matters and what you can skip.
What You Actually Need (And What You Do Not)
Art supply stores are designed to make you feel like you need everything on the shelf. You do not. Here is the short list for a beginner who wants to learn without burning cash.
Charcoal sticks. Buy a mixed pack of vine charcoal and compressed charcoal. Vine charcoal is soft and light — perfect for sketching and blocking in shapes. Compressed charcoal is darker and bolder — great for shadows and fine lines. A pack of each costs about six dollars total.
Paper. Do not buy expensive sketchbook paper. Get a pad of newsprint or inexpensive drawing paper with some tooth (texture). The tooth grabs the charcoal particles and keeps them in place. Smooth paper lets the charcoal slide off. A fifty-sheet pad of newsprint runs about four dollars.
A kneaded eraser. This is the single best tool for charcoal drawing. It lifts charcoal off the page instead of smearing it around like a pink eraser does. You can shape it into a point for fine highlights or flatten it for broad erasing. They cost about two dollars and last for years.
A blending stump. Also called a tortillon. It is a tightly rolled paper tool that blends charcoal into smooth gradients. You can also use a cotton swab or even your finger, but a blending stump gives you more control. About two dollars.
Fixative. A spray that seals your finished drawing so it does not smudge. You can buy workable fixative that lets you draw over it, or final fixative for completed pieces. About six dollars for a can that lasts through many drawings.
What to skip. Skip the fancy charcoal pencil sets with twelve different hardness grades. Skip the expensive pastel paper. Skip the drawing board with the built-in storage compartment. You can tape your paper to a regular piece of cardboard or a clipboard. Save your money for more paper — that is what you will actually use.
Three Fundamental Techniques
Before you try to draw anything specific, practice these three techniques. They are the building blocks of every charcoal drawing you will ever make.
Hatching and Cross-Hatching
Hatching is drawing a series of parallel lines close together. The closer the lines, the darker the area looks. Cross-hatching adds a second layer of lines going the opposite direction.
Try this: draw a row of boxes on your paper. Fill the first box with widely spaced lines going one direction. Fill the next box with lines slightly closer together. Keep going until the last box has lines that are almost touching. Then do the same thing but add cross-hatching on top. You will see how much control you have over value just by changing line spacing.
Common beginner mistake: pressing too hard. Charcoal is soft. Light pressure creates light lines. Heavy pressure grinds the charcoal into the paper and makes it almost impossible to erase. Start light and build up.
Blending and Smudging
Blending is how you create smooth transitions between light and dark areas. After laying down some charcoal, use your blending stump or a soft cloth to gently rub the area in circular motions.
Try this: shade a rectangle from dark on one end to light on the other. Then blend it with your stump. You should see a smooth gradient. If it looks patchy, add more charcoal to the dark end and blend again.
Your finger works in a pinch, but the oils from your skin can create uneven smudges. A blending stump or chamois cloth gives you cleaner results.
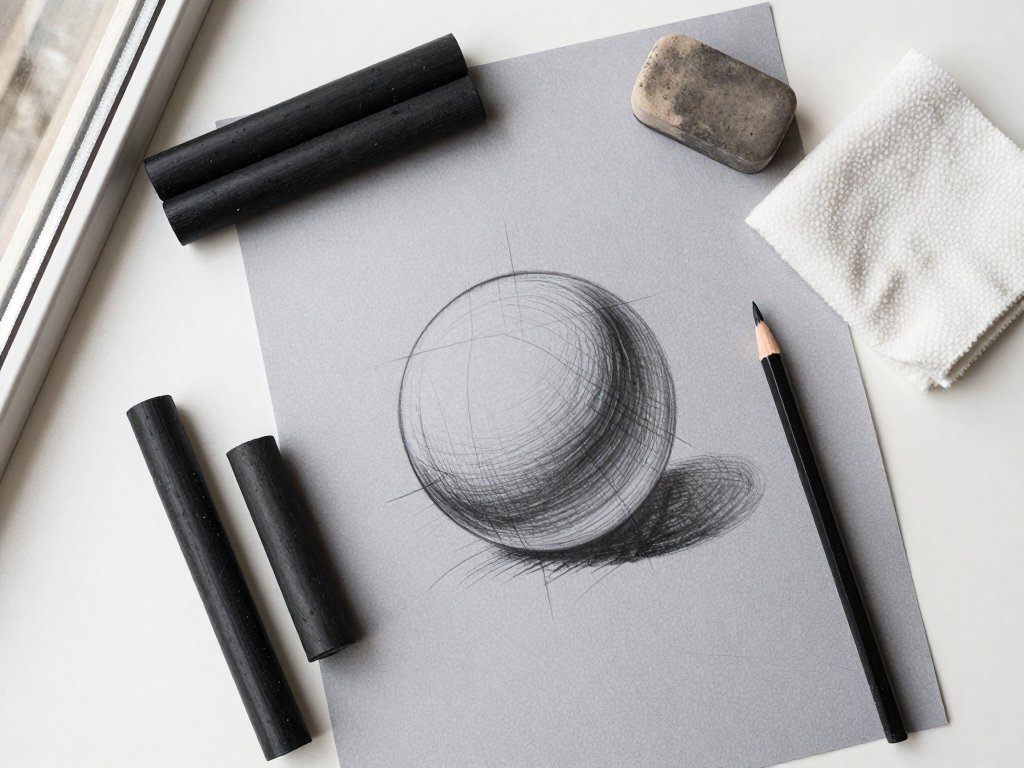
Lifting and Erasing
This is where charcoal drawing becomes magical. You are not just adding dark marks — you are also pulling light areas out of the darkness.
Try this: cover a small area of paper with an even layer of soft charcoal. Then use your kneaded eraser shaped into a point to draw lines by lifting the charcoal away. You can create white lines, highlights, and textures that look completely different from anything you could draw with a white pencil.
This technique is how artists create the illusion of light hitting a surface. A highlight on a cheekbone, the gleam on a piece of fruit, or the sparkle in an eye — all of these can be created by lifting charcoal away.
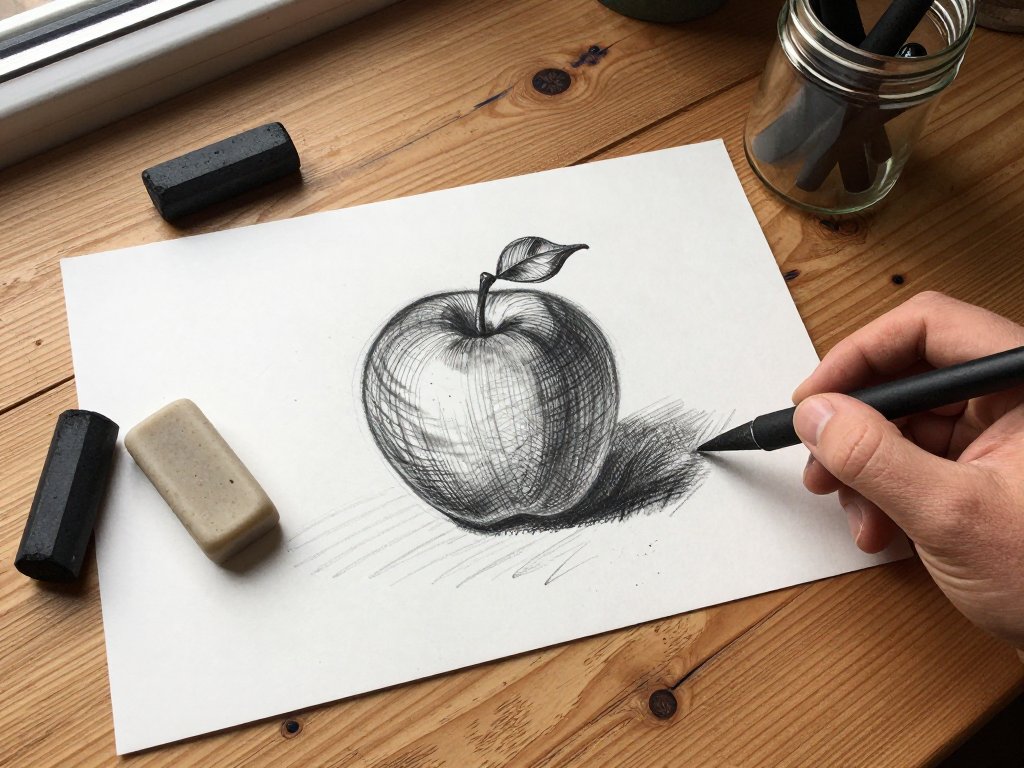
Your First Drawing: A Simple Still Life
Do not try to draw a portrait or a landscape on your first try. Start with something simple: an apple, a cup, or a piece of fruit on a table.
Step 1: Block in the basic shapes. Use your vine charcoal to draw the outline of your subject lightly. Vine charcoal is easy to erase, so do not worry about getting it perfect on the first pass. Focus on proportions and placement on the page.
Step 2: Add the darkest shadows. Look at your subject and identify the darkest areas. In an apple, that is usually the side opposite the light source and the area where the apple touches the table. Use your compressed charcoal to fill in these areas.
Step 3: Add the midtones. Using vine charcoal, fill in the areas between the darkest shadows and the lightest highlights. Blend gently with your stump to create smooth transitions.
Step 4: Lift the highlights. Use your kneaded eraser to pull out the bright spots where light hits the subject directly. This is what makes the drawing look three-dimensional.
Step 5: Refine and adjust. Step back and look at your drawing. Are the proportions right? Do the values feel balanced? Add more charcoal where you need darker areas and lift more where you need lighter areas.
That is it. Five steps to your first charcoal still life. It will not be perfect, and that is fine. My first charcoal drawing looked like a sad potato. By the third one, it actually resembled an apple.
Three Mistakes Beginners Make (And How to Avoid Them)
Let me save you the frustration I went through.
Mistake 1: Using the wrong paper. Smooth paper does not hold charcoal well. The particles sit on top of the surface and fall off or smear unpredictably. Always use paper with some tooth. If you can feel the texture when you run your finger across it, that is the right paper.
Mistake 2: Overblending. It is tempting to blend everything into a smooth, dreamy haze. But drawings need contrast — areas that are sharp and defined alongside areas that are soft and blended. Leave some charcoal marks visible. They add texture and energy to your drawing.
Mistake 3: Not using fixative. You spend an hour on a drawing you are proud of. You set it down to show someone. By the time they look at it, half the charcoal has smeared onto the facing page. Fixative costs six dollars. Skipping it costs you hours of frustration. Spray your finished drawings outdoors or in a well-ventilated area, holding the can about twelve inches away.
Budget Studio Setup: Everything for Under Twenty Dollars
Here is exactly what I recommend for a beginner who wants to try charcoal drawing without overcommitting:
- Vine charcoal sticks (assorted softness) — $3
- Compressed charcoal sticks — $3
- Newsprint pad (50 sheets, 18x24 inches) — $4
- Kneaded eraser — $2
- Blending stump set — $2
- Workable fixative — $6
Total: about twenty dollars. That gives you enough material to produce dozens of practice drawings. When you run out of paper, buy another pad. When your charcoal sticks get too short to hold comfortably, buy replacements. Do not buy the big kit with the fancy case. That is for people who already know they love charcoal drawing. You are just finding out.
How to Practice Without Wasting Materials
Here is a practice routine that costs you almost nothing in materials but teaches you more than aimless drawing.
Five-minute gesture drawings. Set a timer and draw the same object five times in five minutes. You are not trying to create a finished drawing. You are training your eye to see proportions and your hand to move confidently. Use vine charcoal for these because it is fast and erasable.
Value scale exercises. Draw a row of ten small boxes. Fill them from pure white to solid black, with nine evenly spaced values in between. This sounds boring, but it teaches you how much pressure to apply and how to control your materials. Do this once a week.
Copy a master drawing. Find a charcoal drawing you admire — there are thousands online — and try to copy it. You will learn more from copying one good drawing than from making ten mediocre ones from imagination. Pay attention to how the artist used different pressures, blending techniques, and erasing to create the final image.
Final Thoughts
Charcoal drawing is one of the most forgiving art forms for beginners. If you make a mistake, you erase it or draw over it. If something looks wrong, you add more charcoal or lift some away. The medium itself encourages experimentation.
Start with the twenty-dollar setup I described. Practice the three techniques. Draw one simple still life. See if it clicks. If it does, you can invest in better paper, a wider range of charcoal grades, and maybe a proper drawing board. If it does not, you are out twenty bucks — less than a dinner out — and you learned something about what kind of art you enjoy.
Either way, you win. And your cat will forgive you for the charcoal dust.