Introduction
I still remember the first time I picked up a stick of charcoal. I was eighteen, sitting in a drafty community center art class, convinced I had no business being there.
My grandmother had signed me up — she said I needed "something for myself" — and I spent the first twenty minutes convinced everyone could see how out of my depth I was.
But then the instructor dimmed the lights, placed a single white egg on a black cloth, and said something I have never forgotten: "Don't draw the egg.
Draw the light on the egg."
That sentence changed how I see the world. And it is the same sentence I want to share with you today, because charcoal drawing is not about being able to draw perfectly.
It is about learning to see. If you have ever wanted to try drawing but felt intimidated by the idea of getting proportions right or making something look "real," charcoal might just be the medium that sets you free.
It is forgiving, it is messy in the best way, and it teaches you more about light and shadow than any other medium I have tried.
When my own daughter came home from school frustrated with her art class last fall — "Mom, I can't draw, I'm just not good at it" — I pulled out my old charcoal kit and showed her the egg exercise my grandmother had paid for all those years ago.
Within twenty minutes, she had created a drawing that made her gasp. Not because she had suddenly become a professional artist, but because she had seen something she had never noticed before: that the light falling across an object tells you exactly where to put your marks.
Today, I want to walk you through the same process.
Why Charcoal? A Medium Made for Beginners
Before we get into techniques, let me tell you why charcoal is such a wonderful starting point.
Unlike pen or even pencil, charcoal is incredibly forgiving. You can erase it, smudge it, layer it, and wipe it away with almost no trace.
It does not demand perfect lines the way ink does. It invites exploration.
Charcoal comes in several forms, and knowing a little about each will help you choose what feels best in your hand:
Vine charcoal. This is the lightest and most delicate form. It is made from thin sticks of burnt willow or vine, and it produces a soft, silvery grey mark.
It is perfect for sketching out your initial composition because it dusts off the page with almost no effort.
I keep a stick of vine charcoal in my kitchen drawer for doodling while I wait for the kettle to boil.
Compressed charcoal. This comes in sticks or pencils and contains a binder that makes it much darker and more permanent. Compressed charcoal gives you those rich, velvety blacks that make drawings look dramatic and finished. It is what you reach for when you want to define shadows and create contrast.
Charcoal pencils. These are compressed charcoal encased in wood, just like a regular pencil. They are less messy than sticks and give you more control for fine details. I recommend keeping one in your kit for small accents and finishing touches.
White charcoal or white pastel pencils. These are not strictly charcoal, but they are essential for creating highlights. A white pencil on toned or black paper can make your drawing feel alive.
For your first kit, all you really need is a stick of vine charcoal, one or two compressed charcoal sticks, a kneaded eraser, and a pad of drawing paper. That is it. You can spend under fifteen dollars and have everything you need to begin.
The Heart of Charcoal Drawing: Seeing Light and Shadow
The single most important skill in charcoal drawing is learning to see value — that is the art term for how light or dark something is.
Our brains are wired to recognize objects, not the light bouncing off them. When you look at a coffee mug, your brain says "that is a mug" and skips right over the fact that the left side is a warm grey, the right side is nearly black, and there is a bright white sliver of reflected light along the bottom edge.
Learning to draw with charcoal means retraining your eye to see those patches of light and dark first and the object itself second.
I like to think of it as the difference between reading words and reading music.
When you read a sentence, you absorb meaning instantly. When you read music, you have to pay attention to each note, its duration, its place on the staff.
Value drawing is like reading music: you learn to see the individual notes of light and shadow instead of the melody of the object.
The Value Scale Exercise
Before you draw anything recognizable, try this simple exercise. It takes ten minutes and it is the best foundation I know.
Take your softest compressed charcoal and draw ten small squares in a row, each about one inch wide.
Leave the first square completely white — that is your paper. Then make the last square as dark as you possibly can, pressing firmly and layering the charcoal until it is almost glossy.
Now fill in the squares between them, each one slightly darker than the one before, so you have a smooth gradient from white to black.
This is called a value scale, and it teaches your hand how much pressure to apply for each shade.
Do not worry if your first attempt is uneven. My own first value scale looked more like a series of muddy accidents than a smooth gradient.
The point is to build the connection between your eyes, your brain, and your hand.
Practice this scale a few times until you can reliably create five distinct values.
Your First Charcoal Drawing: A Simple Sphere
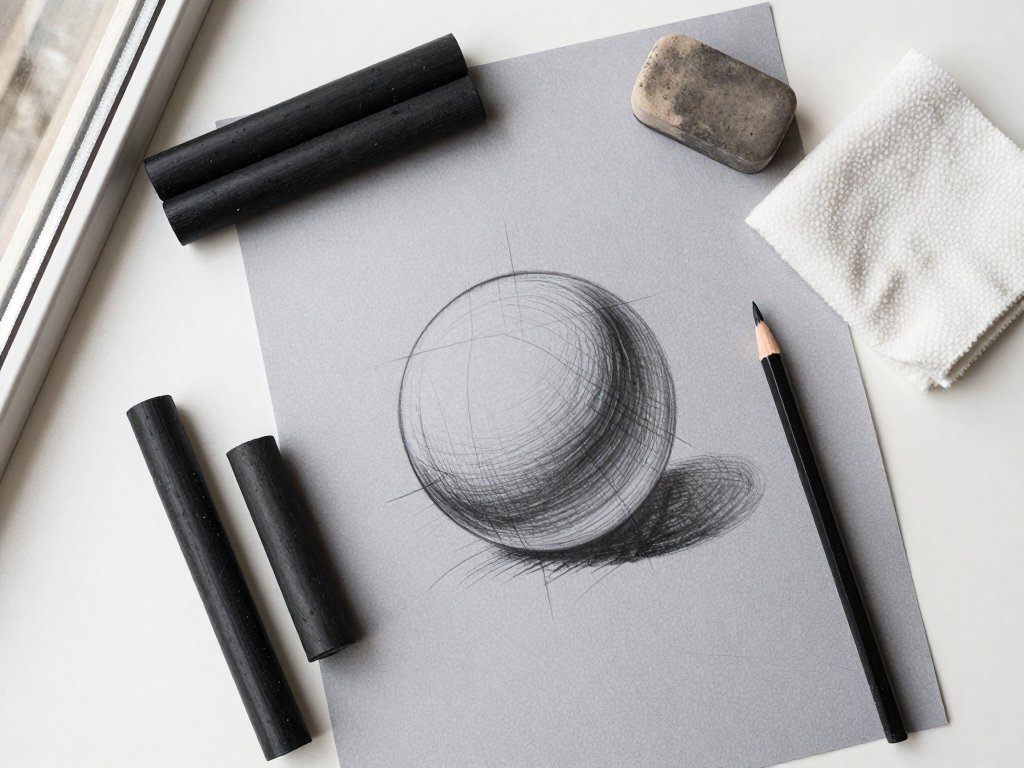
The sphere is the foundation of almost every form you will ever draw. Faces are spheres. Fruit is spheres. Flowers are spheres with petals. If you can learn to draw a convincing sphere with charcoal, you have unlocked the door to drawing almost anything.
Step 1: Set Up Your Still Life
Place a single object — a white egg, a ping-pong ball, or a small ceramic bowl — on a plain surface near a single light source.
A desk lamp works beautifully. Position the light so it comes from one side, creating a clear highlight on one side of your object and a distinct shadow on the other.
Take a moment to really look. Where is the brightest spot? Where does the shadow begin?
Is there a faint rim of light along the dark edge where light bounces off the table?
That bounced light, called reflected light, is what makes a drawing feel three-dimensional.
Step 2: Sketch the Outline with Vine Charcoal
Using your lightest vine charcoal, sketch a rough circle on your paper. Do not erase if it is imperfect.
Just draw another line next to the one that looks wrong. Charcoal is forgiving. You can blend and adjust as you go.
The goal here is not a perfect circle but a loose guide for where your values will go.
Step 3: Lay In Your Darkest Shadow
Look at your object and identify where the darkest value is. On a sphere with a single light source, the darkest area is usually not at the very edge of the shadow side — it is slightly inward, in a region called the core shadow.
Take your compressed charcoal and lay down that dark value in a crescent shape following the curve of your sphere.
Do not worry about staying inside the lines. You can refine the edges later.
Step 4: Add the Midtones
Using the side of your vine charcoal, gently fill in the areas between your dark shadow and the highlight.
This middle region is called the halftone. Work in broad, soft strokes, letting the charcoal catch the texture of your paper.
You can use your finger or a blending stump to soften the transition between values.
The key word here is gently. It is much easier to add more charcoal than to take it away.
Step 5: Lift Out the Highlight
Here is where the magic happens. Take your kneaded eraser — pull it into a soft point like you are shaping putty — and gently lift the charcoal away from the brightest spot on your sphere.
That spot is the highlight, where the light hits the object most directly. Do not rub.
Just press the eraser onto the paper and lift. The charcoal will stick to the eraser, revealing the white paper underneath.
If the highlight looks too harsh, soften the edges by lightly blending with your finger.
Step 6: Refine and Adjust
Step back from your drawing. Literally, take a step back and look at it from a distance.
Does the sphere feel round? Are the transitions between light and shadow smooth? Add a bit more charcoal to the dark areas if needed, lift a bit more from the highlights.
This back-and-forth — adding and lifting — is the rhythm of charcoal drawing. There is no wrong way to do it as long as you keep looking at your object and comparing it to your paper.
Essential Techniques for Mastering Light and Shadow
Once you feel comfortable with the sphere exercise, you can start exploring the techniques that give charcoal drawings their distinctive, expressive quality. These are the same techniques professional artists use, and they are remarkably simple to practice at home.
Hatching and Cross-Hatching
Hatching is the technique of drawing parallel lines to build up tone. The closer the lines are together, the darker the value.
Cross-hatching layers lines in different directions, creating a woven texture that can produce incredibly rich darks.
Try this on a scrap piece of paper: draw a series of diagonal lines going one direction, then layer another set going the opposite direction.
Notice how the intersections create a deeper, more complex black than any single layer of lines could achieve.
This technique is wonderful for adding texture to drawings of fabric, wood grain, or natural forms.
Blending and Smudging
Blending is what gives charcoal its soft, atmospheric quality. You can blend with your fingertips, a tissue, a cotton swab, or a dedicated blending stump (a tightly rolled paper tool available at any art supply store).
Each tool produces a different effect. Fingertips give a warm, organic smudge that is perfect for skin tones and soft shadows.
A blending stump gives more control and a smoother finish, ideal for rendering smooth surfaces like glass or ceramic.
The trick is to blend gently and build up gradually. Heavy-handed blending creates mud. Gentle, layered blending creates depth.
Lifting (Erasing as a Drawing Tool)
One of my favorite things about teaching charcoal to beginners is watching their faces light up when they discover that erasing can be part of the creative process.
In charcoal drawing, your eraser is not a correction tool — it is a drawing tool.
You can use a kneaded eraser to lift out highlights, create texture, or even draw fine white lines.
A plastic eraser cut to a sharp edge can create crisp highlights like the glint on a piece of metal or the sparkle in an eye.
An electric eraser gives you pinpoint control for small details. Experiment with different erasers and different shapes to see what marks you can make.
Common Beginner Mistakes (And How to Fix Them)
Every charcoal artist makes the same mistakes at the beginning. Here are the most common ones I see, along with simple fixes that will save you frustration.
Muddy, over-blended drawings. This happens when you blend too early or too much. The fix is simple: work from light to dark, and do not blend until you have established your lightest values first.
Keep your vine charcoal strokes light and loose before you commit to darker values with compressed charcoal.
If your drawing already looks muddy, lift out some of the charcoal with your kneaded eraser to reveal the paper underneath, then re-establish your values with lighter strokes.
Not enough contrast. Many beginners are afraid to go dark enough. They leave their shadows too light, and the whole drawing looks flat and washed out.
The fix: pick the darkest spot on your object and push your compressed charcoal into it until the paper can barely hold any more.
Then look at the difference between that dark spot and your lightest highlight. That range — from deep black to bright white — is what gives a drawing dimension.
If your drawing looks flat, it probably needs darker darks, not lighter lights.
Smeared edges and fingerprints. Charcoal is messy, and that is part of its charm, but unwanted smudges can be frustrating.
Rest your drawing hand on a piece of scrap paper placed over your work, or use a mahl stick (a simple wooden dowel) to keep your hand off the surface.
If you do get a smudge where you do not want it, lift it with your kneaded eraser and blend the surrounding area to match.
Overworking the drawing. There comes a point in every drawing where you need to stop.
Beginners often keep adding and adjusting until the original freshness is lost. The fix: set a timer for your drawing session.
Thirty minutes is plenty for a first study. When the timer goes off, put your charcoal down and look at your work from across the room.
You will probably be surprised by how good it looks. The things that bother you up close often disappear at a distance.
Paper Matters More Than You Think
The surface you draw on has a huge impact on your results, and this is something beginners often overlook.
Smooth paper (like Bristol or printer paper) gives you fine detail and crisp lines, but it holds less charcoal, so your darks will never be as deep.
Textured paper (like Ingres or Canson Mi-Teintes) has a tooth that grabs the charcoal, allowing you to build much darker values and softer blends.
For charcoal drawing, I recommend starting with a medium-tooth drawing paper that is at least 80lb weight.
Heavier paper holds up better to erasing and layering. Toned paper — paper that is a mid-value grey or tan — is a wonderful choice for charcoal work because it gives you a middle value to work from.
You add dark charcoal for the shadows and use white pastel or charcoal for the highlights, and the paper itself provides the midtones.
It makes your drawings look finished with less effort.
My grandmother always bought me pads of Canson Mi-Teintes in a soft grey. I still use it today, and I think of her every time I open a new pad.
Practical Project: Draw a Simple Still Life
Now that you have the basics, let us put them into practice with a simple still life project that you can set up in your own kitchen. This should take about thirty to forty-five minutes, and you will be amazed by what you create.
What You Will Need
- A piece of fruit (an apple or orange works beautifully, but a lemon is even better because of its texture)
- A single desk lamp or table lamp
- Your charcoal kit (vine, compressed, kneaded eraser, paper)
- A plain background (a piece of fabric or cardboard)
Set Up
Place your fruit on a table about twelve inches in front of a plain background.
Position your lamp to one side, about eighteen inches away, angled so the light falls across the fruit at roughly a forty-five degree angle.
Take a moment to really look at what you see. Notice where the light hits the fruit most directly — that is your highlight.
Notice where the fruit touches the table — that is your cast shadow. Notice the subtle glow of reflected light on the shadow side of the fruit, where light bounces off the table or background.
Draw
Start with vine charcoal and sketch the rough shape and position of the fruit and its cast shadow.
Do not worry about perfect proportions. You can adjust as you go. Once you are happy with the basic placement, identify the darkest area — usually the cast shadow and the core shadow on the fruit itself.
Lay in those dark values with your compressed charcoal. Then work outward into the midtones, using vine charcoal and blending with your finger or a stump.
Finally, lift out the highlights with your kneaded eraser.
Step back frequently and compare your drawing to the actual scene. This habit of comparing is the single most important skill you can develop as an artist. Every time you look back and forth between your subject and your paper, you are training your eye to see more accurately.
Expanding Your Practice
Once you have mastered the sphere and a simple still life, the world of charcoal drawing opens up in wonderful directions.
You can try drawing more complex objects — a crumpled piece of paper, a glass jar, a potted plant.
Each new subject teaches you something different about how light behaves. You can experiment with different papers and different charcoals.
You can try drawing from photographs, though nothing quite compares to drawing from life.
One exercise I return to again and again is what I call the "five-minute gesture." Set a timer for five minutes and draw anything in your line of sight as quickly and loosely as you can.
Do not worry about details or accuracy. Just capture the basic shapes and the major values.
These quick studies teach you to see the big picture without getting lost in small details.
They are also wonderfully freeing because there is no time to be precious about the result.
I keep a small sketchbook and a stick of vine charcoal on my kitchen windowsill.
When I have five minutes — waiting for pasta to boil, letting tea steep — I draw whatever I see.
A coffee cup. A potted basil plant. My daughter's shoes by the back door. These tiny daily sketches have taught me more about light and shadow than any formal class ever did.
Preserving Your Work
Charcoal drawings are delicate. Unlike a graphite drawing that will last for generations pressed in a sketchbook, charcoal can smudge and fade if not properly preserved.
Once you create a drawing you love, you should protect it. The best method is to use a fixative spray, which creates a thin, invisible layer over the charcoal to hold it in place.
You can buy workable fixative that allows you to keep drawing over it, or final fixative for a permanent seal.
Hold the can about twelve inches from your paper and spray in a light, even motion.
Do this in a well-ventilated area or outdoors.
If you do not have fixative, you can place a sheet of glassine paper over your drawing before closing your sketchbook. Wax paper works in a pinch. Avoid using regular tissue paper, which can smudge the charcoal.
Finding Your Own Light
The most wonderful thing about learning to draw with charcoal is that it changes how you see the world.
Once you spend a few afternoons paying attention to light and shadow, you start noticing them everywhere.
The way morning light slants across your kitchen floor. The soft shadow of a tree branch on a sunny wall.
The way your child's face catches the glow of a bedside lamp at story time.
These are moments you might have walked past before, but now they feel significant. They are compositions waiting to be drawn.
I think about that egg in the community center classroom, sitting on its black cloth under a single light.
I think about my grandmother, who signed me up for that class because she believed that everyone deserves something beautiful just for themselves.
And I think about my daughter, who now keeps a piece of vine charcoal in her pencil case and draws the light falling across her desk when she should be doing math homework.
You do not need talent to draw with charcoal. You do not need experience. You only need to look, and to trust that what you see is enough to make a mark worth making.
Find something simple — an egg, a lemon, a coffee cup — and give yourself twenty minutes.
See the light. Put down what you see. Let the shadows guide your hand.
That is all drawing has ever been, and it is enough.