Introduction
I still remember the first time I picked up a stick of charcoal and truly saw what it could do. I was sitting in a community art class, surrounded by people who seemed to know exactly what they were doing, and I was desperately trying to make a straight line. Instead, I got a smudgy, uneven mark that looked nothing like the clean pencil sketch I had imagined. The instructor walked by, glanced at my page, and said something I have never forgotten: "Charcoal does not want to be controlled. It wants to be guided."
That was the moment everything clicked. Charcoal is not a precise, tidy medium. It is messy, soft, and wonderfully forgiving. It rewards a light touch and a willingness to embrace imperfection. And it is one of the best tools a beginner can use to understand two fundamental elements of drawing: texture and tone.
In this article, we will explore how to use charcoal to create rich textures and smooth tonal transitions. Whether you are picking up charcoal for the first time or you have dabbled a bit and want to go deeper, these techniques will help you create drawings with depth, atmosphere, and life.
Why Charcoal?
Charcoal has been used for drawing since prehistoric times — cave paintings made with burnt sticks are among the oldest artworks known to humanity. There is something elemental about it. It connects us to the very first marks our ancestors made on cave walls.
For the modern beginner, charcoal offers several advantages over pencil:
- Speed. Charcoal covers large areas quickly. You can block in a whole composition in minutes, not hours.
- Forgetiveness. Made a mark you do not like? Smudge it, erase it, or draw right over it. Charcoal does not hold grudges.
- Range. From the lightest whisper of gray to the deepest, velvety black, charcoal produces a wider tonal range than almost any other drawing medium.
- Texture. The rough, granular quality of charcoal on paper creates natural texture that pencil cannot replicate.
- Affordability. A starter set of charcoal sticks, a few erasers, and a pad of paper cost less than a dinner out.
If you have been hesitant to try charcoal because it seems messy or unpredictable, let this be your invitation. The mess is part of the charm. The unpredictability is where the beauty lives.
What You Will Need
One of the most welcoming things about charcoal is that you do not need much to get started. Here is a simple kit that will take you from your first mark to a finished drawing.
Essential Supplies
- Charcoal sticks. Buy a variety pack that includes both vine charcoal (soft, light, easy to erase) and compressed charcoal (darker, harder to erase, more intense). You will use both for different purposes.
- Charcoal pencils. These are compressed charcoal in a wooden casing. They give you more control for detailed work. A set of three — soft, medium, and hard — is a great start.
- Paper. Choose paper with some tooth (texture). Smooth paper does not hold charcoal well. Look for drawing paper labeled "charcoal" or "pastel" — it will have enough grit to catch the charcoal particles. A 60lb to 80lb paper is ideal.
- Kneaded eraser. This soft, pliable eraser is your best friend in charcoal drawing. You can mold it into any shape to lift highlights, soften edges, or clean up small areas. It does not leave eraser crumbs.
- Blending tools. Your fingers work beautifully for soft blending. For more precise work, use a blending stump (a tightly rolled paper tool) or a soft cloth.
- Fixative spray. A workable fixative lets you set layers of charcoal so you can draw over them without smudging. A final fixative protects your finished drawing.
Optional but Helpful
- Masking tape. Tape down the edges of your paper to keep it from shifting and to create a clean border.
- White charcoal pencil. For adding bright highlights on toned paper.
- Soft brush. A wide, soft brush for dusting off excess charcoal dust without smudging your drawing.
- Eraser pencil. A pencil-shaped eraser for precise highlight details.
Setting Up Your Workspace
Charcoal is dusty. Embrace this fact and set up accordingly. Work on a flat surface that is easy to clean. Have a paper towel or rag nearby for wiping your hands — you will need it often. Tape your drawing paper to a board or table so it does not shift while you work.
Good lighting matters. A bright, diffused light source (like a north-facing window or a daylight lamp) will help you see the subtle tonal variations in your drawing. If the light is too dim, you will miss the middle tones that give charcoal drawings their depth.
Keep a small mirror on your desk. Looking at your drawing in a mirror reveals mistakes in proportion and composition that you cannot see when looking at it directly. It is a trick every professional artist uses.
Understanding Tone
Tone — also called value — refers to how light or dark an area is. In charcoal drawing, tone is everything. A successful charcoal drawing uses a full range of tones, from pure white (the paper showing through) to deep black (compressed charcoal applied with pressure).
The easiest way to understand tone is to create a value scale. Draw ten small boxes in a row. In the first box, leave the paper white. In the last box, press as hard as you can with your darkest charcoal. Then fill in the boxes between them with progressively darker tones, trying to make each step evenly spaced. This simple exercise trains your eye to see subtle differences in value — a skill that will transform your drawings.
When you look at your subject, try to see it as a collection of tones rather than objects. Do not think "that is an apple, so I am drawing an apple." Instead, think "the top is light, the left side is medium gray, and the shadow underneath is almost black." This shift in thinking — from objects to values — is the single most important thing you can learn as a beginner.
Creating Smooth Tonal Transitions
Smooth transitions between tones are what give charcoal drawings their soft, atmospheric quality. There are several ways to achieve them.
Side-of-the-Stick Shading
Break a piece of vine charcoal in half and use the side of the stick to lay down broad, even areas of tone. Hold the stick flat against the paper and sweep it back and forth gently. The result is a soft, even layer that you can build up gradually. This is the fastest way to cover a large area with consistent tone.
Hatching and Cross-Hatching
For more controlled shading, use the tip of a charcoal pencil to draw a series of parallel lines close together (hatching). Add a second layer of lines at an angle to the first (cross-hatching) for darker areas. This technique gives you precise control over value and works especially well for adding texture.
Blending
After laying down charcoal, use your finger, a blending stump, or a soft cloth to smooth the particles into the paper. Blending softens edges and creates seamless transitions between tonal areas. Your fingertip gives the softest blend; a blending stump gives more controlled, precise blending.
A word of caution: over-blending can make your drawing look muddy. Use blending sparingly — it is a tool, not the main event. Let the charcoal texture show through in most of your drawing, and use blending only where you need a soft transition.
Building Texture
Texture is what makes a charcoal drawing feel alive. A perfectly smooth drawing looks flat and polished but not particularly interesting. Texture — the roughness of bark, the softness of fur, the grain of wood — gives the eye something to explore.
Using Paper Texture
The tooth of your paper is the foundation of your texture. Rough paper grabs more charcoal and produces a grainy, energetic mark. Smooth paper holds less charcoal and produces a finer, more delicate mark. Experiment with different papers to find the texture you love.
Lifting Techniques
After laying down a layer of charcoal, use your kneaded eraser to lift off highlights. Mold the eraser into a wedge shape and press it gently onto the paper, then lift straight up. This creates soft, irregular highlights that look natural — far more organic than rubbing with a regular eraser. For finer highlights, use the eraser pencil or wrap a tissue around your fingertip.
Varied Pressure
Practice applying charcoal with different levels of pressure. A light touch produces a soft, airy mark. Firm pressure creates a dense, dark mark. By varying pressure within a single stroke, you can create lines that fade in and out, adding a sense of movement and dimension to your drawing.
Scumbling
This is a wonderful technique for creating textured, atmospheric areas. Use the side of a charcoal stick and make small, circular scribbling motions. The result is a textured layer of tone that is perfect for foliage, grass, rough surfaces, or the soft blur of a background. Scumbling is forgiving and meditative — it is hard to do it wrong.
Stippling
For fine texture, use the tip of a charcoal pencil to make a series of small dots. The closer the dots, the darker the area. Stippling takes patience but produces beautiful, detailed texture for things like sand, gravel, or the rough surface of stone.
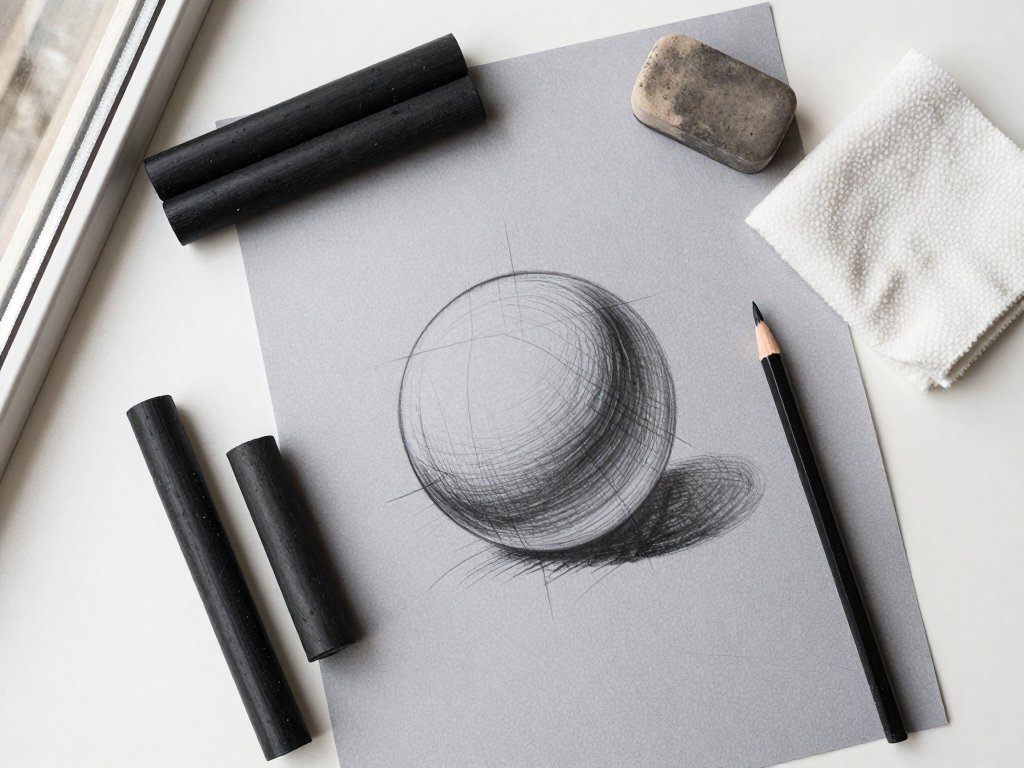
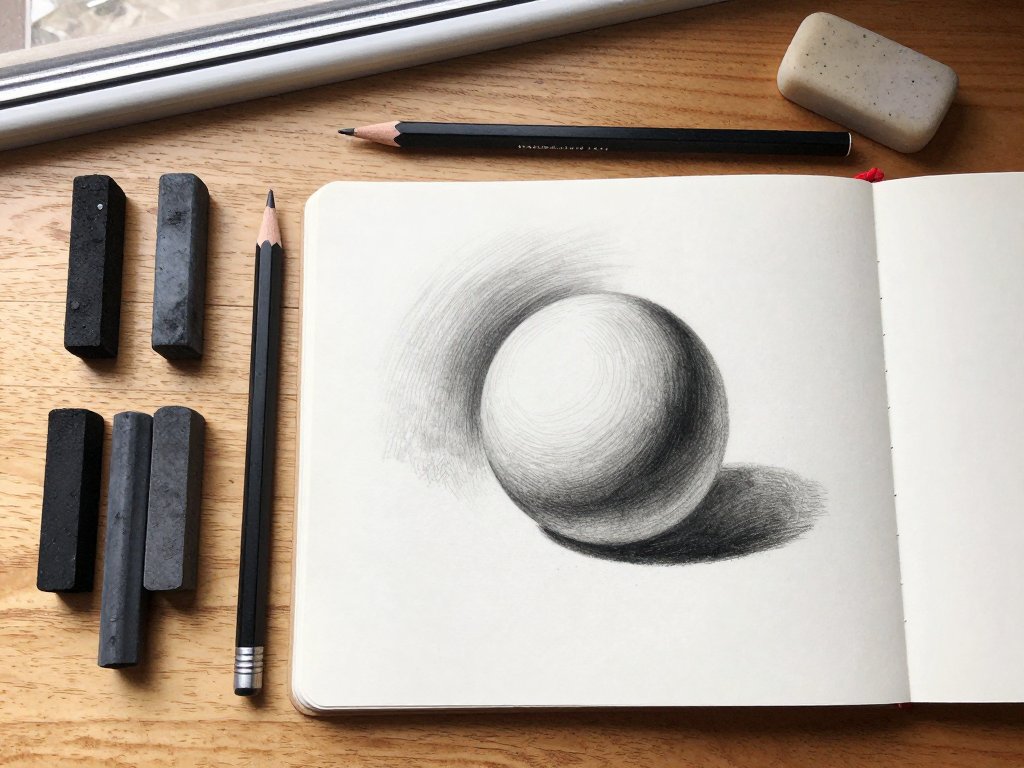
A Simple Exercise: Drawing a Sphere
Before you tackle a full landscape or portrait, start with the classic beginner exercise: drawing a sphere. It teaches you everything you need to know about tonal transitions and texture.
Place a white ball — a ping pong ball, an egg, or a smooth stone — under a single light source. Study how the light falls on it. You will see a bright highlight where the light hits directly, a gradual transition through mid-tones as the surface curves away from the light, a dark core shadow where the light cannot reach, and a reflected light bouncing back from the surface below.
Now draw it with charcoal. Start with the mid-tone using the side of a vine charcoal stick. Use light pressure and broad strokes. Then build the dark shadow areas with compressed charcoal, pressing more firmly. Use your kneaded eraser to lift the bright highlight. Blend the transition areas gently with a blending stump. Step back and look. Does it read as a round form? If not, add more contrast to the shadow side and soften the transition on the light side.
When you finish this exercise, you will understand tonal drawing better than most beginners. Keep your sphere study — it is your first milestone.
Common Beginner Challenges
Every charcoal beginner hits the same walls. Here is how to climb over them.
"My drawing looks too dark"
This usually means you are pressing too hard. Charcoal goes on dark very quickly. Start with a light touch and build up gradually. You can always add more darkness, but it is much harder to lighten an area that is already too dark. Think of it like whispers before shouting.
"Everything looks muddy"
Muddiness happens when tones are too similar. Your drawing needs distinct light, medium, and dark areas. If everything is a similar mid-gray, the eye has nothing to latch onto. Go back and push your darkest darks darker, and make sure your lightest areas are truly light (use the paper white or lift with an eraser).
"I keep smudging my drawing"
Charcoal smudges easily — that is both a feature and a challenge. Rest your drawing hand on a piece of scrap paper placed over the area you have already drawn. Work from top to bottom and left to right if you are right-handed, so your hand is always moving onto blank paper. Use fixative spray between layers to set your work.
"I cannot get fine details"
For details, switch to a charcoal pencil (not a stick) and sharpen it to a fine point with a craft knife and sandpaper block. Alternatively, use your kneaded eraser molded into a sharp wedge to draw highlights into a dark area. Sometimes the best way to add detail is to remove charcoal rather than add it.
Final Thoughts
Charcoal is a medium that rewards patience and playfulness. The more you work with it, the more you will discover its unique voice — the way it can be both bold and delicate, both raw and refined. Some of the most celebrated drawings in art history were made with charcoal, from Michelangelo's figure studies to Käthe Kollwitz's emotionally charged portraits.
But you do not need to be a master to enjoy it. Every mark you make teaches you something. Every smudge that turns into an unexpected texture is a small gift. Every drawing that does not turn out the way you planned is just a lesson in disguise.
So pick up a piece of charcoal. Make a mark. Then make another. Let your fingers get dusty. Let the paper fill with grays and blacks and unexpected shapes. That first smudgy, imperfect line I made in that community art class? I still have that drawing. It is not good in the way a polished drawing is good. But it is honest. And it was the beginning of something I am still learning, still loving, still making marks over.
Your beginning looks exactly like that — a single mark on a blank page. And it is perfect.