Introduction
I bought a pitch bowl and a twenty-four-piece set of imported chasing punches before I had made a single piece of anything.
The whole lot cost me about what a good dinner out costs. Then I ruined three copper blanks in one afternoon and put the box in a cupboard for four months.
The tools were not the mistake. The order I bought them in was, and the model of the process I had in my head was worse.
I thought repousse was a shaping process. You hit the metal, it stretches into the shape you want, done. It is not that. The metal has to move, a little at a time, and you have to keep handing its softness back to it.
Those are different verbs. The gap between them cost me three blanks.
So this is the article I wish someone had handed me first: the cheap version of the setup, the mechanism underneath it, and the specific things that tear a panel.
None of it is hard. It is just unforgiving about skipped steps.
What Chasing and Repousse Actually Are
Repousse comes from the French for "pushed up," and that is exactly what it is. You work the panel from the back, tapping the metal upward into a raised relief. The front face stays smooth and unmarked.
Chasing is the same metal, worked from the front. You refine what the back gave you: crisp the outline, define the edges, add the lines that make a leaf look like a leaf.
A simple way to hold it: repousse builds the hill, chasing draws the map on it. One is volume, the other is information.
Both are done with the metal bedded in warm pitch so it cannot move. Neither involves joining metal or casting it. The only heat in the process is annealing, which is a softening step, not a fusing one.
That is the whole art form. Two directions, one sheet, and a lot of patience with a small hammer.
The Mechanism: Metal Moves, It Doesn't Stretch
Annealed sheet metal is ductile. Its crystal grains can slide past each other, which is why a soft copper blank will bend instead of snapping.
Every hammer blow rearranges those grains and tangles them up. Metallurgists call it work hardening. You will call it "why has this stopped moving."
Here is the paperclip test. Bend a paperclip back and forth and it gets stiff, then hot at the bend, then it snaps. Metal that has been worked has given up its give. Sheet metal does the same thing, just more slowly and in two dimensions.
So you work a small area, and it hardens. You keep hitting it, and instead of rising it thins. Push past that and the thinnest point opens into a crack, and the crack runs.
Which is why the rhythm of this craft is not hit-hit-hit-hit. It is hit, hit, hit, anneal. The pause is not a delay. The pause is the technique.
Annealing, Explained Without the Jargon
Annealing is heating the metal until those tangled grains rebuild themselves into fresh, soft ones. You are not melting anything. You are resetting the clock.
For copper, heat the area to a dull red in dim light, hold it there for a few seconds, then quench in water. The red is easy to overshoot; you want the first blush, not a glowing orange.
Brass takes the same treatment with one warning. Stop at dull red. Push it hotter and the zinc starts to leave the alloy, and you get a pitted, crumbly surface that no amount of polishing will fix.
Sterling silver anneals happily and quenches in water, though it will throw fire scale that you clean off later in pickle.
Dry the piece thoroughly before it goes anywhere near pitch. Water and hot pitch do not get along, and a damp blank will spit and shift.
How often? Every time the metal stops responding. On a small pendant that might be three or four times. On a 1mm panel with deep relief, closer to a dozen. You will learn the feel faster than you expect.
Metals That Suit a Beginner
Copper is the right place to start, and it is not a consolation prize. It is the softest of the common jewellery metals, the cheapest, and the most forgiving when you anneal it badly.
You can buy copper sheet as offcuts from a roofing or plumbing supplier for very little, or as prepared blanks from a craft supplier for a bit more. Either works. The offcuts teach you to cut and file as well.
Brass is the next step up. It is harder, work-hardens noticeably faster, and will need more annealing passes than copper for the same amount of movement. In exchange it holds a crisp chased line beautifully and comes out of the polish looking like something you could sell.
Sterling silver is where the money is, both yours and the metal's. It anneals well and takes detail superbly, so it belongs on the pendants you intend to sell rather than the ones you intend to learn on.
Copper alloys with colour, like bronze and the dark shakudo mixes, are worth exploring once the basics are boring.
Aluminium is the trap. It is cheap, it is everywhere, and it tears. It work-hardens fast, it gives you no colour cue when you heat it, and the annealing schedule is nothing like copper's. Use it for practising domes if you must. Do not learn repousse on it.
Thickness Decides Almost Everything
For small pendants, around 0.5mm is the sweet spot. It moves under light taps, it anneals quickly, and it is thick enough to hold a shallow relief without tearing.
For larger pendants and anything holding a stone, go to 0.6–0.8mm. For decorative panels, 1.0–1.2mm. Past that, hand tools struggle and you start hitting hard enough to damage the surface you are trying to protect.
Too thin and the metal tears at the deepest point of the relief. It also reads badly: a shallow bulge in thin sheet looks like a dent, not a form.
Too thick and the tool will not move it. You compensate with force, the force dents instead of raising, and you spend an hour planishing out your own hammer marks.
A rough rule worth taping to the wall: the maximum height of your relief is about the thickness of the sheet. Want a 2mm rise? Start with 2mm stock, or accept that the metal will thin as it climbs.
The Pitch Bowl (And the Version That Costs Less)
Pitch is refined pine resin, sometimes cut with brick dust or plaster to change its hardness. Cold, it is black and brittle like toffee. Warm, it flows. It is reusable more or less forever, which is why a block of it is a better buy than it looks.
Its job is to make the metal behave like a solid. If the sheet can flex, your hammer energy goes into bouncing it instead of moving it. Pitch also supports the metal right up against the area you are working, so the panel does not dish around your blows.
The classic setup is a heavy cast-iron bowl with a domed interior, filled with pitch. The weight is the point. A light bowl skitters across the bench and eats your blows.
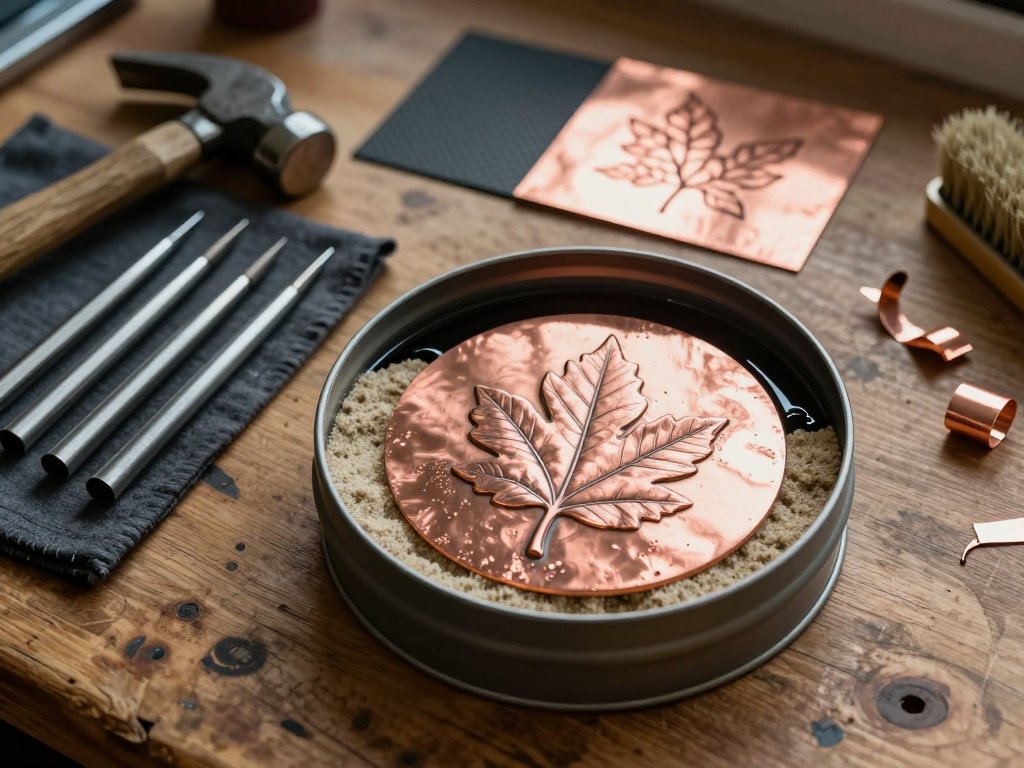
You do not need one to start. A shallow food tin set into a bed of damp sand inside a wooden box does the same job for almost nothing, and the sand deadens the ring. Or pour pitch into a shallow depression carved in a hardwood block.
Pitch comes in soft, medium and hard grades. Soft for deep raising, hard for fine chasing. If you buy one, buy medium.
Warm it with a hairdryer or a heat gun, never a flame. Warm the metal too, press it in, and let the whole thing cool completely before you pick up the hammer.
Tools: Four Punches and One Hammer
You need four punches, not twenty-four. A liner has a blunt, flat chisel edge and is what you use to crisp an outline. A planisher has a polished, rounded face and smooths raised surfaces without cutting them.
A point or small oval punch does the raising work from the back. A matting tool has a textured face, curved or straight, and puts the fine stipple into the background that makes the raised areas look raised.
Buy steel with some temper to it. The cheap sets are made of metal soft enough that the tips mushroom after an hour, and a mushroomed tip writes a wide grey smear into your panel every time you set it down.
You can also make punches. A hardened masonry nail, ground and polished, makes a perfectly good point. So does a worn-out file, cut and shaped. Polish every tip. A rough face is a permanent mark.
The hammer matters at least as much. You want a chasing hammer: light, in the region of 40–85 grams, with a slightly domed face and a springy handle.
A 16oz ball-pein is the wrong tool. It is four times too heavy, it dents in a single blow, and no amount of care will make it behave.
The domed face on a proper chasing hammer lands as a small point of contact that spreads outward, which is exactly what you want when you are moving metal a fraction of a millimetre at a time.
Step by Step: Your First Raised Panel
Draw the design at full size on paper first. Keep the first one genuinely simple: a single leaf, a crescent moon, one bold flower. Detail is a reward for control, not a substitute for it.
- Transfer. Trace the design onto the metal with carbon paper taped down, or draw it straight on with a fine scribe. Keep the lines light.
- Anneal. Dull red, quench, dry completely. A dry blank is a blank that stays put.
- Embed face down. Warm the pitch, warm the blank, press it in so the back of the panel is facing you. Let it cool fully.
- Raise the volumes. With the blunt point, tap from the back. Start at the centre of each mass and work outward in overlapping passes. Do not chase the outline yet.
- Check and anneal. Lift a corner and look at the front. When the metal stops responding, stop and anneal.
- Re-embed face up. Same warming routine, front of the panel toward you.
- Chase the front. Run the liner around the outline. Planish the raised surfaces. Matte the background with the matting tool in overlapping rows.
- Repeat as needed. Back for more volume, front for more definition. Anneal between every pass.
- Finish. Final anneal, remove the pitch, pickle, polish. More on each of those below.
Most beginners stop after one cycle and wonder why the piece looks flat. Two or three full cycles is normal for anything with real depth.
Hammer Control Is the Actual Skill
Light taps, many of them, in overlapping passes. That is the whole thing. A heavy blow moves metal you did not plan to move, and you cannot put it back.
Hold the hammer near the end of the handle and let it fall rather than driving it. Wrist, not shoulder. If your forearm is aching after ten minutes, you are gripping too hard and swinging too big.
Keep the punch at a consistent angle through a pass. Change the angle halfway and you leave a facet line in the metal that no amount of planishing will fully remove.
Think of mowing a lawn in stripes. Each pass overlaps the last by about half its width, so the surface rises evenly instead of in steps.
Rotate the bowl as you work, not just your arm. Your wrist has a comfortable arc and the metal does not care about it, so bring the work to the comfortable angle instead of forcing the tool.
The tool does the work. The hammer only delivers it. If you find yourself pushing the punch into the metal, the punch is blunt or the metal needs annealing.
What a Starter Setup Really Costs
A four-punch set and a chasing hammer together come in around the price of a takeaway dinner for two. That is the honest entry point.
Pitch is a block about the price of a couple of coffees. It lasts years and you remelt it, so the cost per piece is effectively zero.
The expensive item is the bowl, and it is the one you can skip. A cast-iron bowl can cost more than all your tools combined. A tin in a box of sand costs nothing and works.
The real outlay is heat. A small plumber's torch is the single biggest purchase in a starter kit, and there is no clever way around it for copper and brass. A camping stove will do in a pinch if you work carefully and keep the flame moving.
Worth buying: the hammer, one good punch, real pitch. Worth improvising: the bowl, the bench block, the sandbag, the design templates. Not worth buying: the twenty-four-piece set, the deluxe kit, anything with a laminated instruction card.
For Etsy sellers and craft fair vendors, the maths is unusual here. Material cost per pendant is trivial, maybe a dollar or two. Labour is the entire cost. A 40mm repousse pendant is two to four hours of bench time, and that is with practice.
Which is exactly why these pieces price higher at a fair, and why they should. A stamp-and-hammer pendant reads as twenty minutes of work. A repousse leaf reads as an afternoon, because it was one, and buyers can see the hours sitting in the surface.
Put the pitch bowl on the table and people stop walking. That is not decoration. That is the demonstration.
Finishing: Pitch, Pickle, Polish
To get the piece out, warm the pitch gently with a heat gun or hairdryer until the metal lifts. Do not pry it with a blade. You will bend the panel and cut yourself, probably in that order.
Most of the pitch peels away clean. The residue comes off with mineral spirits or denatured alcohol on a rag, then warm soapy water and a soft brush. Work over newspaper, because pitch gets everywhere.
Pickle next. A warm dilute sodium bisulphate pickle removes the fire scale and grey oxide that annealing leaves behind. A small slow cooker dedicated to pickle is the standard shop setup, and it is worth the few dollars.
Rinse thoroughly and dry. Any pickle left in a crevice will keep eating.
Polishing is where the piece finally looks like itself. Raised areas catch the buff and go bright. Recesses stay dull and hold shadow. That contrast is not a side effect of polishing. It is the thing you have been building toward for three hours.
If you want more contrast, a liver of sulphur patina darkens the whole surface, and you then polish the high spots back to bright. The dark stays down in the recesses where the buff cannot reach.
Do not over-polish. A heavy hand rounds off the crisp chased edges you worked so hard to define.
When It Goes Wrong
Almost every failure in this craft traces back to annealing too little or hitting too hard. Here are the specific ones you will meet.
- The metal cracks or tears. Over-worked, or worked cold. Anneal sooner, take smaller bites, and stop working a single spot past the point where it stops rising.
- The pitch cracks. Too cold, or too hard a grade for the depth you are pushing. Warm it a little, or move to a softer pitch for deep raising.
- The piece shifts while you work. The metal was cold when embedded, or the contact area is too small. Warm both, and press it in firmly.
- Punch marks show on the front face. The tip is too sharp, or you are hitting too hard, or you are working the back too close to the finished surface. Blunt the tip, polish it, lighten up.
- The edges curl. You are working too near the edge, where there is no metal to support the blow. Stop about 3mm short and let the pitch hold the perimeter.
- The detail reads flat. You chased the front before the back had produced enough volume. Volume first, detail second, always.
- The background looks busy. You spot-textured instead of running overlapping rows. Matting is a pass, not a poke.
Three Projects to Start With
A raised leaf pendant. Use 0.6mm copper, roughly 30mm by 40mm. From the back, raise the leaf body in three overlapping passes, stem last because it is narrow and wants to fold.
From the front, liner the midrib, planish the leaf surface, matte the ground. Drill a hole, add a jump ring, done.
A domed cabochon setting. Use 0.7mm copper or brass, cut a circle with a good margin. From the back, dome it in concentric passes starting at the centre and working outward, rotating the bowl as you go.
From the front, chase a seat line about 2mm in from the edge so the stone has somewhere to sit.
A small decorative panel. Use 1.0mm copper at about 100mm by 150mm. One border, one central motif, nothing else. This is the project that teaches patience, because at that size you will anneal it a dozen times and you will learn exactly what "the metal has stopped moving" feels like.
Do the leaf first. It is small enough to finish in an evening and complex enough to teach you all four tools.
Conclusion
The setup is cheap. The mechanism is simple. The discipline is annealing, and the discipline is the part nobody sells you in a kit.
If I were starting again, I would buy the hammer and one punch, melt a block of pitch into a tin of sand, and ruin four copper blanks instead of three. The blanks were going to get ruined either way. That is what they are for.
If you want a technique that gets you to a finished pendant in an evening rather than a weekend, hand-stamped jewellery is the other road. It is a different process with a different look, and it is worth knowing about before you commit to pitch and a torch.
But if you want the thing that makes people pick a piece up and turn it over, this is it. Buy the hammer first. The bowl can wait.