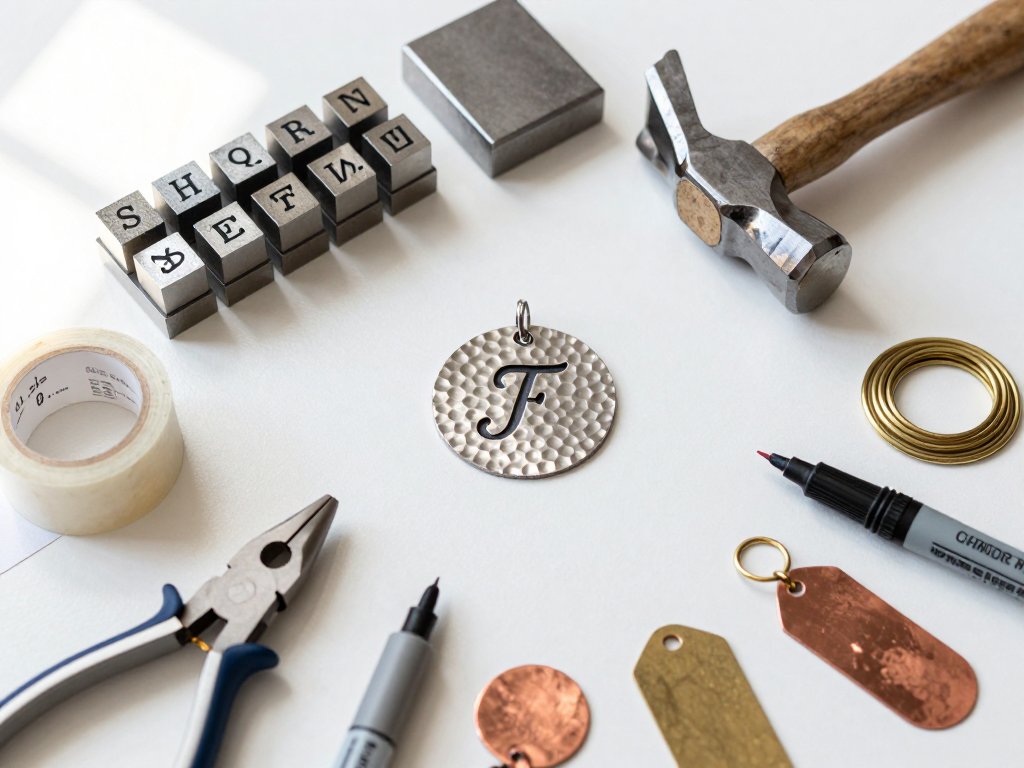
Introduction
A small metal disc costs about a dollar. A set of letter stamps costs less than a pizza. Put the two together with one firm blow from a hammer, and you have a pendant someone will wear for twenty years.
Hand-stamped jewelry sits in a lovely middle place. It is quicker than silversmithing, more personal than anything in a shop window, and forgiving enough that a first attempt usually looks like a real piece.
The metals are soft, the tools are few, and the technique is mostly about patience with spacing. What separates a clean impression from a mangled one is not talent. It is knowing how the metal behaves when the stamp lands.
This guide walks through all of it: the materials worth buying, the four tools that do the real work, how to plan lettering that stays level, and how to add hammered texture that makes the whole piece look intentional.
Why Stamped Metal Keeps Its Meaning
Metal stamping appeals because it converts almost nothing into something kept. A blank costs fifty cents to a few dollars. A whole pendant, finished with a chain, can come in under ten.
It is also a remarkably low-equipment craft. Once you own stamps, a bench block, a hammer, and tape, you can make dozens of pieces without buying another thing.
The style suits the way people wear jewelry now. Personalization is the point rather than an extra. Initials, birth dates, a wedding date, or the coordinates of a first home all fit on a disc.
Stamped pieces also make unusually good gifts, which is where most beginners end up. A pendant stamped with a new baby's name and birthday takes an afternoon and carries real weight.
Tools and Materials: What the Bench Actually Needs
Start with the essentials. Everything on this list fits in a shoebox and will carry years of projects.
- Soft metal blanks — round, oval, rectangular, or tag shapes in aluminium, copper, or brass.
- A steel letter and number stamp set, character height 2 mm to 6 mm.
- A steel bench block, ideally 4 by 4 inches and at least half an inch thick.
- A chasing hammer of about 2 to 3 ounces, or a small brass mallet.
- Painter's tape and a fine-tip permanent marker for layout.
- A metal file plus sanding pads in 400, 600, and 1000 grit.
- A hole punch for thin metal, or a 1 mm drill bit if your blanks are thicker.
- Jump rings in 18 to 20 gauge, and two pairs of chain-nose pliers to close them.
- Cord, leather, or chain to hang the finished pendant.
A few optional extras reward the investment. Liver of sulfur gives an antique patina that makes letters read much more clearly. Polishing pads and a soft cloth bring up the shine.
A rock tumbler with stainless steel shot is the luxury item. Thirty minutes of tumbling burnishes a batch of pendants and quietly work-hardens them so they resist bending.
Choosing Your Metal: Aluminium, Copper, and Brass
Blank material decides how the stamping feels and how the finished piece ages. All three common metals work; they simply ask for different strikes.
Aluminium is the easiest to learn on. It is soft, so the stamp sinks deeply from a single moderate blow, and impressions come out crisp and bright. It stays silver-toned and barely tarnishes.
The trade-offs are real. Aluminium is too soft to solder, it dents if it meets a keyring, and it cannot take a dark patina. Treat it as your practice metal and your low-cost gift metal.
Copper brings warmth and a salmon-pink tone that polishes to a soft glow. It takes a good impression, though it hardens as you work it. Left alone, copper darkens into a rich brown that many makers deliberately encourage.
Brass is the gold-toned option. It is the hardest of the three, so it needs a slightly firmer blow, and it ages into a honeyed, olive-tinged patina that looks convincingly antique.
Look for blanks between 18 and 20 gauge, roughly 1.0 to 1.2 mm thick. Thinner than about 22 gauge and the blank will bow under the hammer rather than hold a clean impression.
Stamps, Blocks, and Hammers: How They Work Together
Stamp sets are made from hardened, tempered steel. Characters are measured by height, and sets commonly run from 2 mm to 6 mm. For pendants, 3 mm is the sweet spot: readable at a glance without crowding a one-inch disc.
Because the steel is hard, it is also brittle. Striking a stamp against another steel surface — the edge of the block, a neighbouring stamp, a steel table — can crack the shank or chip the face. Always strike a stamp on metal that gives.
That is the job of the bench block. This heavy steel slab absorbs the blow and returns it straight up through the blank, which is what drives a deep, crisp impression. A stamp on a wooden desk just sinks the desk.
A chasing hammer is the right striking tool. Two to three ounces, a flat face with the faintest dome, and a short handle balanced for wrist motion.
A brass mallet is the gentler alternative. Being softer than steel, it is unlikely to chip a stamp head, and it forgives a slightly off-target blow.
A claw hammer is a poor substitute for three reasons. Its face is small and domed, so it slips off the flat stamp top and delivers a glancing blow. It is hardened, which damages stamp shanks. And it is simply too heavy for the light repetition stamping requires.
One more habit: keep the stamp vertical. If the shank leans, the character lands tilted, and tilted letters are the most common reason a beginner's first pendant looks handmade in the wrong way.
How Metal Behaves Under the Hammer
When a stamp lands, its raised character pushes the metal sideways and downward. The bench block underneath stops the blank from flexing, so the displaced metal has nowhere to go but into the walls of the impression. That is why the block matters as much as the hammer.
Aluminium yields easily. It deforms at low force, so a firm, single blow of moderate strength is all it takes. Extra effort just deepens a hole you already have.
Copper and brass behave differently because they work-harden. Every blow rearranges the metal's internal structure, tangling it and making the next blow meet stiffer metal. Expect to strike slightly harder, and expect the blank to feel less yielding by the end.
This is also why re-stamping an existing impression rarely fixes it. The second strike finds hardened metal and produces a shallower, shifted mark instead.
The clearest demonstration of all this is ghosting. Hit a stamp once and you get one impression. Hit it twice and the second blow lands a fraction of a millimetre off, leaving two overlapping outlines. Beginners see this constantly, and it reads as a blurry double letter.
Layout and Centring: Planning Lettering That Stays Straight
Everything that goes wrong with lettering goes wrong before the first strike. Layout is the whole game, and it costs nothing but a few minutes and a strip of tape.
Begin by finding the midpoint. Measure the blank's width, divide it in half, and mark it lightly with a fine-tip permanent marker. If your pendant will hang from a hole at the top, factor that in so the text sits comfortably below it.
Lay painter's tape across the blank as a baseline, aligning its top edge with the line your letters will sit on. A second strip above creates a narrow channel that holds stamps steady and keeps them from marching uphill.
Next, plan the spacing. Count your characters, gauge each one's width, and decide on the gaps between them. Do a dry run by laying the stamps in order across the blank, teeth down and undisturbed, and look at the whole word before you commit.
Work from right to left if you are right-handed. Your supporting hand then rests on the blank area you have not touched yet, so it never drags across fresh impressions.
It also lets you build toward the centre. Because you are stamping toward your marked midpoint, any small spacing correction happens on the side you can still shift, and the word stays centred rather than running off the edge.
Step by Step: Your First Hammered Pendant
Set aside an afternoon and work through this once slowly. The rhythm becomes obvious by the third pendant, and after that a piece takes about fifteen minutes.
- Choose your blank. A 22 to 25 mm aluminium disc is the friendliest starting size, since it gives you room to space letters without crowding.
- Decide the text and write it down on paper. Count the characters and sketch their spacing before touching the metal.
- Prepare the surface. Degrease the blank with a little rubbing alcohol so the marker and tape hold, then dry it completely.
- Tape the blank to the bench block. Painter's tape at two opposite edges will hold it flat and stop the blank from sliding when the stamp lands.
- Mark the midpoint and the baseline as described above, then lay out your stamps dry to check the spacing.
- Stamp the first character near the centre and work outward, right to left, one confident blow each. Lift the stamp straight up between strikes rather than dragging it.
- Check alignment as you go. Re-measure the distance to the baseline after every few letters so any drift is corrected immediately.
- Strike with a single decisive blow. If you are unsure of your strength, test on a scrap blank first — but never tap a letter twice, which causes ghosting.
- Texturise the metal with light, overlapping hammer blows, either around the edges or across the face. Do this before stamping if you think you may need to redo a letter.
- File and smooth all edges with the metal file, then work through the sanding pads from 400 up to 1000 grit until the rim feels round and safe.
- Drill or punch the hanging hole, keeping it about 3 mm in from the edge so the metal does not tear out later.
- Apply a patina if you want the letters to read strongly. Liver of sulfur darkens the whole piece; polishing the flat surface afterwards leaves dark only in the recesses.
- Polish the piece to a soft shine with a polishing pad or a short tumble, then wipe away any residue with a clean cloth.
- Open a jump ring sideways, thread it through the hole, close it flush, and hang the pendant on cord or chain.
Hammered Texture: Edges, Surface, and Softening Mistakes
Hammered texture is what turns a flat disc into forged jewelry. It is also the most forgiving step in the craft, and it can quietly rescue an imperfect stamp. There are two distinct looks, and you can use either or both.
Edge texture gives a rustic rim. Hold the blank flat on the block and strike lightly, working around the perimeter so each blow overlaps the last. The metal compresses and dimples inward, and the outline softens into a wobbly, hand-made contour.
Surface texture is denser. Work across the face in a close, even scatter, placing each strike beside the previous one rather than on top of it. Consistent spacing is what makes the pattern look deliberate instead of accidental.
Keep the hammer face flat against the metal on every blow. If the hammer tilts, the edge of its face bites in and leaves a crescent-shaped gouge that no amount of polishing will remove.
Drive the hammer from the wrist, not the elbow. Short, controlled taps give you far more precision than big swings, and precision is what produces even texture.
Here is the quietly useful part: texture softens the look of an imperfect stamp. Light scatters off dozens of small facets, and the eye reads hammered metal rather than noticing that one letter sits half a degree off level.
One caution about order. Texture work-hardens the metal and can nudge a nearby impression, so if you are unsure of a letter, texture first and stamp after. Otherwise, work the surface around the lettering and leave the stamped area clean.
Small blanks sometimes warp as you texture them. Turn the piece over and tap the curve gently on the reverse side to coax it flat again.
Practice, Mistakes, and Their Fixes
Always sacrifice a scrap blank before the real one. Practice blanks cost pennies and they teach you your own strength, which varies enormously from hammer to hammer and hand to hand.
Ghosting is the classic failure. Two overlapping impressions mean the stamp was struck twice, usually from a nervous tap followed by a real blow. It cannot be undone; file the area down and start again, or flip the blank and use the other face.
Uneven depth comes from a blow that was too light. The character is visible but shallow, and it will not hold a patina well. On aluminium you can sometimes deepen it, but on hardened copper or brass, replace the blank.
Lettering that drifts uphill or downhill almost always traces back to a missing or crooked tape baseline. Lay the tape fresh, align it by eye against a ruler, and check your distance to it after every few letters.
Stamps that jump or hop are a sign the blank is not taped down, or the tape has lost its grip. Re-tape and press the stamp flat to the metal before striking.
Bent blanks come from a soft surface underneath. A wooden block, a notebook, or a folded towel will let the metal flex, and a deep impression on a flexing blank curves it permanently. Bench block first, always.
Holes drilled too close to the edge are another common casualty. Leave about 3 mm of metal between the hole and the rim. Any less, and the thin web can tear under the weight of a chain.
Patina, Polish, and Everyday Care
A patina is simply controlled tarnish, and it takes a stamped pendant from pretty to legible. Liver of sulfur is the standard tool: a small amount in warm water, the pendant dipped briefly, then rinsed as soon as the tone looks right.
Once the whole piece has darkened, polish the flat surfaces with fine steel wool or a polishing pad. The raised metal brightens, the impressions stay dark, and the letters appear to have been inlaid.
Aluminium does not take patina well and barely tarnishes, so it needs finishing rather than protection. A polish with a soft cloth is usually the whole job.
Copper and brass keep darkening with wear, which some makers love and others want to slow. A thin coat of Renaissance wax or jeweller's clear lacquer after the final polish will hold the tone you achieved for months.
Daily care is mostly about avoidance. Remove copper and brass pendants before swimming, showering, or applying perfume, since chlorine and skin oils strip wax and accelerate tarnish.
Store pendants individually in a soft pouch or a lined box. Left loose together, hammered surfaces scratch one another, and the texture you worked for gradually smooths away.
What to Make Next
Once the first pendant works, the craft opens up quickly. The obvious next project is a set: the same design stamped once per person, in matching metal, for a small group of gifts.
A family initial necklace is a natural follow-up. Make one small disc per child, stamp each with an initial and a birth date, and hang them from a single chain on separate jump rings.
Dates and coordinates suit tags especially well. A stamped date tag on a keyring makes a sturdy, useful present, and a coordinate disc marks a first home, a wedding town, or a favourite beach.
Assembly is its own small pleasure, and the same jump ring and finishing skills carry straight across to other jewelry projects, including our guide to DIY charm bracelets you can personalize.
Conclusion
Hand-stamped jewelry rewards the beginner unusually well. The materials are cheap, the tool list is short, and the results look like something you would pay real money to buy.
Start with aluminium and a practice blank. Get the feel of a single clean impression, then let the hammer do the texturing. Your first pendant may lean slightly, and it will still be treasured.
Then make a second one for someone else. That is where the craft settles in, and where a few dollars of metal quietly becomes a keepsake.
