Introduction
There is a moment every crafter knows well: you walk into your craft room, take one look at the overflowing bins, the tangled yarn, the scissors that have disappeared into the abyss for the third time this week, and you think, "I need to get organized." But then you look at the price tags on those beautiful storage systems, and the inspiration fades.
The good news? You do not need a custom-built shelving unit or a closet system from a big-box store to create a craft room that works for you. Some of the best storage solutions are hiding in plain sight — in your kitchen cabinets, your recycling bin, and your local dollar store. Sophie Bennett here, and I have spent years figuring out how to keep a small craft space organized without spending much. Let me share what has worked.
In this guide, you will find practical, budget-friendly ideas for every corner of your craft room, from yarn storage to paper organization to tool management. These are solutions that cost little to nothing, take an afternoon to set up, and will transform how you feel about your creative space.
Start with a Clean Slate
Before you organize anything, you need to clear the space. I know — this is the part nobody enjoys. But here is the truth: you cannot organize clutter. You can only organize what you actually use and love.
Set a timer for thirty minutes and go through one section of your craft room. Separate everything into three piles: keep, donate, and toss. Be honest with yourself. That collection of dried-out markers from 2019? Toss them. The fabric you bought for a project you never started and no longer love? Donate it. The half-empty bottle of mod podge that has turned into a solid brick? Into the trash.
Once you have cleared the space, wipe down all surfaces. Dust and craft supplies do not mix well, and a clean room is infinitely easier to organize than one layered in sawdust and glitter remnants.
Repurpose What You Already Have
The most budget-friendly storage is the kind you already own. Before you buy anything, take a walk through your home and see what you can repurpose for craft storage.
Mason Jars and Glass Jars
Every size of glass jar is useful in a craft room. Small baby food jars hold beads, buttons, and sequins. Medium pasta sauce jars store paintbrushes, pencils, and crochet hooks. Large pickle jars are perfect for ribbons, lace trims, and rolls of washi tape. Remove the labels with a little warm water and baking soda, and you have clear, stackable storage that costs nothing. Arrange them on a shelf by size, and they become a decorative feature as well as a functional one.
Shoe Boxes and Shipping Boxes
Sturdy cardboard boxes can be covered with wrapping paper, scrapbook paper, or fabric to create matching storage bins. Measure the height of your shelves and cut boxes down to size if needed. Label each box on the front with a tag or a piece of washi tape and a permanent marker. Stack them on shelves or under your worktable for out-of-sight storage of supplies you do not use daily.
Muffin Tins and Ice Cube Trays
These are brilliant for sorting small items during a project. Use a muffin tin to hold beads, sequins, or small findings while you work. Ice cube trays work perfectly for sorting buttons by color or keeping jump rings and clasps separate. When you are done, pour everything back into its permanent container.
Takeout Containers and Plastic Lids
The clear plastic containers from takeout are perfect for storing small craft supplies. They stack neatly, you can see through the sides, and they have lids that snap shut. Plastic container lids from yogurt tubs or margarine tubs make excellent palette trays for paint — simply squeeze out your colors and clean up is as easy as tossing the lid.
Dollar Store Storage Solutions
The dollar store is a gold mine for craft room organization. Here are the items worth picking up on your next visit.
Adhesive Hooks and Command Strips
Use adhesive hooks on the wall or inside cabinet doors to hang scissors, rulers, tape dispensers, and small tote bags filled with supplies. You can also hang a small wire basket on a hook to hold washi tape rolls or glue sticks. For less than five dollars, you can clear off your entire work surface.
Plastic Bins in Multiple Sizes
Look for clear plastic bins with snap-on lids. Buy several sizes so you can nest them when not in use. Small bins hold thread, needles, and embroidery floss. Medium bins organize paint bottles and brushes. Large bins store bulk fabric, yarn, or seasonal decorations. The key is to buy all the same color or style so they look cohesive on your shelves.
Magnetic Strips
Dollar store magnetic knife strips are incredibly useful in a craft room. Mount one on the wall near your workspace to hold metal tools: scissors, tweezers, seam rippers, paper clips, and safety pins. You will never dig through a drawer for scissors again. A second strip inside a cabinet door can hold bobbins, needle cases, or small metal rulers.
Tiered Organizers
Multi-tier shelves, spice racks, or lazy Susans from the dollar store are excellent for organizing small bottles of paint, ink pads, or embossing powders. Place one on your worktable for frequently used supplies, and you will not have to reach across the room every time you need a color.
DIY Vertical Storage Ideas
When floor space is tight, the walls are your best friend. Vertical storage keeps supplies visible and accessible without taking up precious table or shelf space.
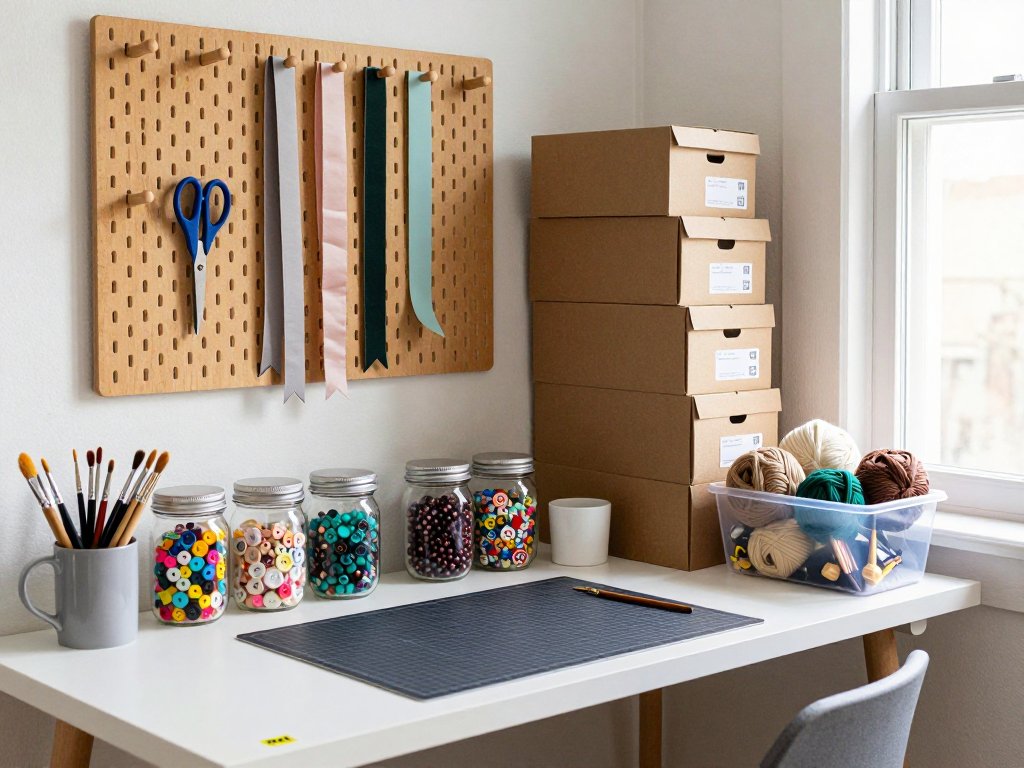
Pegboard Wall
A pegboard is one of the most versatile and budget-friendly storage systems for a craft room. A four-by-two-foot panel costs about fifteen dollars at a hardware store. Paint it to match your decor, mount it on the wall above your worktable, and fill it with hooks, baskets, and shelves. You can hang scissors, rulers, ribbons in spools, small cutting mats, and even lightweight tools. The beauty of a pegboard is that you can rearrange it anytime your storage needs change.
Hanging Shoe Organizer
A clear, over-the-door shoe organizer is a surprisingly effective craft storage solution. Each pocket can hold a different category of supplies: one pocket for glue sticks, one for hot glue guns, one for paintbrushes, one for markers. Hang it on the back of your craft room door or on a closet rod, and you have instantly added dozens of pockets of storage without taking up any floor space.
Wall-Mounted Tins
Collect a few decorative tin containers from a thrift store and mount them on a wooden board or directly to the wall using heavy-duty adhesive strips. Use them to store washi tape, twine, or small tools. Paint them in coordinating colors for a stylish wall display that doubles as storage.
Tension Rod Inside a Cabinet
Install a small tension rod inside a deep cabinet or closet to create a hanging storage space for spray bottles, rolls of wrapping paper, or ribbon spools. Simply slide the rolls onto the rod, and they will stay organized and easy to grab without falling over every time you open the door.
Organizing by Craft Type
Different crafts have different storage needs. Here is how to organize the most common supplies on a budget.
Yarn and Fiber Storage
Yarn is bulky and tends to tangle. Store it in clear plastic bins sorted by weight or color. For smaller amounts, use large zippered pillow protectors or cotton storage bags that let the yarn breathe. If you have space, mount a few wooden dowels or a tension rod in a corner to hang skeins like a mini yarn shop display. This keeps them untangled and makes it easy to see your full color palette at a glance.
Paper and Cardstock Storage
Paper should be stored flat to prevent curling. Use magazine holders or cardboard file boxes labeled by color or pattern. If you have a lot of scrapbook paper, a simple dish rack from the dollar store makes an excellent paper sorter — just slide sheets into the slots. For loose sheets of cardstock, a shallow box lid or a baking sheet works as a portable sorting tray.
Paint and Brush Storage
Paint bottles should be stored upright and in a cool, dry place. A tiered spice rack or a wooden wine crate turned on its side makes an excellent paint caddy. For brushes, fill a mason jar or a tall can with clean, dry rice or small pebbles, and stick the brushes in handle-first. This keeps the bristles protected and makes it easy to grab the right brush at a glance.
Beads and Small Findings
Small items need compartmentalized storage. Use a tackle box or a bead storage case with adjustable dividers. If you do not want to buy a dedicated box, use an ice cube tray or a muffin tin for temporary sorting, and store long-term in small glass jars or pill organizers. Magnetic sheets placed in the bottom of a drawer can keep metal findings like earring hooks and clasps from sliding around.
Stamps and Ink Pads
Clear stamps can be stored in three-ring binder pages designed for trading cards or photo sleeves. Mount them on a sheet of acetate and slip them into the sleeves. Wood-mounted stamps are bulkier — store them on a shelf in stackable trays sorted by theme. Ink pads should be stored upside down (lid-side down) to keep the ink evenly distributed. A small toolbox or fishing tackle box works perfectly for organizing ink pads by color family.
Creating a Budget-Friendly Workstation
Your actual work surface matters just as much as your storage. If you do not have a dedicated craft desk, here are a few low-cost alternatives.
An old dining table from a thrift store or a secondhand desk from a Facebook marketplace can become a perfectly good craft table. Cover the surface with a self-healing cutting mat (one of the few items worth spending money on) or a thick layer of butcher paper that you can replace when it gets messy.
For additional workspace, consider a foldable utility table from a hardware store. They cost around forty dollars, fold flat when not in use, and provide a generous work surface. Place a piece of plywood on top for stability, and you have a sturdy, budget-friendly craft table.
Lighting is often overlooked but essential. A simple desk lamp with a daylight bulb (5000K color temperature) makes a huge difference in how accurately you see colors and how comfortable it is to work for long periods. Check thrift stores for affordable lamps, or use clip-on utility lights from a hardware store for about ten dollars.
Maintaining Your Organized Space
The hardest part of organization is not the setup — it is keeping it that way. Here are a few habits that will help your craft room stay organized with minimal effort.
First, adopt the "put it back" rule. Every time you finish using a tool or supply, put it back in its designated spot before you move on to the next thing. This takes ten seconds per item and saves hours of cleanup later.
Second, do a five-minute tidy at the end of every crafting session. Put away the scissors, cap the glue, close the paint bottles, and sweep or vacuum the floor. Five minutes of effort now prevents a weekend of deep cleaning later.
Third, reassess your storage every season. As your craft interests change, so will your storage needs. A bin that held embroidery supplies last spring might be better used for pumpkin painting supplies in the fall. Give yourself permission to rearrange and repurpose as your creativity evolves.
Finally, resist the urge to buy supplies just because they are on sale. Every new purchase should have a home before it enters your craft room. If there is no space for it, think twice before bringing it in.
Conclusion
An organized craft room is not about having the most expensive shelving or the trendiest storage bins. It is about creating a space where you can find what you need when you need it, where you can sit down and start creating without spending the first twenty minutes searching for a pair of scissors. Every solution in this guide costs under twenty dollars, and most cost nothing at all. Start with one area — your desk, your yarn bin, your paint collection — and build from there.
Your craft room does not have to be perfect. It just has to work for you. And with a little creativity and a few repurposed items, it can be both organized and budget-friendly. Now go enjoy your newly tidy space, and happy crafting.