Introduction
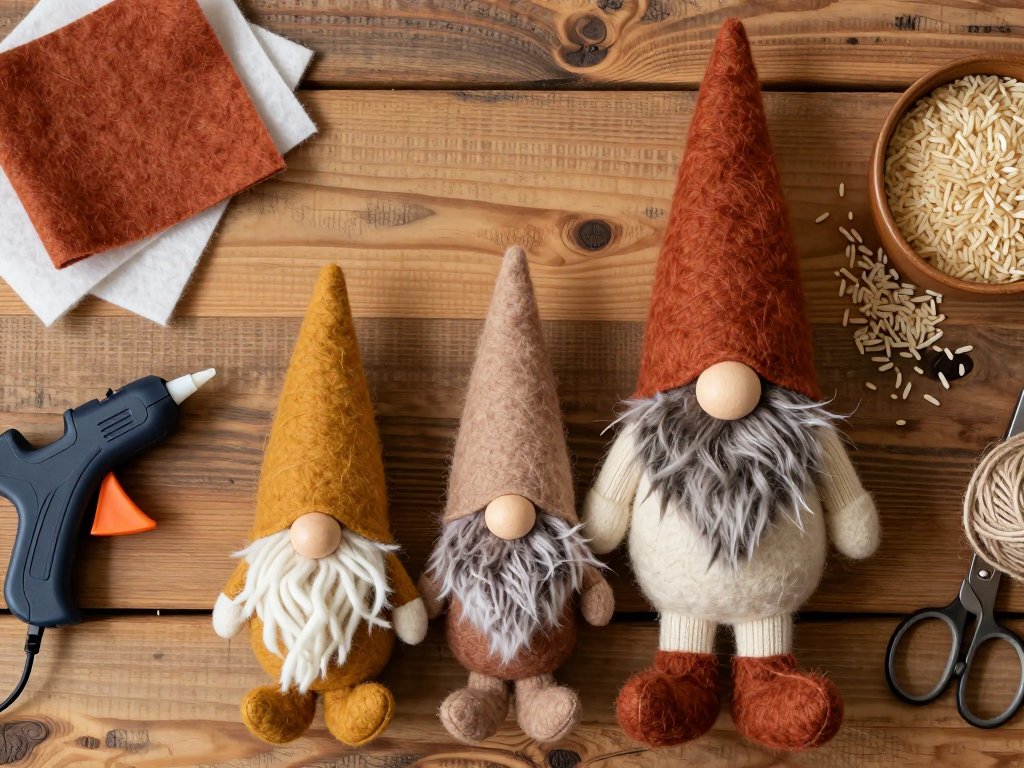
Somewhere between a garden statue and a storybook character, there is a small creature wearing a cone hat and a beard down to his knees. That is a fall gnome, and once you make one, you will want a shelf of them.
A gnome starts with a sock you probably already own. Add a felt cone, a shaggy beard, and a wooden bead nose, and you have a rustic autumn decoration finished in about an hour.
No sewing machine, no pattern, no measuring tape. If you can work a glue gun and stuff a cushion cover, you already have every skill this project asks for.
What a Fall Gnome Actually Is
The gnome comes from the Nordic tomte, or nisse — a small, bearded guardian of the farm and household. He was said to help with chores and to expect a bowl of porridge in return.
Over centuries the figure traveled across Scandinavia and into harvest and holiday decorations. The pointed hat and the long beard are what survived, and together they are the whole personality of the thing.
The hat is a cone because the original tomte wore a low, pointed cap to stay warm. The beard is enormous because it covers most of the face, leaving only a round nose peeking through.
Why This Is a Good First No-Sew Project
Most beginner decor projects need one tool you do not own yet. This one needs a glue gun, which plenty of us already have in a drawer from the last school project.
The mistakes here are forgiving too. A crooked seam disappears under a cuff, and a full, lumpy beard covers a hundred small imperfections in the body below it.
And it moves quickly. From cutting the sock to setting the finished gnome on the mantel is roughly one hour of hands-on time, not a whole weekend.
That matters when your craft time arrives in twenty-minute windows between other things. You can stop after the body is filled and pick up the hat tomorrow with no harm done.
Materials You'll Need
Everything below fits on one shallow tray, which keeps cleanup quick and stops small helpers wandering off with the good scissors.
- A fuzzy or crew sock for the body — plush chenille or a soft fleece-lined sock in cream, oatmeal, or rust hides lumps best; a plain cotton crew works too, but stretch it over your hand first to be sure it is not too thin to hold rice.
- Felt sheets or a felt cone for the hat — stiffened craft felt holds a cone shape on its own; if you use the floppy kind, plan to double it or brush on fabric stiffener.
- Faux fur or chunky yarn for the beard — a strip of short-pile faux fur roughly 2 by 6 inches, or about 40 strands of chunky yarn cut to 6 inches.
- A wooden bead or felt ball for the nose — a 20 to 30 mm wooden bead in natural or stained brown; a felt ball in a slightly darker shade reads softer against the beard.
- Dry rice or beans plus polyester fiberfill — a half cup of rice for the base and a generous handful of fiberfill above it; beans work but are heavier and harder to balance.
- Hot glue and a low-temperature glue gun — the low-temp gun is the one to buy for this project; it still bonds felt and fur but will not scorch the fabric or burn fingers badly.
- The kid-safe alternative — tacky craft glue or Fabri-Tac in a squeezy bottle, which holds felt well and cannot burn anyone, plus a couple of clothespins to clamp seams while it dries.
- Twine — jute or cotton baker's twine for a belt, a hanging loop, and the bow at the tip of the hat; thin twine wraps a hat cleanly, thick twine makes a chunkier belt.
- A cinnamon stick — one per gnome as a hat accent or a tiny bundle tied in the arms; it also makes the finished piece smell faintly of the season.
- An acorn cap or a tiny faux leaf for accents — an acorn cap makes a perfect little hat pin, and a single faux leaf tucked behind the beard adds a second texture.
- Optional fabric stiffener — a small bottle of felt stiffener or a mix of white glue and water, only needed if your felt hat will not stand up on its own.
Setting Up a Glue Station Before You Start
Felt is forgiving, but hot glue is not. A minute of setup saves you from peeling dried strings off the kitchen table for a week.
Cover the work surface with parchment paper or a silicone mat. Glue pops off both cleanly once it has cooled, which keeps the table and the finished gnome tidy.
Keep a small bowl of cold water nearby and a silicone finger guard on your glue hand. If a blob of glue lands on skin, cool it in the water, never pull at it hot.
Set the gun on its stand at the back of the tray, cord tucked away from small hands, and let it heat a full five minutes before the first squeeze.
If children are helping, run the adult glue steps at a separate table, or glue everything yourself and hand the pieces back for assembly. Tacky glue at the kid station is the safest arrangement of all.
Making the Body
The body is the foundation, so it is worth getting the fill right before you attach a single hat or beard. A wobbly gnome usually has a filling problem, not a glue problem.
Where to Cut the Sock
Lay the sock flat with the heel facing up and cut straight across the foot, just above the heel, so the tube below the cut is about 7 to 9 inches long. The cuff becomes the bottom edge and hides under the beard.
Turn the tube wrong side out and run a line of glue around the cut edge, then press it flat to seal. Turn it right side out and you have an open bag with the cuff at the base.
If you want a taller gnome, cut higher and keep the heel in the body — the extra fabric simply fills out the shape once it is stuffed.
Filling It So It Sits Flat
Pour about half a cup of dry rice into the tube first and settle it into the base with your fingers. The rice is the weight that keeps a lightweight sock gnome upright.
Press the rice down until it forms a flat, even layer about an inch deep. That flat layer is what lets the gnome stand on a shelf edge without tipping.
Now add polyester fiberfill above the rice, a small handful at a time, pushing it down the sides with a chopstick or the end of a wooden spoon.
How Full Is Full Enough
Fill until the body holds its shape when you set it down, but the fabric still gives slightly when you press a thumb into it.
Overstuffing is the most common beginner mistake. A sock stuffed to bursting turns into a barrel and stops looking like a little person under a hat.
Understuffing is quieter but just as bad. Leave the body too soft and it slumps forward the moment you glue a fur beard to the front.
Tuck the top opening inward and glue it closed in a straight horizontal line. That flat top is the base you will build the hat on, so keep it level.
Making the Beard
The beard is what makes the gnome read as a gnome, so give it more attention than the body. Both versions below take about ten minutes.
The Faux Fur Beard
Cut a strip of short-pile faux fur about 2 inches wide and 6 inches long with sharp scissors or a craft knife on a mat. Cut only the backing, never through the fur pile.
Brush the fur away from your cut line with a damp fingertip before you snip, so you trim backing and not fluff. Work over a bin, since faux fur sheds generously.
Glue the strip across the front of the body about an inch below the top, leaving the top inch clear for the nose and the hat brim. Then shape the bottom into a beard.
Trim the lower edge into a soft V or a rounded point, cutting small amounts and checking as you go. A long, narrow beard suits a tall gnome; a wide, short one suits a small one.
The Chunky Yarn Beard
Cut roughly 40 strands of chunky yarn to 6 inches. A small stack of yarn wrapped around a book and cut once gives you a neat, even bundle in one motion.
Lay the strands side by side and glue them to the body in a single row, or loop the bundle in half over a thin line of glue and press flat for a folded, layered look.
Trim the free ends level, then angle the sides so the beard narrows at the bottom. Stocking yarn this way produces a beard that hangs instead of standing out stiffly.
Keeping Either Beard From Shedding
Run a thin line of glue along the back of the fur or yarn where it meets the sock. That seals the loose fibers into the seam and stops them dusting your shelf.
For faux fur, you can also dab clear-drying craft glue on the underside of the backing with a fingertip. Give it an hour to dry before you set the gnome anywhere.
Why a Small Glue Line Beats a Big Blob
A thick bead of hot glue soaks through felt, stiffens fur into a crust, and pushes visible glue out the sides of the seam where nobody wants to see it.
Aim for a line no thicker than a piece of dried spaghetti. Press for ten seconds, then let go — the bond sets fast and a thin line holds just as well as a fat one.
Attaching the Nose
The nose does about eighty percent of the expression on a gnome with no eyes, so it is worth placing slowly before you commit to glue.
Position the bead so the bottom third of the nose sits inside the top of the beard. About two-thirds of it should stay visible, poking out over the fluff.
Dry-fit it first and look at the gnome straight on from a step back. If the nose disappears into the fur, move it higher; if it floats above the beard like a balloon, move it down.
Glue the bead with a single small dot at the back rather than a ring around it. Press it into the felt for ten seconds and hold the nose steady so it does not slide.
A felt ball nose is more forgiving than wood because you can pinch it into a slightly oval shape, which sits more naturally against a curve of beard.
Making the Hat
The hat is the part people notice first, and it is also the piece most likely to give you trouble. Both the felt cone and the wrapped version work well.
Rolling a Felt Sheet Into a Cone
Cut a quarter circle from a 9 by 12 inch felt sheet, with the arc about 10 inches long. A bigger arc makes a wider hat; a narrower one makes a taller, sharper point.
Bring the two straight edges together and overlap them by about half an inch, then glue that seam down in a single line from base to tip. Hold it with a clothespin while it sets.
Press the cone onto the top of the gnome's head before the glue is fully cool. Felt stays slightly flexible for a few seconds, which lets you shape it to the head.
Glue the base of the cone all the way around the flat top of the body. Sit the hat low enough that it covers the top inch of the body and meets the beard line.
Adding a Cuff or Brim
Cut a strip of contrast felt about 1 inch wide and long enough to wrap around the hat's base with a small overlap. A cream or oatmeal cuff on a rust hat looks intentional and hides the seam line.
Glue the cuff around the bottom of the cone, seam to the back, then add one small gather at the front if you want a softer, slouchier look.
The Yarn-Wrapped Hat Variation
Glue the tip of the cone to the felt at the base and wrap chunky yarn tightly around the whole cone, spiralling upward and pressing each row against the last.
When you reach the tip, leave a 6 inch tail and tie it into a small knot or a tiny tassel. This version covers a lumpy seam completely and uses up leftover yarn.
Finishing the Tip
Glue a small bell, a twine knot, or a tiny felt ball to the point of the hat. A knot of twine is the quiet choice; a little bell makes the gnome feel festive.
Tuck a cinnamon stick under the cuff at a slight angle and glue it in place. Push a single faux leaf behind it for a second layer of autumn texture.
Optional Personality: Arms, Mittens, and a Tiny Scarf
A plain gnome is perfectly good, but ten extra minutes gives him something to do with his hands.
For wire arms, cut two 4 inch lengths of 18-gauge floral wire, wrap each in a narrow strip of felt, and glue one end into each side of the body just below the beard.
Mitten hands are simply two small felt ovals glued over the wire ends. Angle them so one hand rests on the beard and the other points outward, which looks far more natural than two symmetrical arms.
For a scarf, cut a felt strip about 1 inch wide and 12 inches long, wrap it around the base of the beard, and knot it once at the front. A little twine bow on top of the knot finishes it.
Sizing a Family of Gnomes
One big gnome for the mantel plus three small ones for a tiered tray is the arrangement that gets the most compliments, and it costs almost nothing extra.
Start with a knee-high sock for the largest gnome, which gives you a finished figure around 12 to 14 inches tall. A thick chenille sock makes a chunkier, sturdier shape.
For the small gnomes, use baby socks or cut the tube from an adult sock into 4 inch sections. A 4 inch body takes about two tablespoons of rice and a walnut of fiberfill.
Scale the accessories down as you go. A 4 inch gnome takes a 1 inch hat arc, a 1 by 2 inch fur scrap, and a 10 mm bead nose.
Keep the family in the same palette but vary the tones. Three rust-and-cream gnomes with one mustard hat reads as a set rather than three unrelated objects.
A Kid-Friendly Workflow
This project splits beautifully between grown-up and child work, which is rare for anything involving a hot tool.
Children can sort the materials, match sock colors to felt hats, stuff the fiberfill, place the nose, choose the accents, and hand you pieces in the order you need them.
The grown-up steps are cutting with sharp tools, everything with the hot glue gun, trimming faux fur, and setting the wire arms. Tacky glue can move more of the assembly to the child's side of the table.
Set up a tray per person with their own sock, felt pieces, and beard strip. Shared supplies go in the middle, and the glue gun stays at the far end with the adult.
Give each child one job at a time rather than the whole gnome at once. Stuffing the body, then stopping to pick the nose, then stopping for the hat keeps small hands engaged for the full hour.
Expect the first gnome to look handmade rather than polished, and say so out loud. The lopsided ones tend to be the ones that end up on the fireplace.
If you are making these with a group, the work goes faster with one adult at the glue gun and three or four children on assembly. It is a good rainy-autumn-afternoon activity.
Display and Styling Ideas
Where a gnome sits changes how it reads. The same figure looks whimsical on a bookshelf and quiet and rustic on a mantel.
Once your gnomes are in place, the pinecone crafts for fall decor round out the same rustic shelf in an afternoon.
An entryway table is the best first home for the big gnome. Pair him with a small lamp, a shallow dish of keys, and one dried stem in a jar.
On a bookshelf, group the small gnomes on a single shelf with books stacked flat underneath. Height from the book stack keeps them above eye level and out of the way.
On a mantel, keep every candle at least a foot away from the beard and hat. Faux fur and craft felt are both flammable, so distance matters more than styling here.
A tiered tray is the ideal small-gnome display. Put the tallest on the bottom tier, two on the middle tier, and an acorn or mini pumpkin on the top.
For a wrapped present, tie the gnome to the ribbon with a loop of twine and let it hang as the gift topper. The receiver keeps the gnome and the paper gets recycled.
For a fall photo backdrop, stand three gnomes on a hay bale or a wooden crate with a plaid blanket behind them. Natural light from a window is all the lighting you need.
Troubleshooting Common Problems
Every one of these has a cause and a quick fix. None of them means the gnome is ruined or that you should start over.
The Gnome Will Not Sit Straight
The rice layer is too thin or the fiberfill is packed unevenly. Open the base seam, add another two tablespoons of rice, and press it into a flat, level disc before gluing closed.
Glue Strings Everywhere
You are lifting the nozzle too far from the work. Keep the tip within a quarter inch of the felt, pull the gun away with a quick twist, and use a low-temp gun, which strings far less than a high-temp one.
The Hat Is Floppy and Will Not Stand Up
Your felt is too soft. Brush fabric stiffener on both sides, let it dry, then re-roll; or cut a second quarter circle, glue the two layers together, and roll the double-thick felt into a cone.
The Faux Fur Is Shedding Everywhere
You cut through the pile instead of the backing. Dab clear craft glue along the cut edge from the underside and let it dry an hour. Next time, part the fur and snip only the backing layer.
The Beard Hides the Nose
The nose went in too low, or the beard creeps up when the glue sets. Peel the nose off with a little warmth, trim a shallow notch in the top of the beard, and reset the nose higher.
Scorch Marks on the Felt
Your gun is too hot for felt. A shiny or browned patch means the fibers have melted. Trim the scorched edge away, or hide it under the cuff, and switch to a low-temp gun from here on.
Conclusion
A gnome is a small, quiet reward for an hour of your time. There is nothing to be anxious about, because the whole design is a hat, a beard, and a nose on a stuffed sock.
Start with one. Make the body, let it firm up on the counter, and finish the hat after dinner if you would rather work in two short sittings than one long one.
If you already have leftover felt and a spare sock in the drawer, you can start this tonight and finish the hat after dinner. Nothing about it needs a fresh trip to the craft store.
Which palette are you leaning toward this year — rust and cream, or mustard and oatmeal? I would love to know what you choose, so leave a comment below.
When you finish your first gnome, send me a photo or tag me in it. The lopsided ones are always my favorites.
And if you enjoy it, the next projects are easy. A matching gnome in red and green becomes a holiday gift, a few tiny ones strung on twine become ornaments, and one holding a wooden spoon makes the perfect companion to a hot cocoa bar.
Pick a sock, heat the glue, and make the small thing. Your mantel will thank you.

