Introduction
There is something about a well-crafted ceramic vase that anchors a room. The smooth curve of a ribbed vase catching afternoon light.
The quiet weight of a matte ceramic vessel on a wooden console table. Pottery Barn has built an empire on this aesthetic, and it is easy to see why — their ceramic vases convey a sense of permanence and artistry that elevates any space.
But the price tags? Those can be harder to love.
A single medium-sized ceramic vase from Pottery Barn can run anywhere from forty to over a hundred dollars.
And if you want to create a styled vignette with three vases in varying heights — that staple designer look you see in every home magazine — you are looking at a significant investment.
The good news is that you can achieve the same sculptural, high-end look for a fraction of the cost by making your own.
With air-dry clay and a few simple tools, you can create ceramic-inspired vases that look remarkably similar to their designer counterparts.
I have spent years experimenting with different clays, finishes, and techniques to replicate the look of expensive ceramics.
Some attempts were failures — cracking, uneven surfaces, disappointing textures. But those failures taught me exactly what works.
Let me walk you through the methods I use to create Pottery Barn-inspired vases that cost about five dollars each in materials.
Understanding the Pottery Barn Aesthetic
Before we start making, let us look closely at what makes Pottery Barn ceramics distinctive.
These are not ornate, hand-thrown pieces with painterly glazes. The signature Pottery Barn vase is defined by clean lines, subtle texture, and a restrained color palette.
Think ribbed surfaces, matte finishes, earthy tones, and simple silhouettes.
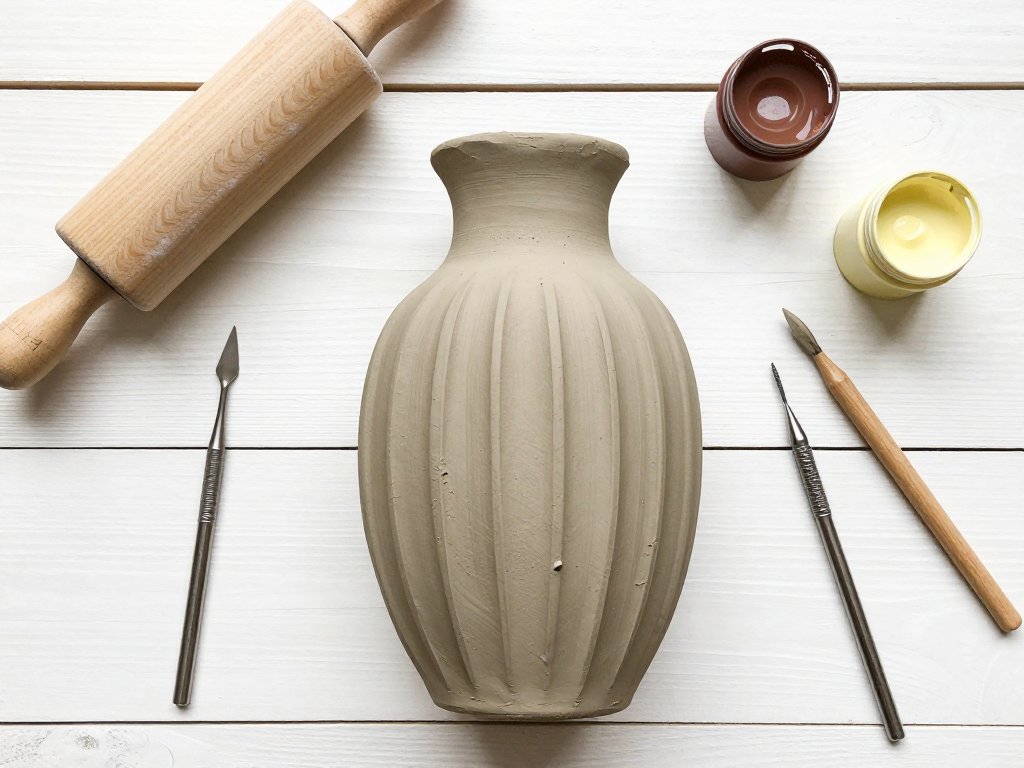
Ribbed or fluted vases — those with vertical grooves running from top to bottom — are perhaps the most iconic Pottery Barn ceramic style.
The ridges create visual interest through light and shadow without relying on bold colors or patterns.
This makes them surprisingly achievable for a home crafter, because the ribbing can be created with simple tools rather than a potter's wheel.
Other recurring styles in their collections include:
- Organic, irregular forms — vases with subtle asymmetry that mimic hand-thrown pottery
- Textured surfaces — achieved through stoneware glazes that pool in crevices
- Neutral palettes — cream, terra cotta, soft gray, warm taupe, and matte black
- Tapered silhouettes — wider at the base and narrowing at the neck
Understanding these elements helps us make intentional design choices rather than just guessing at shapes. Every tool mark and surface treatment should move us closer to that high-end aesthetic.
Materials: Choosing Your Clay
For this project, I recommend using a high-quality air-dry clay rather than polymer clay or oven-bake alternatives.
Air-dry clay is more forgiving for larger forms, does not require a kiln or oven, and takes texture beautifully.
The trade-off is drying time — most pieces need three to seven days to cure fully — but the results are worth the wait.
Here is what I recommend for the most Pottery Barn-like finish:
- White air-dry clay — La Doll Premier or Creative Paperclay are excellent choices. They dry to a smooth, porcelain-like finish that takes paint beautifully. A one-kilogram block costs about twelve dollars and will yield three to four medium vases.
- Terra cotta air-dry clay — if you prefer a warmer, earthier look, natural terra cotta air-dry clay gives that sun-baked Mediterranean feel that Pottery Barn often features in their summer collections.
- Gray stoneware air-dry clay — less common but worth seeking out for its sophisticated, industrial finish that resembles high-fired stoneware.
Avoid cheap "school-grade" air-dry clays, which tend to crack excessively and produce a chalky, unrefined surface. The difference between a twelve-dollar block of quality clay and a five-dollar economy block is immediately visible in the finished piece. This is one area where spending a little more makes a dramatic difference.
Essential Tools
You do not need a pottery studio to create these vases. Most of the tools are household items or inexpensive finds from a craft store:
- Rolling pin — for flattening clay to an even thickness. A wooden rolling pin works, but a acrylic roller gives a smoother, non-stick surface.
- Clay scoring tool — a toothpick, wooden skewer, or the tip of a paperclip works perfectly for scoring edges before joining pieces.
- Ribbing tool — this is the key to creating that signature fluted texture. A silicone ribbing tool is ideal, but you can also use a plastic gift card, a popsicle stick, or a serrated knife for wider grooves.
- Small bowl or cup — for water to keep your clay moist while working.
- Sandpaper — fine-grit (220 to 400) for smoothing the dried surface before painting.
- Acrylic paint — matte finish acrylics in your chosen colors. Ceramic matte sealer for the final coat.
- Plastic wrap — to keep unfinished pieces from drying out between sessions.
The total investment for tools, assuming you already have basic household items, is about fifteen dollars. And since these tools are reusable, your second vase costs only the price of the clay.
Creating the Classic Ribbed Vase
The ribbed vase is the crown jewel of Pottery Barn's ceramic collection. Here is how to make your own version using slab-building techniques — no potter's wheel required.
Step 1: Prepare Your Clay
Knead your air-dry clay for several minutes until it is soft, pliable, and free of air bubbles.
A few minutes of thorough kneading prevents frustrating cracks later. Roll the clay out to an even thickness of about a quarter-inch.
Use two thin wooden dowels or rulers on either side of your clay as guides to ensure uniform thickness.
If the clay feels too dry and crumbly, mist it lightly with water and knead again. If it feels too sticky, let it rest for fifteen minutes covered with plastic wrap. The ideal consistency is smooth and slightly firm — like room-temperature butter.
Step 2: Cut Your Pattern Pieces
For a simple tapered vase, you need three pieces: a rectangular body panel, a circular base, and a neck ring.
The body panel should be wider at the bottom than the top to create the tapered silhouette.
A good starting size for a medium vase is 10 inches wide at the base, 6 inches wide at the top, and 8 inches tall.
Use a paper template to trace and cut your pieces. A sharp craft knife or clay cutting tool produces cleaner edges than scissors. Cut your pieces slightly larger than your template — you can trim them after assembly.
Step 3: Create the Ribbed Texture
This is the step that transforms a simple clay form into a Pottery Barn-inspired piece. Before assembling the vase, lay your body panel flat and use your ribbing tool to create vertical grooves. Work from top to bottom in one continuous motion. Space the grooves about half an inch apart.
For a subtle, elegant texture, use a wide silicone ribbing tool that creates shallow, rounded grooves.
For a more dramatic ridged look, use a narrower tool or the edge of a popsicle stick to create deeper, sharper channels.
I recommend starting with shallow grooves — you can always deepen them, but you cannot undo a cut that is too deep.
One technique I learned through trial and error: if you press the ribbing tool into the clay at a slight angle rather than straight down, the grooves catch light more beautifully. The angled edges create a gradient of shadow that gives the vase depth and dimension.
Step 4: Assemble the Vase
Score the edges of your body panel where it will join the base. Apply a thin layer of water or clay slip (clay mixed with water to a toothpaste consistency) to the scored edges.
Press the body panel gently onto the base, working your way around to distribute the pressure evenly.
Use your fingers to blend the seam smooth, then reinforce the inside joint with a thin coil of fresh clay pressed into the corner. This double-layer joint is what prevents cracks as the clay dries.
Attach the neck ring in the same way, scoring, slipping, and smoothing. If you want a wider opening for fresh flower arrangements, leave the neck ring slightly larger than the body opening. For dried flower arrangements, a narrower neck works beautifully.
Step 5: Refine and Dry
Once assembled, smooth all seams with a damp finger or a soft silicone brush. Check that the vase sits flat on a level surface. Trim any uneven areas at the rim with a sharp blade.
Let the vase dry slowly, covered loosely with plastic wrap for the first two days, then uncovered for the remaining curing time.
Slow drying is essential — if the surface dries faster than the interior, the vase will crack.
A drying time of five to seven days at room temperature is ideal. Resist the urge to speed things up with a hair dryer or oven.
After the vase is fully dry, sand it lightly with fine-grit sandpaper to remove any rough spots or tool marks. Pay special attention to the rim and base, where imperfections are most visible. Wipe away the dust with a damp cloth before painting.
Coloring and Finishing
The finish is where your vase transforms from a clay object into a convincing ceramic piece. Pottery Barn's signature look relies on matte, slightly irregular surfaces that feel natural rather than plastic.
Painting Technique
Use matte acrylic paint in your chosen color. Apply two to three thin coats, allowing each coat to dry completely before applying the next. Thin coats preserve the ribbed texture; thick coats fill in the grooves and dull the effect.
For a more authentic ceramic look, try this layering technique: paint the entire vase with a base color, then dry-brush a slightly lighter or darker shade over the raised ridges.
The dry-brush technique picks up the high points of the texture while leaving the recessed grooves darker, creating the same light-and-shadow effect that makes expensive ceramics so visually appealing.
Popular Pottery Barn-inspired color combinations include:
- Soft cream with a warm white dry-brush — mimics creamy stoneware
- Warm terra cotta with a terracotta-orange base and a pale peach dry-brush
- Matte black with a charcoal gray dry-brush — sophisticated and modern
- Dusty sage — mix white with a tiny amount of green and gray for that muted, botanical tone
- Warm taupe — brown base with a cream dry-brush for a natural linen-like effect
Sealing
Apply a matte ceramic sealer or matte acrylic varnish as the final coat. This protects the paint, gives the vase a subtle ceramic sheen, and makes it water-resistant enough for fresh flowers. Two thin coats of sealer, with drying time between them, provide durable protection without altering the matte finish.
If you want a glossy finish like some Pottery Barn glazed ceramics, use a gloss varnish instead. I personally prefer the matte finish — it looks more like authentic fired stoneware and is more forgiving of minor surface imperfections.
Budget Comparison: Homemade vs. Store-Bought
Let us talk about the numbers, because this is ultimately a budget-friendly project. Here is a realistic cost breakdown for a single medium ribbed vase:
- Air-dry clay — approximately three dollars per vase (one block makes three to four vases)
- Acrylic paint — approximately one dollar per vase (a five-dollar bottle covers many projects)
- Matte sealer — approximately one dollar per vase
- Sandpaper — pennies per vase
Total material cost: about five dollars per vase.
Compare that to a comparable Pottery Barn ribbed ceramic vase, which typically retails for forty to eighty dollars depending on size. For the cost of a single store-bought vase, you can make eight to sixteen vases of your own — enough to style an entire shelf, mantel, or tablescape.
And here is the hidden benefit: if you chip or break a homemade vase, you are out five dollars and a weekend.
If you chip a Pottery Barn vase, you are out fifty dollars and a trip to the store.
There is a genuine freedom in making things that are beautiful enough to love but affordable enough to replace.
Design Variations to Explore
Once you have mastered the basic ribbed vase, the possibilities expand considerably. Here are some variations that maintain the high-end ceramic aesthetic:
Organic Free-Form Vases
Instead of building from a template, roll your clay into a slab and gently shape it around a balloon or crumpled paper form.
The resulting organic curves and subtle asymmetry mimic hand-thrown pottery. These free-form vases are some of the most forgiving projects for beginners, because irregularity is part of the design.
Carved Geometric Patterns
Before assembly, use a sharp tool to carve geometric patterns into the flat clay surface — triangles, chevrons, or vertical lines.
When the vase is assembled and painted, the carved areas create subtle shadow patterns that shift throughout the day as the light changes.
This technique produces vases that look surprisingly complex and artisanal with minimal effort.
Petal Neck Vases
Instead of a simple round rim, cut your neck ring into gentle petal shapes that flare outward.
This creates a sculptural opening that can hold a single stem or a small cluster of flowers without need for additional support.
The petal neck is a popular Pottery Barn detail that appears in their spring and summer collections.
Sculptural Ring Vases
Create a simple cylinder, then add coiled clay rings around the exterior at different heights. Paint the entire piece in a single matte color. The rings catch light and shadow in a way that is reminiscent of contemporary ceramic art. This variation is surprisingly modern and architectural.
Tips for a Professional Finish
After making dozens of these vases, I have collected a handful of techniques that separate an amateur-looking piece from one that truly resembles expensive ceramics:
- Sand twice. Sand once with medium-grit (220) to remove major imperfections, then again with fine-grit (400) for a silky surface. The extra five minutes of sanding makes a dramatic difference in how the paint lays down.
- Prime before painting. A thin coat of white gesso or matte acrylic medium helps the paint adhere evenly and prevents the clay from absorbing too much pigment, which can make colors look dull.
- Thin your paint. Add a few drops of water to your acrylic paint to achieve a milk-like consistency. Thin layers build up gradually without obscuring the ribbed texture.
- Work in natural light. Painting under a desk lamp can hide uneven coverage. Natural daylight reveals exactly where your paint is thin or thick.
- Add weight to the base. If your vase feels too light and prone to tipping, glue a small stone or a few heavy beads to the inside of the base before sealing. This gives the vase the satisfying heft of real ceramic.
- Embrace imperfections. A tiny air bubble mark or a slightly uneven rim reads as handcrafted charm, not a mistake. The most expensive ceramics often celebrate these small irregularities.
Caring for Your Handmade Vase
Air-dry clay vases are more delicate than kiln-fired ceramics, but with reasonable care they will last for years.
If you plan to use your vase for fresh flowers, insert a glass vial or small jar inside to hold the water, keeping moisture away from the clay surface.
For dried flowers, branches, or decorative use only, no liner is needed.
Dust your vase regularly with a soft, dry cloth. If the painted surface gets scuffed, a light touch-up coat of acrylic paint restores it to like-new condition. Avoid exposing the vase to direct sunlight for extended periods, as UV light can gradually fade the paint.
With these simple precautions, your handmade ceramic-inspired vase will remain a beautiful part of your home decor for years — a testament to what is possible with a few dollars worth of clay and a bit of creative patience.
Conclusion
Recreating the look of high-end ceramic vases at home is not about cutting corners — it is about understanding what makes those designs beautiful and reinterpreting them with accessible materials.
The ribbed texture, the matte finish, the sculptural silhouette — these are design principles, not secrets guarded by a kiln.
They are available to anyone willing to spend an afternoon working with clay.
The first vase you make may not be perfect. Mine was not. But the second will be noticeably better, and by the third or fourth, you will have developed an eye for proportion, texture, and finish that rivals what you see in the stores.
And the best part? Every time someone admires your vase and asks where you bought it, you get to smile and say, "I made it."
So pick up some clay, clear your kitchen table, and give it a try. Your entryway table deserves a beautiful vase — and you deserve the satisfaction of making it yourself.
