Introduction
She sat in her favorite armchair by the window, the late afternoon light catching the silver in her hair like spun threads of moonlight.
My grandmother, Nana Jo, was the most beautiful woman I had ever seen. I was seven years old, armed with a stubby pencil and a piece of printer paper, and I was determined to capture her face.
What came out looked less like my beloved grandmother and more like a potato with glasses.
I remember staring at my drawing, then at her kind, crinkled eyes, then back at my potato — and bursting into frustrated tears.
"Oh, honey," she said, pulling me onto her lap. "Faces are the hardest thing in the world to draw. But they're also the most wonderful. Every line tells a story."
She was right. I am forty-two now. I have three children of my own — two boys and a girl — and I have drawn hundreds of faces over the years.
My daughter Lucy's chubby cheeks at six months. My eldest son Noah's gap-toothed grin. The way my husband's crow's feet crinkle when he laughs at something silly on television.
And yes, I have drawn Nana Jo so many times that I no longer need a reference — her face lives in my heart, mapped and memorized.
Portrait sketching can feel impossibly intimidating when you are starting out. I know that feeling intimately.
But I promise you this: drawing faces is not a magical gift reserved for the naturally talented.
It is a skill, built on observation and practice and a few simple rules of proportion.
You do not need expensive supplies or fancy art classes. All you need is a pencil, some paper, and the willingness to look closely at the people you love.
Let me walk you through what I have learned.
The Basic Proportions of a Face
The single most important lesson I ever learned about drawing faces came from a battered copy of Andrew Loomis's Drawing the Head and Hands, which I found at a library book sale for twenty-five cents.
The book was older than my mother, and it smelled faintly of mildew and forgotten time.
But inside it held the secret that changed everything for me: the proportions of the human face follow a pattern.
Start with an oval — not a perfect egg shape, but something slightly wider at the cheekbones and narrower at the chin. Think of a gentle, elongated teardrop turned right side up. This is the basic canvas for your portrait.
Now, here is the rule that Nana Jo could never have explained to me with words but that I wish I had known at seven: the eyes sit exactly halfway down the head.
Not a little above halfway. Not a little below. Exactly in the middle. Measure from the top of the head to the chin — the eye line divides that distance in half.
I still draw a light horizontal guideline across the middle of my oval every single time I start a portrait, even after twenty-five years of practice.
The bottom of the nose sits one-third of the way between the eye line and the chin.
And the mouth sits one-third of the way between the bottom of the nose and the chin.
These are not arbitrary numbers — they are the geometric foundation that makes a face look like a face instead of a potato with glasses.
I teach these proportions to my own children, and I watch their drawings transform the moment they start using guidelines.
The ears align with the eyes and the nose, stretching from the eye line down to the bottom of the nose.
The width of the face is approximately five eyes wide, with one eye's width between the eyes.
The corners of the mouth line up with the center of each eye. These proportions shift slightly with age and individual features, of course — children's features are more compact, older faces show more distance between features as skin loses elasticity — but these basics will keep your portrait from looking like a Picasso before you are ready for that particular adventure.
The Eyes: Windows to the Soul
My grandmother had eyes the color of warm tea, framed by laugh lines that spread like tiny fans toward her temples. When I finally learned to draw eyes properly, I felt like I had unlocked a door I had been pushing against for years.
An eye is not a football. It is an almond shape — pointed at the inner corner, wider and rounder at the outer corner.
The upper eyelid curves more dramatically than the lower one, like a gentle arch over a soft hill.
The lower eyelid is subtler, almost flat along the bottom, with a delicate shadow beneath it that makes all the difference between a living eye and a dead one.
I recommend starting with an HB pencil for the basic almond outline — hard enough to keep your lines light and adjustable, soft enough to see what you are doing.
Once you have the shape, sketch in the iris as a perfect circle (even though part of it is hidden by the upper eyelid).
The pupil goes in the center of the iris. Here is the trick that transforms an eye from flat to alive: leave a tiny white highlight on the iris, slightly off-center, exactly where the light source hits.
That single speck of untouched paper is what makes an eye look wet, reflective, and real.
For the lashes, do not draw them as individual spikes like a child's drawing of grass.
Instead, think of them as a soft dark fringe. Use a 2B pencil with a sharp point and draw lashes in clusters, sweeping outward and upward from the upper lid.
The lower lashes are sparser, finer, and best suggested with just a few light strokes.
A 4B pencil is wonderful for deepening the dark of the pupil and the shadow under the upper eyelid.
When my daughter Lucy asked me why I always spent so long on the eyes, I told her what Nana Jo told me: "The eyes are where the person lives." It sounds sentimental, I know.
But look at any portrait that makes you stop and catch your breath, and I promise you it is the eyes that did the catching.
The Nose: More Subtle Than You Think
For years, I avoided drawing noses. They seemed like these strange, protruding obstacles in the middle of the face, and my attempts at them always looked like something a toddler might sculpt from Play-Doh. It turns out I was trying too hard.
The nose is almost never drawn with a hard outline. When you look at someone's face, you do not actually see a line running down the side of their nose — you see a soft change in value, a gentle transition from light to shadow that suggests the bridge.
The best noses in portrait drawing are the ones you barely notice, because they sit in the face naturally rather than shouting for attention.
Start with a subtle curve for the bridge, using a hard 2H pencil so the line stays light and erasable.
Indicate the ball of the nose with a soft circle of shading — not an outline, but a whisper of graphite.
The nostrils are teardrop shapes, not circles, and they sit at the base of the nose, flaring slightly outward.
Use your kneaded eraser to lift out highlights on the bridge and the tip of the nose.
This is where the magic happens: the places where light kisses the nose are what give it form and dimension.
I think about noses differently now. Instead of seeing them as difficult facial features, I see them as beautiful, varied landmarks that tell stories about where we come from.
Noah has my husband's straight, narrow nose. Lucy has my round, slightly upturned one — the nose I used to hate as a teenager, the nose I now love because I see it on her face every morning.
The Mouth: The Cupid's Bow
The mouth is where expression lives. A tiny shift in the curve of the lips can turn a smile into a smirk, a frown into a pout, a neutral expression into a lifetime of unspoken emotion.
I learned to draw mouths by watching people talk on television, sketching their lips in the margins of notebooks during late-night insomnia sessions.
The upper lip has a distinctive shape called the Cupid's bow — two gentle peaks in the center that curve down symmetrically.
It is thinner than the lower lip in most faces. The lower lip is fuller, rounder, and catches more light, which means you will want to leave more highlights there.
Both lips meet at the lip line, which is almost never a straight line; it dips in the center and curves up at the corners.
Use a 2B pencil for the lip line — you want it defined but not harsh.
The shaded area under the lower lip is just as important as the lips themselves.
That small crescent of shadow gives the lower lip its projection, its presence in three-dimensional space.
Without it, the mouth looks like it was pasted onto the face like a paper cutout.
The corners of the mouth hold shadows too, especially in portraits where the subject is smiling.
And here is a tip I wish someone had told me twenty years ago: the corners of the mouth almost always have tiny, almost invisible shadows.
Do not forget them. They are what make a mouth belong to a face rather than float on top of it.
The Ears: Don't Skimp on These
Ears are the part of the face that everyone forgets until the portrait looks wrong, and then no one can figure out why.
I cannot tell you how many faces I drew as a young artist where the ears were afterthoughts — tiny C-shapes haphazardly stuck to the sides of the head, bearing no relationship to the features they were supposed to accompany.
The ear is surprisingly complex on the inside. It has a series of curves and ridges that resemble a tiny, intricate seashell.
The outer rim (the helix) curves around like a question mark. Inside, there is a parallel ridge (the anti-helix) that creates a Y-shaped division.
The earlobe at the bottom is soft and round. Do not draw all of these details with hard lines — suggest them with subtle value changes, letting the graphite do the work of describing form.
Remember that ears sit between the eye line and the bottom of the nose. They are not placed randomly.
And they tilt slightly backward, matching the angle of the jaw. When you draw a face from the front, the ears are visible on both sides but flattened and simplified.
In a three-quarter view, the far ear is partially hidden behind the head, and the near ear gets more attention and detail.
I like to use a 4B pencil for the darker shadows inside the ear's curves and a kneaded eraser to lift highlights along the helix. Ears are beautiful in their complexity. Give them the attention they deserve, and your portraits will suddenly look complete.
Hair: Flow, Shadows, and Highlights
Hair terrified me for years. It still makes me nervous, if I am being honest.
There is so much of it, and it seems like such a monumental task to render every strand.
But here is the truth: you do not draw every strand. You draw the suggestion of every strand.
Think of hair as a single shape first — the overall form, the silhouette of the hairstyle.
Block it in with a 2B pencil using broad, directional strokes that follow the way the hair falls.
Look at your subject. Does their hair part on the left and sweep to the right?
Stroke your pencil in that direction. Does it curl around their ears? Curve your strokes accordingly.
The deepest shadows in the hair are found near the scalp, where the hair is thickest and light struggles to penetrate.
Use a 6B pencil here — soft, dark, rich graphite that you can smudge slightly with your finger or a blending stump for smooth, velvety darkness.
The highlights are created by leaving the paper white or lifting graphite with a kneaded eraser shaped into a fine point.
Pull out individual strands of lighter hair from the dark mass, working from the highlights outward.
When I draw Lucy's hair — long, wavy, the color of autumn leaves — I always start with the darkest shadows near her crown and work outward, saving the light-catching strands on top for last. The result is hair that looks dimensional and touchable rather than a flat brown helmet.
Do not be afraid to leave large areas of your hair block unfinished. The eye fills in the gaps when the suggestion is strong enough. Hair that is meticulously detailed everywhere looks stiff and unreal. Hair that is partly suggested, partly implied, looks alive.
Putting It All Together: From Profile to Three-Quarter View
The first face I ever drew that actually looked like a real person was a profile of Nana Jo.
Profiles are forgiving — you only have half the features to worry about, and the silhouette of the face does most of the work for you.
I drew her strong nose, the gentle curve of her chin, the soft slope of her forehead, and something clicked.
For the first time, the person on the paper looked like the person in my heart.
I recommend starting with a profile view when you are learning. The proportions are simpler because everything is arranged along a single curve — the forehead, the indentation at the eye, the bridge of the nose, the lips, the chin.
Once you can draw a credible profile, move to the front view, where symmetry becomes your friend and your enemy at the same time.
And once you master the front view, try the three-quarter view, which is the most natural and the most challenging.
In a three-quarter view, the face is turned about forty-five degrees away from you. One side of the face is closer and shows more detail; the other side is compressed and simplified.
The far eye is smaller and narrower. The bridge of the nose overlaps the far eye slightly.
The mouth shifts off-center. This is where all the practice with proportions pays off, because you can use your guidelines to place features even as they shift in perspective.
I keep a sketchbook dedicated entirely to faces. My children model for me while they watch cartoons.
My husband poses during football commercials. I draw strangers in coffee shops, their faces captured in the five minutes before my latte gets cold.
Every single drawing teaches me something new about how light falls on a cheekbone, how a smile changes the shape of an eye, how a person's age and life experience writes itself into the lines of their face.
Common Mistakes and How to Fix Them
I have made every mistake in the portrait-drawing book, often more than once. Let me save you some of the heartache.
Eyes placed too high. This is the most common mistake I see in beginner portraits, and it was my nemesis for years.
We instinctively place the eyes nearer the top of the head because that is where we perceive them to be.
But the eyes are exactly in the middle. Draw that horizontal guideline before you do anything else.
Trust the measurement, not your instinct. Your instinct is lying to you.
Mouth too small. Beginners often draw mouths that are dainty and tiny because they are afraid of overwhelming the face.
But the mouth is wider than you think. The corners should align roughly with the center of each eye.
If your subject looks like they have a tiny doll mouth in the middle of a real face, widen it.
I promise it will look better.
Nose too dark or outlined. The nose does not have an outline. It has soft shadows and subtle highlights.
If your nose looks like a drawing of a nose rather than part of a living face, lighten your touch.
Use your kneaded eraser to soften the edges. Let the nose emerge from the face through value, not lines.
Ears placed too low or too high. Ears align with the eyes and the nose. If your portrait feels subtly wrong and you cannot figure out why, check the ears. Nine times out of ten, they are floating in the wrong position.
Hair that looks like a helmet. Hair should have volume, direction, and variation. If your hair is a single solid shape with no highlights or shadows, it looks like a wig on a mannequin.
Add a deep shadow near the scalp, pull out some highlights, and let your strokes follow the direction of growth.
Facial features floating without guidelines. Even professional portrait artists use construction lines. I still draw a light oval, a center line, and horizontal guidelines for the eyes, nose, and mouth on every single portrait I start. Do not skip this step. It is not cheating. It is architecture.
Conclusion
I kept that potato drawing of Nana Jo for years. It is probably still in a box somewhere in my mother's attic, the paper yellowed and soft at the edges.
I look back on it now with tenderness rather than frustration. That lumpy, earnest little drawing was the first step on a journey that has brought me more joy than I could have imagined on that tearful afternoon in her living room.
The face I draw of Nana Jo today looks like her. It has her eyes — warm tea with crinkled corners.
It has her nose — strong and beloved. It has the soft, knowing smile she wore when she told me that faces were both the hardest and the most wonderful thing to draw.
She passed away ten years ago last spring, but I can still bring her to life on a piece of Bristol paper with nothing but a few pencils and my memory.
That is the gift of portrait sketching. It is not about technical perfection or photorealistic accuracy.
It is about connection. It is about sitting across from someone — or holding them in your memory — and saying, "I see you.
I see the way the light falls on your cheekbone. I see the curve of your smile.
I see who you are."
So find a face you love. Pick up a pencil. Draw an oval. Measure the halfway point with your eye or with a finger held up to your subject.
Trust the proportions. Be patient with yourself. And when you make a mistake — because you will, and that is fine — remind yourself that every wrong line is just part of learning to see.
Your grandmother was right. Faces are the hardest thing in the world to draw. But they are also the most wonderful.
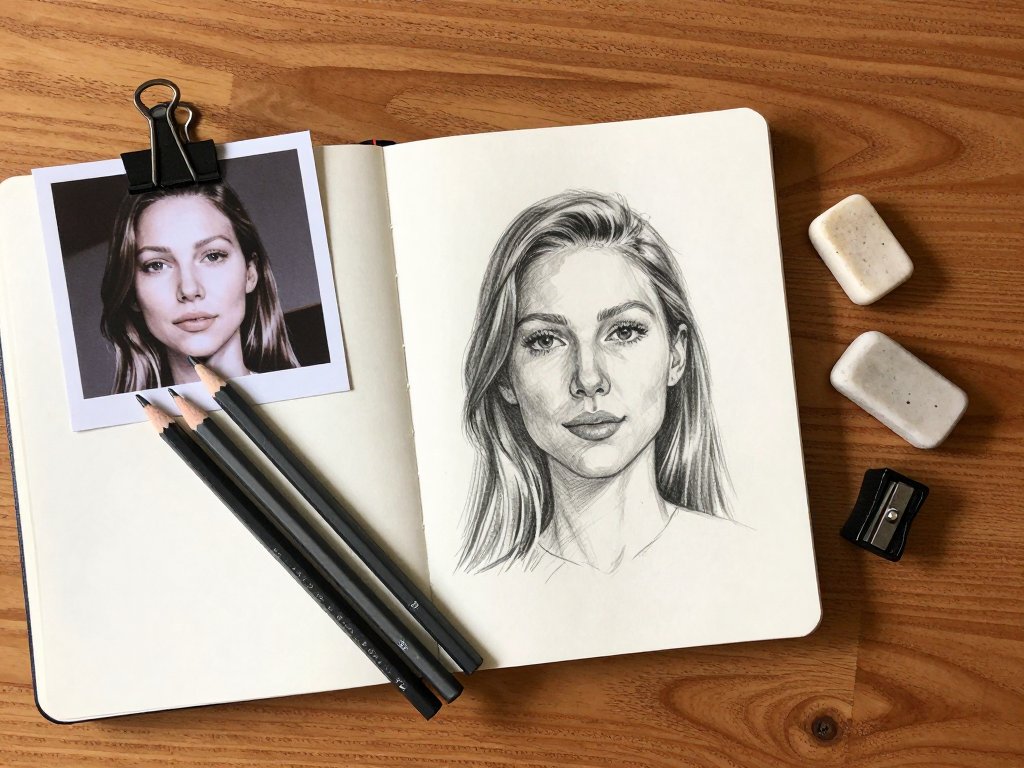
Image: A flat-lay photograph of portrait drawing supplies arranged on a light wooden table. A smooth Bristol sketchbook lies open to a page showing a partially completed face sketch.
Scattered around the sketchbook are several drawing pencils: a 2H, an HB, a 2B, a 4B, and a 6B, all with visible graphite tips and wood shavings nearby.
A gray kneaded eraser sits beside a white vinyl eraser. A small black-and-white reference photo of an elderly woman's face is clipped to the edge of the sketchbook.
Soft natural light from a nearby window casts gentle shadows across the scene, creating a warm, inviting atmosphere.
The composition is clean and centered, with the pencils aligned diagonally toward the open sketchbook.