Introduction
There is a gentle rebellion happening in the ceramics world, and it is gloriously lopsided.
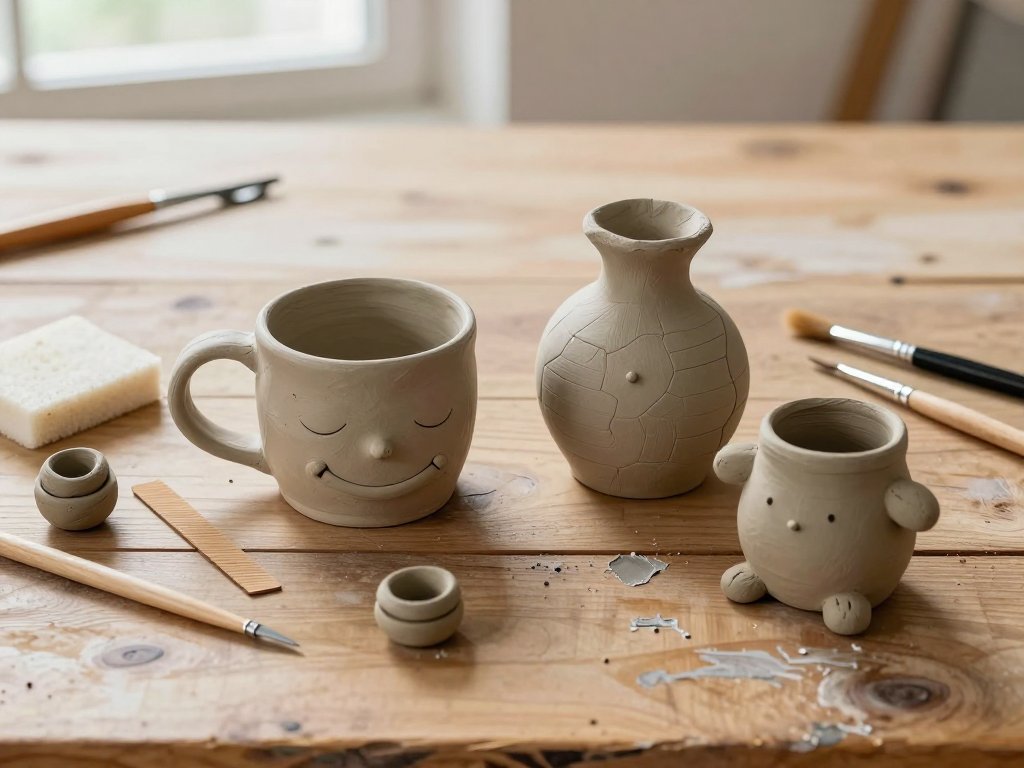
Mugs with sleepy faces and vases that tilt like curious birds; this is kooky pottery, and it has charmed makers everywhere.
You need no wheel, no studio, and no prior art class to join in.
Everything here begins with your hands, a little clay, and the willingness to be imperfect on purpose.
What Is Kooky Pottery?
Kooky pottery is hand-built ceramics that celebrate character over precision: wonky mugs whose handles wave like tails, lumpy vases with faces peeking over their shoulders.
The so-called ugly-cute aesthetic sits at the heart of the trend. Creatures that look mildly confused, pots that grin, teapots with eyebrows.
On social media, this wave has become a beloved style of its own.
People do not treasure these pieces because they are flawless; they treasure them because they seem to look back at you.
Why It Resonates
Kooky pottery offers something increasingly rare: permission to be imperfect.
In a home full of polished, mass-produced decor, a wonky handmade mug feels honest.
Its quirks record the human hand that shaped it, and that becomes part of its charm.
The making itself is quietly mindful.
Working clay pulls your attention into your palms and slows a busy day down to the shape of a small bowl.
The results also make singular gifts.
No one else owns a creature quite like yours.
A Natural Fit for Beginners
Here is the lovely secret: beginners are wonderfully suited to kooky pottery.
Charm lives in the irregularities, and beginners produce irregularities quite naturally.
You need no years of practice to make a face that feels friendly or a pot that feels alive.
The techniques in this guide are simple, ancient, and learnable in a single afternoon.
What matters is not control but curiosity.
Choosing Your Clay
Your first decision is choosing a clay, and the options are friendlier than they sound.
Low-fire earthenware is the warm, earthy clay of flowerpots and folk art.
It fires at lower temperatures and comes in rich terracotta reds and soft creams.
Mid-fire stoneware is denser and more durable, a fine choice for mugs you will use daily.
Both are kiln clays: they must be fired at high heat to become permanent ceramic.
Until that firing happens, they stay workable, and unused scraps can be reclaimed and used again.
Air-dry clay is the no-kiln beginning.
It cures at room temperature over a day or two, hardening without any heat at all.
It suits first experiments, and finished pieces can be sealed with acrylic varnish.
How to choose between the paths?
If a community studio or class near you offers firing, kiln clay rewards you with lasting, food-safe pieces.
If not, air-dry clay lets you begin tonight with nothing more than a single trip to the craft store.
For a first playful creature, either path is a good one.
Tools of the Gentle Trade
You need remarkably little to begin, and nothing extravagant.
A basic kit will carry you through every project in this guide:
- A needle tool, for scoring, carving, and fine details.
- A wooden knife or rib, for shaping walls and smoothing surfaces.
- A small sponge, kept damp, for softening edges and wiping seams.
- A scoring tool or an old fork, for roughening clay before joins.
- A small paintbrush, for applying slip.
- A wire cutter, for slicing clean portions from a block of clay.
- A rolling pin and two guide sticks, for rolling even slabs.
Add a bowl of water, a cloth for your lap, and a table that does not mind a little mess.
Kitchen finds stand in admirably: a chopstick for scoring, a butter knife for trimming.
This small set is enough for years of small projects.
The Pinch Pot Method
The pinch pot is the oldest pottery technique and the perfect first lesson.
One ball of clay becomes a cup, a creature, or the beginning of something stranger.
Work the Clay First
Begin by kneading, or wedging, your clay until it is smooth and springy.
This removes air pockets that could cause trouble later and warms the clay to your hands.
Form a ball about the size of a tangerine, with no cracks on its surface.
Open and Shape
- Press your thumb into the center of the ball, stopping short of the bottom.
- Rotate the ball slowly as you pinch the walls between thumb and fingers.
- Squeeze gently and evenly, turning the pot a little with every pinch.
- Work outward from the bottom so the walls stay an even thickness, about the width of your little finger.
- If the rim thickens, pinch it between thumb and forefinger while turning.
- Keep going until the pot feels light and rings softly when you tap it.
The rhythm matters more than the result: turn, pinch, turn, pinch.
Gentle, even squeezing lets the walls rise without collapsing.
Smooth and Refine
When the shape pleases you, smooth the surface with a damp finger or sponge.
Tap the base gently on the table to give the pot a flat, stable bottom.
Do not chase perfection here.
A pinch pot that leans slightly has already found its personality.
Coil Building
Coil building lets you grow taller, curvier forms by stacking ropes of clay; it is how sculptural vases and creature bodies are born.
Roll Even Coils
On a clean surface, roll a piece of clay into a long snake with flat, open hands.
Roll from the center outward, letting your hands travel toward the ends.
Aim for ropes as thick as your finger, and keep the finished coils covered so they do not dry out.
Stack with Score and Slip
- Begin with a small base disc or the base of a pinch pot.
- Lay your first coil along the edge of the base.
- Score both surfaces of the join with a fork or needle tool until they are rough.
- Brush slip over the scored area; slip is simply clay stirred with water to the consistency of cream.
- Press the coil firmly into place, then blend the seam inside and out with a finger or rib.
- Add the next coil, staggering the seam points so the walls stay strong.
Scoring and slipping is how clay pieces stay together.
The roughened surfaces grip the slip like glue, and blending welds the parts into a single wall.
Skip this step and your pot will part ways with itself as it dries.
Shape as You Rise
As the walls grow, you can gently guide the silhouette.
Press from inside to swell a belly, or from outside to narrow a neck.
Let the form lean if it wants to; you are building a character, not a machine part.
Slab Building Basics
Slab building works with flat sheets of clay, perfect for trays, boxes, and angular vases.
Roll an Even Slab
- Place two guide sticks on your work surface, parallel to each other.
- Flatten a ball of clay between them with the palm of your hand.
- Roll the pin across both sticks, letting them set the thickness for you.
- Roll in several directions, turning the slab, until the pin rides smoothly on the sticks.
- Lift the slab onto a board with care, supporting it fully so it does not stretch.
Guide sticks guarantee uniform thickness without any measuring.
Cut and Join
- Draw your shape on the slab with a needle tool, then cut it out.
- Keep the cut edges slightly beveled so the joins have more surface to grip.
- Score and slip every edge that will meet another.
- Press the pieces together and blend the seams inside and out.
Fresh slabs are floppy, so join them while they are still supple.
Support upright walls with a rolled newspaper or your fingers until they firm up.
Adding Personality: Faces and Features
Now the real fun begins: the face. A few small bumps become a personality in minutes.
Eyes, Smiles, and Expressions
Roll two tiny balls of clay for eyes and press them gently into the surface.
For a closed, sleepy eye, press a curved line with a needle tool or the edge of a wooden knife.
Carve a smile as a simple arc, or pinch a small ball of clay into a nose.
Ears, horns, and little feet all begin as small rolled or pinched shapes.
The Golden Rule of Attachments
Always score and slip anything you attach, exactly as you did with your coils.
Then blend the base of each feature so it melts into the wall.
A feature pressed onto dry, unscored clay will fall off as the piece dries or fires.
Let the Clay Speak
Set your piece down and look at it from across the table.
Does it want a worried brow, a tiny fang, an extra ear?
Let the piece tell you what it wants to be; half the joy is in the conversation.
Lean into asymmetry: one eye higher than the other, a crooked smile, an ear that droops.
These small imbalances are what make a face feel alive rather than manufactured.
Surface Decoration Before Firing
Before clay goes to the kiln, or dries for good, its surface is an open canvas of carving, pressed texture, and underglaze.
Carving into Leather-Hard Clay
Wait until the clay reaches the leather-hard stage, firm enough to hold its shape but still damp.
At this point a needle tool or wooden knife cuts clean lines that neither drag nor crumble.
You can scratch in hair, scales, tiny flowers, or a swirling doodle around the belly of a vase.
Pressing Texture
Texture is the fastest way to make a piece look considered.
Press lace, leaves, coins, or handmade stamps into soft or leather-hard clay.
For a deeper toolbox of ideas, explore our guide to textured pottery techniques, which walks through stamping and carving in generous detail.
Painting with Underglaze
Underglaze is color for clay, painted on before the final firing.
It behaves much like watercolor and fires to a soft, matte richness beneath a clear glaze.
Apply it to leather-hard or bone-dry pieces, letting each coat dry between layers.
Leave some clay bare.
Exposed earthenware or stoneware grounds the piece and lets your textures breathe.
Drying and Finishing
How a piece dries decides how it survives, so slow and steady wins here.
Dry Slowly, Under Loose Plastic
Cover your finished piece loosely with plastic wrap or a plastic bag.
This slows evaporation and gives the clay time to release moisture evenly.
Drying too fast is the great cause of cracks, especially at rims and joins.
Leather-Hard and Bone-Dry
Leather-hard clay is firm, cool, and no longer sticky; it holds detail and carves cleanly.
Bone-dry clay has lost nearly all its moisture; it feels room temperature, looks lighter, and is quite fragile.
Kiln clay must be completely bone-dry before it meets any heat.
Firing Kiln Clay
Kiln clay passes through two firings: bisque and glaze.
The bisque firing hardens the piece into a porous, chalky ceramic ready to accept glaze.
After glazing, a second, hotter firing melts the glaze into a glassy, often food-safe surface.
If you have no kiln, a community studio or class can help.
Call or visit and ask simply, "Can I fire my pieces here?"
Most studios welcome outside work for a modest fee; ask which clays they accept and when pieces will be ready.
Many also offer glazing sessions for your bisque ware.
Finishing Air-Dry Clay
Air-dry pieces need no kiln, but they do appreciate protection.
Seal them with two or three coats of acrylic varnish or a soft wax once they are fully dry.
This deepens color and guards against dust and wear.
Treat air-dry treasures as decorative pieces and keep them clear of standing water.
Three Beginner Projects
Ready to make something? Here are three gentle first projects, each built on the techniques above.
Project One: A Pinch-Pot Creature
Begin with a pinch pot, but do not stop at a bowl. Turn it on its side and it becomes a body, ready for a small pinched head and two bead eyes.
Add little feet, ears, or whatever horns occur to you, scoring and slipping every join. Smooth each seam until the creature looks born rather than assembled.
Let it rest on its feet, or curl it into a sleeping lump; you decide its mood. Children adore these little beings, which is why they make perfect first gifts.
Set yours on a windowsill and notice how often you smile at it. That is the whole point.
Project Two: A Coil Personality Vase
A coil-built vase is really a portrait in disguise. Roll a flat base disc, then stack coils upward, blending each seam as you rise.
Widen the belly for a generous creature, then narrow a neck that tilts to one side. Build slowly and let the silhouette surprise you.
Once the form pleases you, give it a face at the leather-hard stage with pressed eyes and a carved smile. Dry it slowly, then fire or seal it.
Stand a few dried flowers in its crooked neck. Even if the vase leans, it will hold its bouquet with quiet dignity.
Project Three: A Slab Catch-All Tray
This tray corrals keys, rings, and small treasures by the front door. Roll a slab between your guide sticks and cut a soft oval or leaf shape.
Cut a thin strip for the rim, score and slip it into place, and blend the seam until the wall rises smoothly from the floor.
Press lace or a carved stamp into the center of the tray, or stamp a simple face and let a carved smile run across the clay.
At the leather-hard stage, clean the edges with a damp sponge and dry slowly. Give the finished tray as a housewarming gift, or keep it where you will see it daily.
Troubleshooting: Friendly Fixes
Kooky pottery forgives almost everything, but a few hiccups deserve understanding.
Cracks
Cracks usually mean drying happened too fast, or joins were too dry or too thin.
Slow the drying with looser plastic, and keep joins moist while you work.
A small crack in leather-hard clay can be filled with slip and smoothed over.
And a hairline that survives is often just another wrinkle in the character's face.
Pieces That Detach
If a nose or ear falls off, the join likely lacked slip or scoring.
While the clay is still damp, roughen both faces, apply slip, and press them firmly back together.
Once dry or fired, the join can never be invisible again.
Score and slip generously, and this trouble rarely repeats itself.
Warping
Warping comes mostly from uneven wall thickness, since thin areas dry and shrink faster.
Keep walls consistent, and let pieces rest on a flat surface as they dry.
Rotate them occasionally so no single side bears all the weight.
Remember that a gentle wobble can become the piece's signature lean.
Fingerprints and Ding Marks
Every beginner leaves fingerprints; consider them evidence of honest work.
For a smoother surface, wipe the piece with a damp sponge once it is leather-hard.
Small dings can be pressed back into shape while damp, or simply left as texture.
In kooky pottery, a wobble or dent is not a flaw; it is where the personality moved in.
Conclusion: Joy Over Perfection
Your first kooky piece is not about mastery; it is about joy.
It is about ten quiet minutes of turning clay in your hands while the kettle boils.
Choose the smallest, silliest idea you can imagine, and make it slowly.
A little pinch-pot creature with lopsided eyes is a wonderful place to start.
Make one for yourself, then make one for someone you love.
Hand-made gifts carry a warmth that no store-bought thing can imitate.
The clay will wobble, the smile will skew, and the creature will be perfect anyway.
