Introduction
There is a moment in pottery that never stops being a small astonishment. A pot sits under a smooth, sober coat of dark slip — flat, grey, unremarkable — and then you drag a needle tool across it.
A pale line appears, bright as cut chalk. What you have just done is draw on a pot. Sgraffito is the most immediate decoration technique in ceramics, and it asks almost nothing to begin.
No glaze chemistry. No brush control built over years of practice. A pot, a layer of contrasting slip, a small tool, and a patient hour at the kitchen table.
That last part is the real cost. Sgraffito is not difficult, but it is unhurried. It rewards the person who waits for the clay to reach the right state rather than the person who rushes the pot.
This guide walks through the meaning, the timing, the tools, the carving, and the firing. It assumes you have never scratched a line into a pot before.
If you work in nap-sized stretches of time, this is a kind craft for it. Nearly all of the work happens in one or two quiet windows, and the pot waits happily for you in between.
What Sgraffito Means, and Where It Came From
The word comes from the Italian sgraffiare, to scratch. The same root survives in English as a scratch-away technique used in plaster and in fresco work as well.
In ceramics it names a simple act: a layer of one colour is scratched through to expose the colour underneath it. The line is not painted on. It is uncovered.
The technique is old and very wide-ranging. It appears in Italian Renaissance maiolica, where potters scratched through slip before glazing the piece.
Korean buncheong ware carries incised and inlaid white-slip ornament on grey-bodied stoneware, a tradition whose restraint still looks astonishingly modern to the eye.
Potters in Japan worked in closely related traditions — mishima is the name most commonly used there for inlaid slip patterns, a method that grew out of Korean inlay.
Across the early Islamic world, potters scratched white slip over darker bodies to make bold graphic wares. Nobody owns this technique. It appeared wherever people found two colours of clay.
What unites these traditions is not a shared style. It is a shared method: layer, contrast, carve. That is the whole of it.
The core principle: a contrasting layer
Everything in sgraffito depends on a difference between two layers. Usually a coloured slip sits over a paler body clay. The reverse works just as well.
What matters is value — how light or how dark each layer reads — rather than hue. A dark line in a pale field is legible from across a room.
Two colours of similar value will dissolve into each other no matter how lovely they are alone. A soft grey slip over pale clay is beautiful wet and nearly invisible fired.
So choose deliberately. You want a real step between dark and light. That step is the entire drawing.
The Three Timing Windows
If you take one thing from this article, take this. Sgraffito is governed by moisture, and there are exactly three states the clay can be in when you pick up a tool.
Only one of them is easy. The other two will make you think you are bad at this, when all that has happened is that you carved too early or too late.
Too wet: the smearing window
On freshly formed clay, the slip layer is still buttery. The tool sinks in and pushes the slip sideways instead of lifting it cleanly away.
The line blurs. Its edges burr up into soft ridges. Sometimes the groove half-fills itself again as the slick slip slumps inward.
You cannot rescue a wet line by pressing harder — that only collapses the walls further. Cover the pot and wait.
Leather-hard: the crisp window
Leather-hard is the state you are waiting for. The clay has stiffened enough to hold its form, but it still carries a little moisture.
The slip on the surface feels dry to a fingertip, while the body beneath stays faintly cool. The tool now cuts rather than plows.
Shavings curl away from the groove the way a paring curls off a bar of soap. The line edges stay sharp and the channel stays open.
This window is generous. Wrapped loosely in plastic, a leather-hard pot may hold its state for a day or more.
Bone dry: the chipping window
Bone dry means all the water has gone. The clay is pale, light in the hand, and no longer cool against your cheek.
Carving now produces brittle crumbs and hard chips. The slip has become a dry skin that lifts at the line's edges in jagged flakes.
The body underneath can spall too — small shallow flakes shear off the surface, and they cannot be pressed back down. Spalling does not repair.
If your pot has gone past leather-hard, do not carve it. Recycle it, or bisque it plain and decorate it with paint instead.
How to test with a fingernail
The test takes a second. Press a thumbnail gently into the clay near the foot, where nobody will look.
On wet clay your nail sinks in and leaves a deep, shiny print. Wait longer.
On leather-hard clay the nail leaves only a shallow dent, and the surface feels cool and firm. This is your moment — start carving.
On bone-dry clay the thumbnail barely marks it, if at all, and the surface feels neither cool nor damp. Too late for the tool.
Spend one afternoon doing this on scraps before you touch a real pot. The habit becomes instinctive quickly, and it is the single skill separating a good sgraffito piece from a frustrating one.
Preparing the Surface
Begin with a form you can carve comfortably. Almost anything will work, but shape changes the difficulty a great deal.
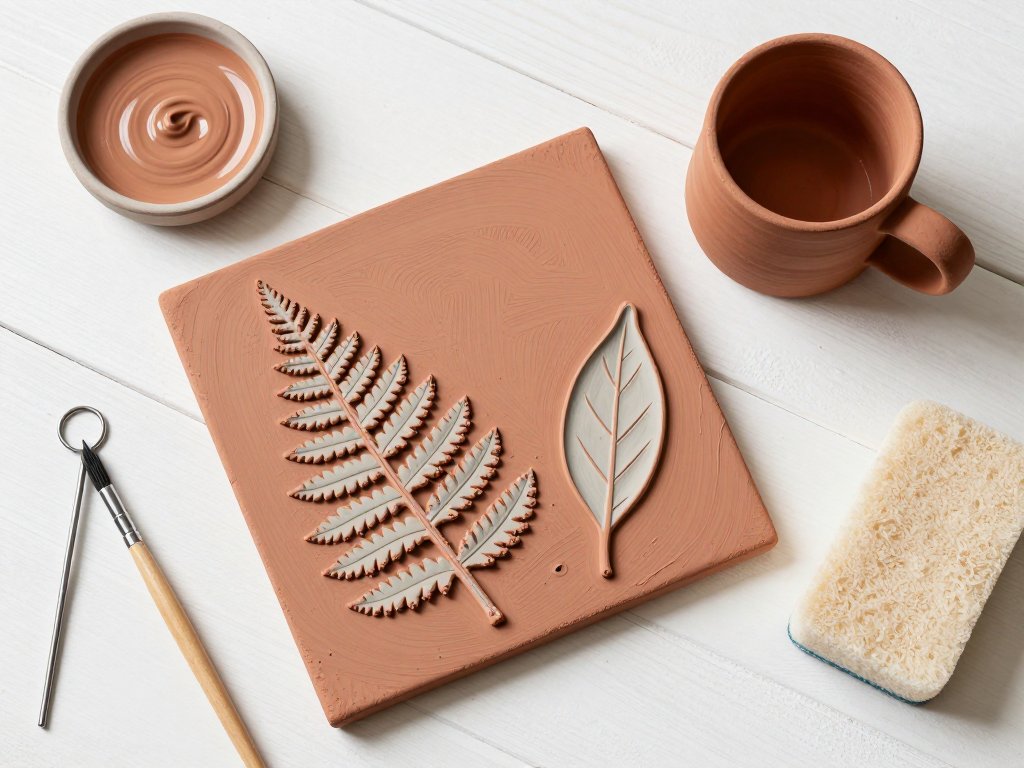
A flat slab tile is the easiest first project, and I would gently insist on it. Every part of the design is visible at once, and a flat tile also fires safely.
If you have never rolled a slab, the same rolling and compression method used in slab pottery gives you an even, well-compressed sheet — the ideal blank for a first sgraffito tile.
A hand-built mug or a wheel-thrown bowl is the natural next step. Both are rounder and less forgiving, and both look wonderful once lines wrap around them.
Smooth the surface while the clay is still damp. Run a wooden rib over it and sponge away ridges, lumps, and throwing lines.
Every bump in the body shows up amplified in the carved line. A surface that wobbles gently produces a groove that wobbles gently.
Then let the piece settle toward leather-hard inside a loose plastic bag, away from draughts and radiators. Half an hour to several hours, depending on the weather.
One quiet rule: use a slip whose shrinkage matches your body clay. Slip made from your own clay body's dry powder is the safest choice, and also the cheapest.
Applying Slip: Thin Coats, Even Layers
Slip is clay thinned with water to a thick cream. It is the layer you will carve through, so it deserves a little care.
You can buy coloured slip ready-made, or mix your own by adding body stain or oxide to clay powder. A few spoonfuls of stain in a jam jar of slip goes a long way.
Beginners need two to three thin coats, letting each dry to a matte finish before brushing the next. Thin coats dry without cracking; one heavy coat does not.
Brush in the same direction with overlapping strokes. Scrubbing back and forth lifts the layer you just laid and leaves ridges for the tool to catch on.
Consistent brushing also lets you read your coverage. Hold the pot up to a window and thin patches will glow through.
An even coat is not tidiness for its own sake. You are carving only a millimeter or two deep, so a coat that varies in thickness will cut through in one place and barely dent the slip in another.
Dry the coats gently. No hairdryer, no sunny windowsill, no fan. Fast surface drying is what makes slip peel, craze, and flake.
A brushable underglaze can stand in for slip as the top layer. It behaves more like paint, dries without flaking, and is easier to control — though the tool cuts it with a slightly grainier edge.
Whichever you use, test it on a scrap tile first. Colours shift in the kiln, sometimes dramatically, and value is the thing to watch.
The Tools, and What They Do to a Line
You do not need a drawer of equipment. Four tools will carry a whole first piece, and three of them may already be in your kitchen.
- Loop tool — a small wire loop on a handle. It removes a wide ribbon of slip and cuts a clean U-shaped channel. The workhorse for bold lines and filled-in areas.
- Needle tool — a fine steel point. It draws the thinnest line and behaves like a pencil. Best for detail, hatched texture, and outlines you mean to widen later.
- Sgraffito wire loop — a narrower, shallower version of the loop tool, made for this technique. It leaves crisp channels at a predictable depth.
- Dull pencil — genuinely useful. A worn, rounded point makes a soft, slightly irregular line that is forgiving of an unsteady hand.
- Wooden rib — not for carving. It compresses the clay and smooths the surface before you begin.
- Fine brush — for clearing crumbs out of the channels as you work. A clean line is a visible line.
- Soft brush — for a final dust-off before the bisque fire.
Worth keeping nearby as well: a bamboo skewer for tight corners, and an old gift card for scraping back a mishima surface.
Line width follows tool width, and that is the real design decision here. A needle gives you a hairline; a loop gives you a drawn stroke several millimeters wide.
Pick one tool for your main outlines and stay with it. Mixing widths at random makes the eye read a drawing as accidental, even when the design itself is good.
Check your tips for burrs before you start. A slightly bent needle point tears the slip instead of slicing it, and it leaves a fuzzy edge on every single line.
Transferring a Design onto the Clay
You can draw straight onto the slip with a needle, and many potters do. Freehand is the most immediate route and the most alive.
It helps to sketch the motif on paper first, several times over. Not to copy it exactly, but to teach your hand the moves before they become permanent.
For a repeatable design, use newsprint or tracing paper. Draw the motif at full size, lay the paper on the slip, and go over the drawing with a ballpoint pen.
The pressure leaves a faint indentation in the slip. Lift the paper and carve over the mark. Nobody will ever see the guide line — it disappears under the tool.
A paper template cut from cardstock or mylar is the fastest way to get a repeated shape right. Hold it firmly and draw around it, then lift and reposition.
A stencil is simply a template with the inside removed. Use yours to mark outlines with a needle rather than dusting colour through, which leaves a soft edge.
Then think carefully about the curve. On a flat tile, the eye takes in the whole composition at once, like a page in a book.
On a rounded pot, the viewer sees only a section at a time. So enlarge every element, keep motifs tall rather than wide, and repeat them around the circumference.
A strip of paper wrapped around the pot's belly is a fine planning aid: mark your repeats on the paper, unroll it, and transfer the marks to the clay.
Above all, design boldly. Fine lines and small motifs vanish at arm's length on a curved surface.
Carving Technique, Step by Step
At leather-hard, with your design marked in, this is the sequence I follow on every piece.
- Do the fingernail test. If the clay is still tacky, walk away and cover the pot.
- Carve the main lines first — the ones carrying the drawing. Secondary detail goes in afterwards.
- Carve toward yourself. Pull the tool steadily in your own direction; never push the point away from your body.
- Hold the tool at a shallow angle, roughly twenty to thirty degrees. Think of slicing, not plowing.
- Use light repeated passes instead of one deep gouge. The first pass marks the line; later passes deepen and widen it.
- Clear the crumbs with a soft brush as you go. Piles of slip grit make the tool chatter and jump.
- Keep the channel widths consistent. Count your passes per line and aim for the same count everywhere.
- Work in sections, and rotate the pot on a banding wheel or lazy Susan rather than twisting your whole body.
- Stop while the design still looks relaxed. Overworking a line is the most common way to ruin a good one.
Depth matters for reasons beyond looks. A deep channel filled with glaze becomes a dark graphic line; a shallow one disappears entirely under the glaze.
But a very deep carve weakens a curved wall. On a mug, keep the cuts shallow and let the two-tone contrast do the work.
Let the finished piece dry slowly and completely before it goes anywhere near a kiln. Rushing that drying re-opens every cut edge you made.
Design Ideas for a First Sgraffito Piece
Choose a motif that looks better when the hand wobbles slightly. Botanical line work is the classic for exactly this reason.
- Botanical lines — a fern frond, a wheat stalk, one long leaf, an olive branch. Gentle curves are forgiving and read beautifully carved.
- Geometric repeats — stripes, chevrons, dotted bands, a simple grid. Excellent practice, and very satisfying around a rim.
- Folk-art birds — a plump, simple bird silhouette with hatching inside the wing. Charming, and the folk style absorbs imperfection.
- A monogram — one letter inside a carved border. A lovely personal gift on a mug or a set of tiles.
- Seasonal motifs — a few autumn leaves, a simple pumpkin, a tulip, a snowflake. Easy to draw and always in season somewhere.
- Negative space — carve the background away entirely and let the shape stand proud. Decide early which is figure and which is ground.
Hatching is your tonal tool. Crossing fine needle lines close together reads as a mid-tone from across the room, exactly like pen and ink.
For a first tile, pick two elements and repeat them. Restraint reads as confidence, and it also means far fewer lines to get wrong.
Firing and Glazing Without Losing the Lines
First the piece goes through a bisque fire, typically to cone 04. This hardens the clay and the slip without melting anything.
Then comes the glaze, and here is where beginners lose a drawing they were proud of. Glaze is glass, and glass fills the grooves you just carved.
A thick glaze pools in every channel, rounding off the sharp edges and softening the contrast. The design goes quiet and slightly foggy under all that shine.
The fix is a thin coat of clear glaze. Clear, so both layers still show through; thin, so the carved lines stay crisp.
The other approach is a wipe-back. Glaze the piece generously, let it sit a moment, then wipe the raised surface with a damp sponge so glaze stays only in the recessed lines.
Wipe-back gives a matte, tactile surface with glossy carved channels — a lovely look, but it can leave flat areas patchy. Practice it on a tile first.
Some potters leave the exterior entirely unglazed and glaze only the interior of anything that will hold food. Unglazed slip-carved clay has a dry, chalky beauty that suits tiles and sculptural pieces.
Bear in mind that anything food-safe needs a proper liner glaze on food surfaces. And remember that the fired colours will differ from the wet ones you see now.
Troubleshooting: When the Lines Go Wrong
Spalling and chipping mean you carved too dry. The slip lifts in flakes and the body underneath shears away. There is no fix; on the next piece, carve earlier.
Ragged, smeared lines mean you carved too wet. The slip pushed sideways instead of lifting. Wait for leather-hard, or let the pot firm up under a light cover.
Slip flaking off in the kiln is almost always too thick a coat, or a slip that shrinks differently from the body. Use two or three thin coats, and mix slip from the same clay body.
Patchy colour after firing means uneven slip thickness. Variegated slip is fine if you like it; if you want an even field, brush more consistent coats.
Glaze hiding the carving comes from too much glaze applied too thickly. Thin it, dip faster, or wipe back before the glaze fire.
The design simply vanishing is nearly always a value problem. The two layers were too close in tone. Test your slip and your body together on a scrap tile before committing to a pot.
Cracks along carved lines usually mean the cuts ran too deep for the wall thickness. Shallow and confident beats deep and cautious.
Keep every failed tile. They are firing records — honest evidence of what your clay and your slip actually do in the kiln.
Two Variations Worth Trying
Once the basic technique feels familiar, two related methods open up a great deal of range. Both are beginner-friendly in different ways.
Mishima-style inlay
In mishima, you reverse the usual order. Carve your lines into the bare leather-hard body first, then press contrasting slip into the grooves.
Let the filled lines dry back to leather-hard, then scrape the whole surface flat with a metal kidney or a stiff rib.
The result is an inlaid line sitting flush with the surface — no groove at all, crisp as a printed pattern. It is superb on flat tiles.
Pale slip on a grey stoneware body is the traditional pairing, and it looks wonderfully quiet.
Sgraffito with underglaze painting
The second variation layers colour underneath the carving. Paint an underglaze field first, add slip, then carve — so each groove reveals coloured underglaze rather than bare clay.
You can also paint underglaze into the carved channels after carving, filling the lines with colour the way an illuminated letter is filled.
Both routes reward planning, since the colour decisions happen before and after the tool rather than during. Stay with three or four colours.
A Patient Afternoon, and Three Small Tiles
Sgraffito rewards two things: a steady hand and an unhurried afternoon. Neither arrives on the first attempt.
So before you commit to a mug — with its foot, its curve, its handle — make three small tiles. Fifteen centimeters square is plenty.
Use the first tile to test the timing, pressing your thumbnail into the clay until you trust your own judgment.
Use the second to test your slip, its thickness and its tone, brushed in thin coats and carved when it feels right.
Use the third to test the design itself. When all three come out of the bisque fire, you will have taught yourself the parts no article can teach you.
Tiles are cheap to fire, forgiving to handle, and the safest thing to put into a kiln. Nothing is wasted.
Then make the mug. Then carve a bowl. The first bright line you pull out of a dark slip will still surprise you every time.
