Introduction
My grandmother had a sugar maple at the edge of her yard, and every October I would sit on the porch steps with a chewed pencil and try to draw it. My attempts never looked like that tree. They looked like a lollipop on a stick.
It took me years to understand what I was doing wrong. I wasn't drawing badly. I was drawing the wrong thing entirely. I was tracing the outline of the tree instead of building its structure.
This guide is the lesson I wish someone had handed me back then. We will look at trunk structure, branch forks, the three basic silhouettes, foliage as masses, bark texture, line weight, and the particular pleasure of autumn color.
You do not need talent for this. You need a pencil, a piece of paper with some tooth to it, and ten quiet minutes. Let's begin with the single mental shift that changes everything.
Why Beginners Draw Lollipop Trees
Almost every beginner draws a tree as an outline. You look at the tree, you see its outer edge, and your pencil traces that edge. A trunk goes up, then a cloud shape sits on top.
The problem is that a tree has no real outline. A tree is a collection of branches and leaves with light and sky showing through everywhere. Its edge is soft, ragged, and full of holes.
When you draw only the silhouette, you get a solid shape with nothing inside it. That is why it reads as a lollipop. It has mass but no structure, and our eyes instantly know something is missing.
There is one mental shift that fixes this, and it is simple to say and strange to do. Draw the spaces between the branches, not the branches themselves.
Look at your tree again. Notice the small triangles of sky poking through the leaves. Notice the dark gaps between limbs. Those negative shapes are what your eye actually reads as "tree."
When you draw the gaps, the branches appear automatically, the way a coastline appears when you draw the sea. The tree builds itself around the holes you leave.
Start With the Skeleton
Before a single leaf goes on the page, place the bones. Every believable tree sketch begins as a trunk and a handful of branches, and only then does foliage arrive.
Draw through the leaves. Pretend the foliage is transparent for the first five minutes. This is the most useful habit a beginner can build.
Taper, Not Tube
A trunk is never a cylinder. It is fat at the base and narrows as it climbs, often in a gentle curve rather than a straight line. Draw two lines that converge slightly as they rise.
Add a gentle lean. Real trunks almost never stand perfectly vertical. A slight S-curve near the base makes the tree feel rooted and alive rather than like a fence post.
Use a 2B pencil for this stage. It is soft enough to be expressive but hard enough to stay crisp, and it erases cleanly when you change your mind.
How a Tree Actually Divides
Here is a rule that will transform your trees. Branches divide, they do not sprout sideways off a pole. A trunk reaches a certain height, then forks into two, or sometimes three.
Each of those branches travels upward, then forks again. Repeat this pattern and you have a tree. It is fractal, which is a fancy way of saying "small branches look like big branches."
Watch the angles. Fork angles are usually narrow near the top of the tree and wider lower down. A branch that shoots out at a perfect right angle looks wrong to almost everyone.
Never draw a branch that grows perfectly horizontal and then stops. Every limb should reach toward light, which means upward, with a slight sweep.
Connecting to the Trunk
The most common structural error is a branch that floats beside the trunk instead of growing out of it. Fix this by drawing the fork itself, not two separate lines.
Start at the trunk, let your line swell slightly where the branch leaves, then narrow as it travels out. That little swelling is the shoulder of the branch, and it tells the eye the two are one piece.
Draw the hidden continuation of a branch a little way inside the trunk if you like. It vanishes under the bark, and that small overlap makes the joint feel solid.
The Three Basic Silhouettes
Most trees you will want to sketch fall into three families of shape. Learning them gives you a starting block for any species you meet.
Round or Deciduous
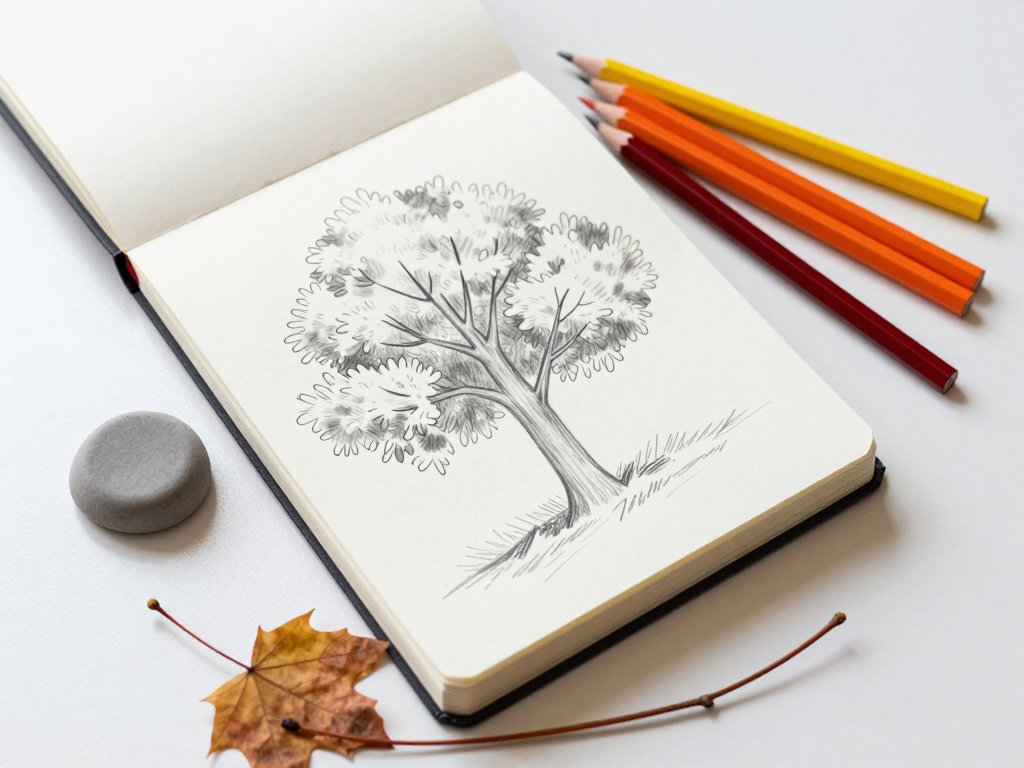
Think of a maple, an oak, or an elm. The overall mass is roughly circular, sometimes wider than it is tall, like a broad umbrella.
The interior is open. Light comes through in patches, so you break the circle into several overlapping clumps rather than one smooth dome. This is where most beginners over-simplify.
An oak is a good first subject because its clumps are distinct and slightly blobby. A maple is trickier, with a rounder crown that needs more negative space.
Conical or Evergreen
A spruce, a fir, or a cedar reads as a triangle. The trunk is often hidden, and the branches droop in layered tiers from top to bottom.
Draw evergreens with downward strokes. Sketch the silhouette first, then carve horizontal notches along the edges to suggest the hanging branch tips.
Notice how different the drawing feels. An evergreen is dense and dark, so you press harder and leave fewer gaps. It is the opposite of the open deciduous tree.
Weeping
A weeping willow or a weeping cherry is drawn with gravity in mind. The mass still has a crown, but every mark falls downward in long, trailing curves.
Use long vertical lines and let them overlap. The trunk usually shows to a good height before the curtain of leaves begins its descent.
Weeping trees are forgiving to draw because the leaves hide so much structure. They are also wonderful practice for learning rhythm in your stroke.
Foliage as Masses, Not Leaves
This is where most sketches either come alive or fall flat. You cannot draw ten thousand leaves, and you should not try. Draw clumps instead.
Think of each clump as a soft pillow of color. A big tree might have five or six of these pillows, some in front of the trunk and some behind it.
Give every mass a light side and a shadow side. The light comes from one direction, so decide early where the sun is and stay loyal to that decision.
Feed your edges with variety. Let some clumps be round, some jagged, some feathery. A uniform fuzzy edge is the tell of a beginner, and it reads as cotton candy.
Then leave gaps. Poke small irregular holes through your masses so the paper shows through. Those bright specks are sky, and they are what makes a tree breathe.
Resist the urge to fill every hole with a leaf. The empty paper is doing work for you, and it is often the most beautiful part of the drawing.
Bark Texture: Suggest, Don't Copy
You will never draw every crack in a trunk, and you don't need to. Bark is a texture, and textures are best suggested with a repeating stroke that your eye can finish on its own.
The key is matching the direction and rhythm of your marks to the species in front of you. Let your pencil move the way the bark grows.
Birch
Birch is unmistakable. It has pale, smooth bark marked with short horizontal dashes and dark oval scars. Use an HB pencil and light pressure, drawing quick little sideways ticks.
Keep the trunk itself almost white, and let the paper be your highlight. Add a touch of grey on the shadow side, and your birch will appear with very few marks.
Oak
Oak bark is deeply furrowed. It runs in long vertical ridges with dark cracks between them, so use vertical strokes with a 4B pencil and a broken, jittery pressure.
Start light and deepen only the deepest fissures. Skipping the pressure in places gives you the rough, interrupted look of real oak bark.
Sycamore
Sycamore and London plane shed their bark in patches, leaving pale plates against darker older wood. Draw little irregular shapes rather than lines.
Block in the darker areas first with a 2B, then erase plate shapes out with your kneaded eraser. Lift the highlight, and the patchwork appears by itself.
Line Weight and Pressure
Your pencil can say three different things depending on how hard you press, and a good sketch uses all three within a single tree.
Press harder for the trunk, especially on the side away from the light. A dark, firm line stops the eye and tells it "this is near" or "this is heavy."
Use lighter, broken lines for the outer edges of foliage. Think of a moth's wing rather than a wall. Short light strokes suggest softness and let the edge dissolve into space.
Keep the interior clumps soft and smudgy, and save your crispest lines for the very front of the drawing. This creates depth without your having to shade anything.
Choose your pencils with intent. An HB does fine detail and light edges, a 2B handles general shading, and a 4B or 6B gives you the deep shadows under foliage. Keep them all in your hand.
Here is the truth that saves beginners from overworking. At small sizes, value beats detail every single time. If the dark and light shapes are right, no one notices the missing leaves.
Fall Foliage: Working in Color
Autumn is the season people most want to draw, and it is also the season that most often turns to mud. The fix is a limited palette and a careful order of layering.
Pick no more than five colored pencils. Something like a lemon yellow, a golden yellow, a cadmium orange, a burnt sienna, and a deep red will cover most of the season.
Lay colors down warm first, then add cool tones on top. Start with your lightest yellow as a base, since anything you put over it will show it through.
Let each layer whisper rather than shout. Light pressure, many passes, and patience. Colored pencil rewards tiny additions spread over time.
Follow the season's progression: yellow underneath, orange in the middle, red on the top and at the edges. Warm yellow lives where the sun hits, and cool reds gather in the shadowed interior.
Notice where the transitions are sharp and where they blur. A maple blaze can be almost banded, while an oak turns slowly from gold to brown with no clear edge.
Colored pencil glides beautifully over graphite, and it can also deepen it. Lay shadow in graphite first, then glaze warm color on top for foliage in shade.
The paper matters here. A paper with visible tooth holds layer after layer, while a slick sheet will just fill up. Look for a drawing paper around 120 to 150 grams.
Save your deepest reds and browns for last so you never have to lighten them. In colored pencil you can always darken, but it is hard to go the other way.
Simplifying a Real Tree
A sketch is a decision about what to leave out. Half of the skill of drawing from life is choosing what to ignore, and that freedom is what makes this fun.
Start by choosing one focal branch, the limb whose shape you find most interesting. That branch is your subject. Everything else is supporting cast.
Crop without guilt. Your pencil's job is not to record the whole tree but to capture the part that made you stop and look.
Look at your tree through a frame made of your fingers, or a small rectangle of card. This is called a viewfinder, and it forces you to pick a composition.
Rows of trees going away from you create a lovely sense of distance, and the same rules of scale that govern buildings apply here. If you want to understand why trunks get closer together as they recede, this walkthrough of One-Point Perspective Drawing for Beginners explains the thinking clearly.
Ignore the busy background. Ignore that one branch that juts awkwardly toward you. Ignore the shadow of the shed. You are making a drawing, not taking a photograph.
Ask yourself one question as you simplify: what first caught my eye? Keep that, and let everything else blur into soft clusters of tone.
A Beginner Walkthrough, Step by Step
Set aside twenty minutes and follow these six steps. If you do them in order, you cannot go far wrong.
- Block in the trunk and main fork. Draw two tapering lines for the trunk, then split them into two or three leaders near the top. Keep it light with an HB.
- Add three secondary branches. Let each one fork off your leaders with a narrow upward angle, swelling slightly where it leaves the parent limb.
- Cluster the foliage masses. Place five or six soft pillow shapes over the branches, letting some sit in front and some behind the trunk.
- Texture the trunk. Add short horizontal dashes for birch or scratchy vertical fissures for oak, and deepen only the deepest grooves with your 4B.
- Add the shadow side. Press harder on the side away from the sun across the trunk and the undersides of the foliage clumps.
- Finish with individual leaf marks at the edges. Just a handful, only along the outer silhouettes where the eye wants to linger.
Notice that the leaves come last and come few. That is the secret. The masses carry the drawing, and those last few marks simply top it off.
Common Problems and Fixes
If your sketches keep going sideways, you are almost certainly hitting one of these four snags. The good news is that each one has a simple remedy.
Foliage That Looks Like a Cloud Blob
This happens when every edge is the same soft fuzz. Break the outline into distinct clumps with clear edges between them, and poke holes through to the paper.
Vary the size of your clumps as well. One big mass, two medium ones, and several small ones always reads better than four equal circles.
Branches That Float
Your branches are not connecting to the trunk. Go back and redraw the fork as a single continuous swell from trunk to limb, and never let a branch line touch the trunk without joining it.
Trace each branch inward with your eye before you draw. If you can't find where it meets the wood, you will guess wrong every time.
Over-Detailing
You are drawing too much. Stand up, step back three paces, and look at your sketch from across the room. The problems usually reveal themselves instantly.
Try squinting until your eyes almost close. Squinting removes detail and shows only value and shape, which is exactly what your viewer sees from far away.
Muddy Autumn Color
Mud comes from too many colors layered at heavy pressure, and from mixing complements carelessly. Limit your palette and go light.
Keep your yellows clean and let orange sit beside them rather than blending into them. A bright yellow next to a warm orange sings; the same two smeared together go grey.
Ten Minutes a Day, All Season
Here is my favorite practice in the whole world, and it costs almost nothing. Choose one tree you can see from a window or pass on your daily walk.
Sketch that same tree for ten minutes a day. Not a finished drawing, just a quick study in a cheap notebook with an HB pencil.
In autumn you will watch the green fade and the gold arrive. You will see the gaps open as the leaves thin, and you will learn exactly what a tree looks like as it undresses.
By winter you will know that tree's skeleton better than any teacher could show you. You will know which branch forks first and which limb reaches the sky lightest.
By spring you will greet the buds like old friends, and your pencil will already understand the shape before your eyes do.
That is the quiet reward of this craft. Not a perfect drawing, but a relationship with a living thing, recorded ten minutes at a time in a small and ordinary book.
So sharpen your pencil, find a tree, and begin. The lollipop stage is over, and something far lovelier is waiting on the page.