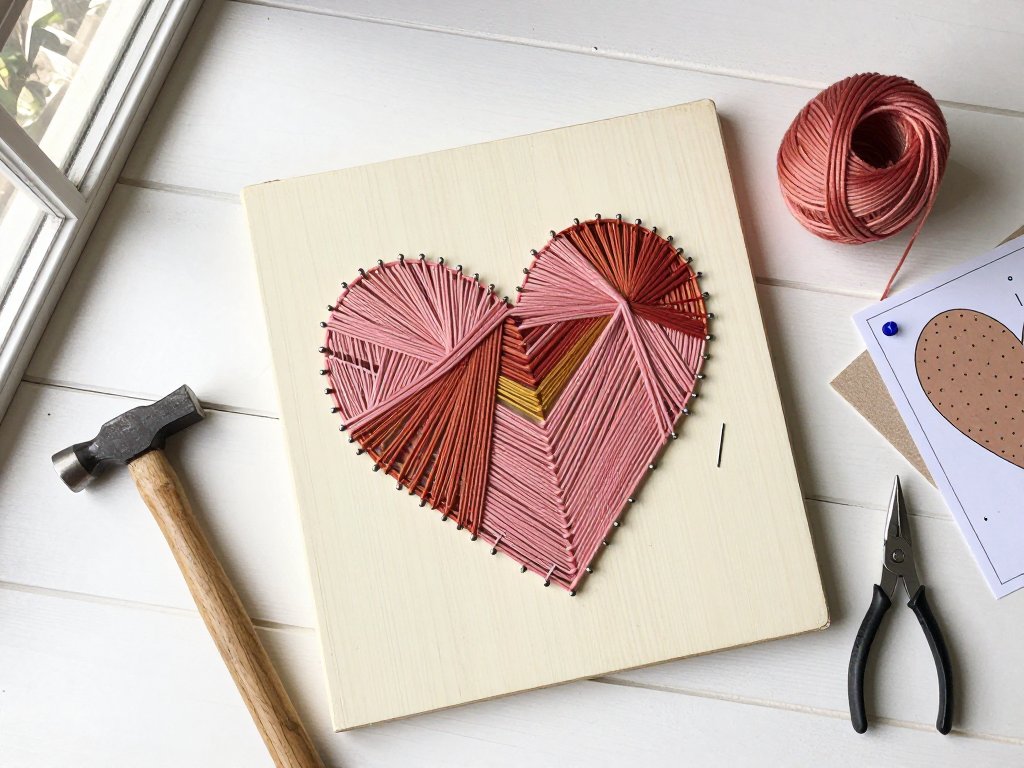
Introduction
My first string art board went into the trash whole. Nails, thread, plywood panel, the lot. I did not even try to salvage it.
Here is what went wrong. I hammered the nails by eye, so they sat at five different heights. The thread slipped off every short one. Two nails bent halfway in and I kept going anyway, because I had already spent an hour on it.
Finished result: a heart shape that looked less like a heart and more like a bird's nest that lost a fight. Lesson cost me a board, a spool of thread, and an afternoon.
The second board cost almost nothing extra. It hangs in my hallway right now, and the only things I changed were one cheap habit and about five dollars of hardware. That is genuinely the whole fix.
This is why string art is one of the best beginner wall-art projects you can pick up. The expensive part is a board. Everything else is nails and thread.
Can you tap a nail into wood without bending it? Then you can make something worth hanging. And if you cannot do that yet, stay with me. Neither could I.
What String Art Actually Is
String art is a board, a line of nails, and thread wound between them. The nails are only the skeleton. The thread is the artwork.
That one distinction is why this project forgives so much. When you look at a finished piece, your eye reads the geometry of the thread, not the nails underneath it.
The nails basically disappear into the light and shadow of the wound thread. A nail that leans a degree or two off vertical never reads as a mistake to anyone but you.
And you are the only person who knows where the problem is. Everyone else sees a heart, an initial, a mountain range, a pumpkin.
So where do actual mistakes go? Into the fill. The interior winding is dense, layered, and visually noisy in the best way. A loose pass, an odd angle, an accidental crossing — they all vanish into that texture.
What does not vanish is an uneven nail line, because the outline is the one place your eye goes looking for precision. That is where your effort belongs.
Think of it this way: you are not building a perfect grid. You are drawing a shape with a hammer and then coloring it in with string.
The Real Materials List
You can buy almost all of this at a hardware store and a craft store in a single trip, and none of it is specialty equipment.
Nothing here needs to match a brand. Anything functional will do the job.
- A board or plywood panel — a cut piece about 8 by 10 inches up to 12 by 12 inches for a first project. Half-inch plywood is the sweet spot: thick enough to hold nails, thin enough to cut at home.
- Paint, stain, or sealer for the board — a small can of craft paint runs a few dollars and covers two or three boards. Paint first, nail later. That order matters and I will explain why.
- Finishing nails or panel pins — finishing nails have a tiny head that disappears into thread; panel pins are thinner and hold better in thin plywood. A small box of 1-inch nails is a few dollars and will last many projects.
- A lightweight hammer — a 12-ounce hammer is plenty. A heavy framing hammer is the wrong tool here; it drives nails too fast and splits wood.
- Thread — crochet thread is the workhorse: strong, cheap, and available in dozens of colors. Embroidery floss is shinier and comes in smaller amounts. Thin yarn fills space faster but fuzzier and bulkier.
- Sandpaper — medium and fine grit, about five dollars for a pack you will use for years. You are knocking down splinters and rounding the edges before painting.
- A printed paper pattern — free printable outlines exist for hearts, initials, states, and simple shapes. Print at the size you want your finished piece.
- Painter's tape — for holding the pattern flat against the board, and for masking areas you would rather not paint.
- Needle-nose pliers — for pulling a bent nail, tightening a knot, and pulling the last bit of tail through a tight spot. You will use them more than you expect.
- Optional sawtooth hanger — a few cents each in a multi-pack. Only needed if you want the board flat against the wall.
Add it up and a first project lands somewhere in the ten to twenty dollar range, mostly for the board and the paint. The nails and thread carry over to the next five pieces.
If you sell at craft fairs, that carry-over is the part worth noticing. Your cost per piece drops fast after the first board, which is why string art works so well in batch runs.
Prep the Board Before You Hammer Anything
Sand the panel first, focusing on the cut edges. They are usually rough, and a splinter under a fingernail is a lousy way to start an evening project.
Wipe off the dust with a slightly damp cloth, then let it dry completely. Paint sticks badly to sawdust, and it will show as a gritty texture under your thread.
Now paint, stain, or seal it. Two thin coats beat one thick coat every time, and a foam brush is easiest for small panels.
Let it cure properly — overnight if you can stand the wait. Painting after nailing is possible, but paint will pool around each nail and look sloppy.
One more thing: a painted board makes the thread pop. Natural wood absorbs thread color and flattens the whole piece.
Choosing a Pattern You Can Finish
Your first pattern should have one continuous outline. That is the single most useful rule for picking a design.
Circles, hearts, letters, and state outlines are all one unbroken line. They are easy to nail and easy to string.
Skip anything with tiny detail, thin letter strokes, or interior islands on the first attempt. Those come later, once you know how your hands behave with a hammer.
Size matters too. Stay under 12 inches wide for board number one. Bigger boards do not take longer because the pattern is harder — they take longer because there are more nails.
Transferring the Pattern
Print your outline at full size, then cut away the excess paper. You want the pattern to fit on the board with at least an inch of margin on every side.
Tape it down flat with painter's tape at all four edges. Cheap office tape pulls wood fibers when you remove it; painter's tape does not.
If you are drawing your own design rather than printing one, tape the paper to a window on a sunny day and trace the outline through the glass. A glass patio door works even better.
Now punch guide holes. Use a pushpin, an awl, or a thumbtack and press a hole through the paper along the outline, spacing them about half an inch apart.
Do not skip this step and do not rush it. Those tiny holes are your nail map, and they are what stops you from eyeballing a wobbly line.
When you pull the paper off, a faint dotted outline stays behind. That is the difference between guessing and following a plan.
Nail Placement: Spacing, Count, and Depth
Consistent spacing does more for the final look than anything else you will do. Place your nails at even intervals along the dotted outline.
Half an inch is the sweet spot for most designs. A quarter inch gives you a smoother curve but doubles your nail count.
An inch apart is too sparse. The thread has to travel too far between nails, and the outline reads as loose and stringy.
How many nails does a beginner actually need? A 12-inch heart at half-inch spacing runs roughly 70 to 90 nails. A simple letter or geometric shape usually lands between 40 and 60.
That is a comfortable evening, not a marathon. If your chosen design needs 300 nails, you picked the wrong first project.
Depth matters less than consistency. Aim for a quarter to a half inch of nail sticking up, and keep every single one at that same height.
Uneven depth is exactly what killed my first board. Thread climbs to the tallest nail and slips right off the short ones.
Here is the cheap habit that fixed it: hold the nail between your thumb and index finger so only the amount you want exposed is above your fingers. Hammer until your fingertip touches the wood, then stop.
Your fingers become the depth gauge. No measuring, no marks, no guessing, and every nail ends up identical.
Working With Thin Plywood
Half-inch plywood is forgiving. Quarter-inch plywood splits much more easily, especially near the edges and along the grain.
Two fixes work for thin panels. First, predrill each guide hole with a bit slightly smaller than your nail.
Second, blunt the nail tip. Turn the nail upside down, tap the point lightly with your hammer to flatten it, then hammer it point-down.
A blunted tip crushes the wood fibers instead of slicing them apart. Counterintuitive, but it nearly eliminates splitting.
Tap gently, too. Let the weight of a small hammer do the work rather than your shoulder. Three light taps beat one hard swing every time.
Stringing Technique, Step by Step
Now the part people actually look forward to. The hammering is done; the rest is quiet and repetitive in a good way.
- Tie the anchor knot. Pick a nail in a low-traffic spot, like the bottom point of a heart. Tie a double knot around the nail shaft and pull it snug against the board.
- Take the first pass. Bring the thread across the board to a nail on the opposite side, loop it once around the shaft, and continue.
- Wrap once per nail, every time. One clean loop is enough. Two loops build up and make the thread ride up the shaft toward the head.
- Keep tension even. Pull each pass until it feels snug but not tight enough to bend the nail or distort the board.
- Fill the outline first. Wind one or two passes around the whole perimeter to establish the shape before you touch the interior.
- Work the fill in a random back-and-forth rhythm. Cross the middle at different angles rather than parallel lines. This random fill is what creates that dense, woven texture.
- Stop when the fill is dense enough that you cannot see the wood through it. Usually two or three full passes over the interior.
- Tie off and cut. Knot the thread around a nail shaft, trim the tail to about an inch, then tuck it under the fill with your needle-nose pliers.
Should you fill the outline before or after the interior? There is a real trade-off here, and both orders work.
Outlining first gives you a crisp, defined border. The outline holds the shape while you fill, and the interior winds over it.
Filling first and outlining last gives you a sharper edge that sits on top of the fill, which looks cleaner in photos. It is less forgiving, though, because a loose fill can sag once the perimeter is set.
For a first piece, outline first. Get the shape locked in, then fill it in and relax.
Switching Colors for Clean Color Blocking
Color blocking is the single easiest way to make a cheap project look designed. The rule is to keep colors from bleeding into each other.
Switch colors at a nail, not mid-pass. Tie off the old thread, knot the new one on the same nail, and keep going from there.
That one nail becomes the border between two color zones. No stray strands of the wrong color crossing the line.
Another trick: decide your zones before you start. Interior one color, outline another, or a vertical split down a letter stroke.
Three colors maximum on a first project. More than that and the eye stops reading the shape and starts reading the mess.
Finishing: Tightening, Hiding the Tail, and Backing the Board
Before you call it done, run a quick tension check. Press a finger into the middle of the fill and feel for slack sections.
If a section feels loose, wrap a few extra passes through that area at a slightly different angle. Loose areas are almost always spots you wound too quickly.
Now deal with the tail. You already knotted and trimmed it — the final step is hiding it completely.
Slide the trimmed end under the existing winds with needle-nose pliers and pull it through. It disappears into the fill in about ten seconds.
A dab of craft glue on the knot is optional insurance. Do not glue the thread to the board, just the knot to itself.
Next, back the board. Cut a piece of felt or cork to the size of the panel and glue it to the back.
This does two things. It stops the nail points from scratching your wall, and it gives the whole piece a finished, store-bought weight.
Peel-and-stick felt sheets are the easiest option. A yard of craft felt and a glue stick costs about a dollar per board.
Hanging It and Living With It
Attach a sawtooth hanger to the back if you want the board sitting flat against the wall. Hammer it in before you glue the felt backing.
Sawtooth hangers are a few cents each in a multi-pack. You can also just use two small nails in the wall, which costs nothing at all.
Where should it go? String art is dense and textural, so it holds a small wall on its own better than a thin poster would.
A narrow hallway, the strip of wall above a console table, or the awkward space beside a window all work.
Small-space ideas: hang three small boards in a vertical column to fill a skinny wall. Group a heart, a letter, and a small geometric shape as a mini set.
Gallery wall ideas: mix one string art piece with framed photos, a mirror, and a woven basket. The texture of the wound thread breaks up all the flat frames.
A string art piece sits especially well next to other easy seasonal wall decor. Mine hangs beside my fall gnome decor, and the neutral thread colors keep the two from fighting.
Keep it out of direct sunlight if you used bright thread. Fading is slow but real, and it shows worst on saturated reds and oranges.
String Art With Kids
This is a genuinely good family project, as long as you split the work in a way that matches everyone's hands.
Here is the split that works: the adult does every bit of hammering. The child does the stringing.
Give the child the job of holding the board steady with one hand on the back edge. They are involved in the nailing without being under the hammer.
Choose a simple shape for a kid project. A heart, a star, a cloud, or a single large letter. Something with a short outline and lots of open interior.
Fewer nails, wider spacing — an inch apart is fine here. It is easier to see the shape forming and much faster to fill.
Blunt tools for small hands. A tack hammer weighs less and hurts less if it connects with a finger. Safety glasses are non-negotiable if a child is anywhere near the hammering.
Tape the pattern down for them. Do not ask a child to trace through a window or reposition paper every thirty seconds.
Use embroidery floss instead of crochet thread for kids. It is softer on little fingers and comes in small, bright amounts that suit short attention spans.
Cut thread into two-yard lengths. Kids tangle four-yard strands in seconds; two yards is manageable and easy to replace.
Be ready for them to stop halfway. That is fine. Cover the board with a cloth and finish the fill yourself tomorrow — an unfinished string art board looks perfectly fine under a towel.
If they keep going and fill a whole shape, let them. A wonky kid-made heart is the best thing that will ever hang on your refrigerator.
Troubleshooting: When Something Goes Wrong
Almost every string art problem has a fix that takes under five minutes. Here are the ones you are most likely to hit.
- Thread slipping off the nails. Usually uneven nail depth — the thread climbs to the tallest nail and slides off the short ones. Fix the height first, then re-wrap. A tiny dab of glue on the anchor nail helps too.
- Nails pulling loose. Thin plywood plus a slightly oversized nail hole. Pull the nail, put a drop of wood glue in the hole, and reset it. Or step up one nail size.
- Sagging strings. You wound too loose in one area. Go back through that section with extra passes at a new angle and tighten as you go.
- Crooked outline. Almost impossible to fix once the fill is in, so check the nail line with a straightedge before you string a single pass. If you are already past that point, lean into it — a slightly organic outline still reads as handmade.
- Board splitting. It happens near edges and along the grain. Predrill the guide holes, blunt the nail tips, and clamp and glue any split you catch early.
- Thread tangles. Stop winding, put the board down, and untangle before you pull. Use shorter lengths, and never spin the board around to reach the far side — walk your hands around it instead.
Do not throw a flawed board away. Nobody has ever seen the back of a piece of wall art, and most of these fixes are invisible from a foot away.
Designs That Actually Work for a First Project
These five shapes show up again and again because they nail easily and read clearly from across a room.
- A heart. One continuous outline, a wide interior for filling, and it flatters a three-color palette. The classic first string art project, and deservedly so.
- A monogram initial. Pick a thick, blocky letter — a serif with thin strokes will fight you. Use a second color inside the letter to make it pop off the board.
- A state outline. Free printable outlines exist for every state, which makes pattern sourcing effortless. Florida and Texas are the friendliest shapes; a jagged coastline is not.
- Simple geometric shapes. A sunburst, a triangle, a chevron, three stacked waves. These have short outlines, which means fewer nails and a fast finish.
- Seasonal silhouettes. A pumpkin, a single leaf, a snowflake, a bare tree. Same board and same technique, different thread colors — which makes them ideal for batch runs and craft fair tables.
Pick one shape, one palette, and one board size. Then make the next three identical.
That is how a single weekend turns into a small collection, and eventually into a shelf of pieces you can gift or sell.
Conclusion: The Second Board
The board that replaced my disaster cost almost nothing. Same nail box, one more spool of thread, a painted scrap panel from the garage.
I held every nail at the same depth with my fingers as the gauge. I punched guide holes in a printed outline before I touched the hammer.
That is it. Two changes, about five dollars of extra hardware, and the result is hanging in my hallway.
Which is really the point of string art. The materials are cheap, the mistakes hide in the fill, and the skills transfer instantly from one board to the next.
So pick a small shape this weekend. A heart, an initial, a state outline — something with one clean line and a short outline to nail.
Start small, keep the nails even, and let the thread do the work. Your second board will already look like something you meant to make.

