Introduction
I still remember the first time I opened my grandmother's vanity drawer. It was crammed with rouge pots, powder compacts, and lipstick tubes from decades past — all in shades of rose, coral, and petal pink. I was maybe eight years old, sitting cross-legged on her bedroom floor, and I was mesmerized. She sat down beside me, took out a small pot of cream blush, and dabbed a bit on the back of my hand. "That color," she said, "is called Blushing Bride. Your mother wore it on her wedding day."
That moment — the intersection of color, memory, and beauty — is what watercolor blush makeup art captures so beautifully. It is a new creative trend that combines the soft, diffused quality of powder blush with the fluid, unpredictable nature of watercolor. You paint beauty looks — eyes, lips, cheeks, full faces — not on skin, but on paper, using actual blush colors as your palette. The result is dreamy, ethereal, and surprisingly forgiving, even for beginners.
In this article, I will walk you through how to start painting blush makeup art, what supplies you need (hint: you probably already have most of them), and how to create your first soft floral beauty look on paper. Whether you are a watercolor enthusiast or someone who has never picked up a paintbrush, this trend welcomes you exactly as you are.
What Is Watercolor Blush Makeup Art?
Watercolor blush makeup art is exactly what it sounds like: using watercolor techniques to paint faces, features, and beauty looks, with a palette inspired by makeup. Think flushed cheeks, soft pink lips, shimmery gold eyelids, and dewy highlighted skin — all rendered in translucent watercolor washes.
What sets it apart from traditional watercolor portraiture is the color palette. Instead of realistic skin tones, you work with blush shades: soft pinks, warm peaches, dusty roses, coral, lavender, and champagne gold. The faces you paint do not need to look like real people. In fact, the most beautiful pieces in this genre feature abstract, minimalist features — a single eye with a wash of pink eyeshadow, a pair of lips floating on the page, or a profile where the cheek is a soft bloom of coral.
The trend has grown rapidly on platforms like Instagram and Pinterest, where creators share what they call "blush studies" — small, quick paintings that focus on capturing a particular color story or mood. It is accessible, it is beautiful, and it is deeply satisfying to create.
Why This Trend Is Perfect for Beginners
If you have ever been intimidated by watercolor — the way it bleeds, the way it refuses to stay within the lines — blush makeup art might be exactly what you need. Here is why.
First, there is no pressure to paint realistic faces. The beauty of blush art is in the abstraction. A face can be suggested by a curved line and a wash of pink. An eye can be a simple almond shape with a halo of color around it. You are not trying to capture a likeness; you are trying to capture a feeling.
Second, the color palette is intentionally limited. Instead of mixing complex skin tones and shadows, you work with two to four colors per painting. This constraint is liberating. It forces you to focus on composition, wash technique, and the interplay between pigment and water — the fundamentals of watercolor — without getting lost in color theory.
Third, the pieces are small. Most blush studies are painted in pocket-sized sketchbooks or on four-by-six-inch watercolor paper. A small painting takes fifteen to thirty minutes from start to finish, which means you can complete one in a single sitting. There is nothing more encouraging for a beginner than actually finishing something.
Supplies You Will Need
One of the best things about watercolor blush makeup art is how few supplies you need to get started. Here is exactly what I recommend.
Watercolor Paint in Blush Tones
You do not need a full set of paints. For blush art, focus on pinks, peaches, corals, warm browns, and a gold or champagne shimmer. A set of six half-pans in these tones will serve you well. Brands like Winsor & Newton Cotman, Daniel Smith, and Sakura Koi offer excellent starter sets. If you have existing watercolors, simply choose your warmest pinks and corals.
Watercolor Paper
Use cold-press watercolor paper, at least 140lb (300gsm) weight. This weight holds up to wet washes without buckling. A pad of five-by-seven-inch paper is perfect for practice. Arches, Fabriano, and Canson all make reliable student-grade paper.
Brushes
A round brush in size 4 or 6 is your most important tool. It can do everything from fine lines to broad washes. A size 2 brush is useful for small details like eyelashes and lip lines. Synthetic brushes are perfectly fine for beginners and much more affordable than natural hair.
Water and Paper Towels
Two jars of clean water — one for rinsing, one for clean water — and a roll of paper towels for blotting and lifting pigment. That is really all you need.
Optional: A White Gel Pen or Gouache
Many blush artists add tiny highlights — a gleam on a lip, a sparkle on a cheekbone — using a white gel pen or a small tube of white gouache. This is optional but adds a lovely finishing touch.
Basic Techniques for Blush Art
Before you paint your first face, practice these three watercolor techniques. They are the building blocks of every blush study you will create.
Wet-on-Wet Washes
This technique creates the soft, diffused blush effect that defines the trend. Wet your brush with clean water and paint a small area of your paper — about the size of a cheek or an eyelid. While the paper is still damp, load your brush with dilute pink or coral pigment and touch it to the wet area. Watch the color bloom outward in a soft, feathery halo. This is how you create the flushed, dewy look that makes blush art so romantic.
Lifting
If a wash is too dark or you want to create a highlight, blot the wet paint with a clean, dry paper towel. The paper towel will absorb the pigment, leaving a lighter spot. You can also use a barely damp brush to lift color in a specific shape — like a crescent-shaped highlight on a lower lip or a gleam on a cheekbone.
Dry Brush for Fine Lines
For eyelashes, lip lines, or hair strokes, use a nearly dry brush with concentrated pigment. Load your brush with paint, then blot it on a paper towel until almost no water remains. Lightly drag the brush across the paper to create thin, textured lines. Practice this on scrap paper until you get a feel for the pressure and speed.
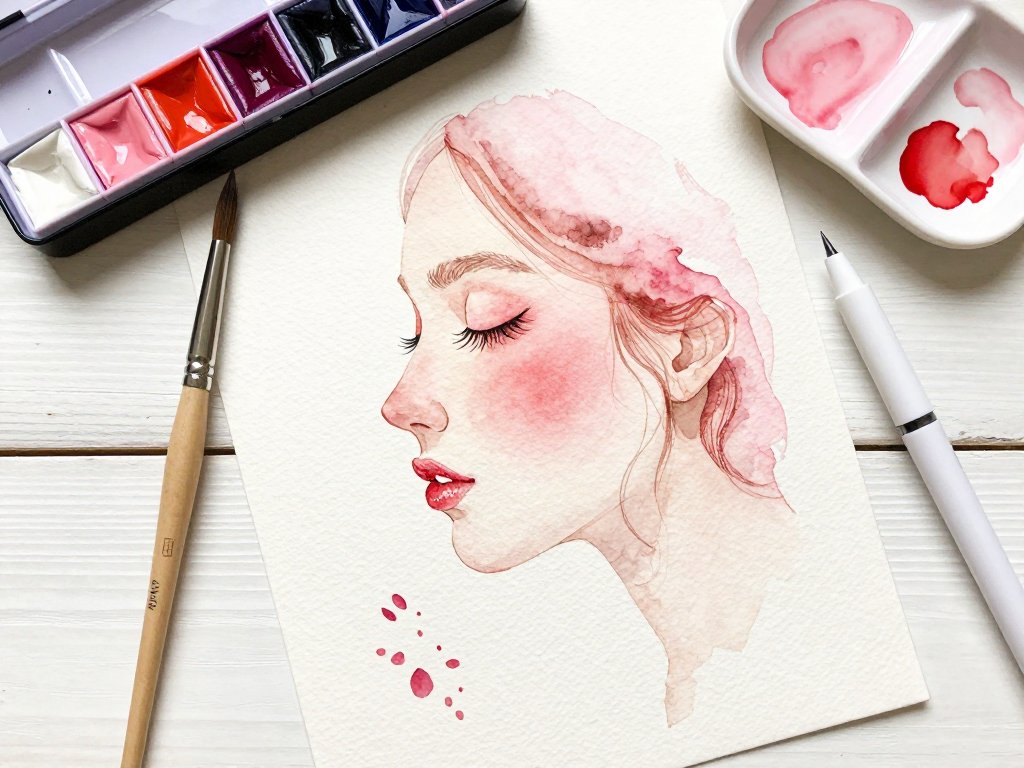
Your First Blush Study: Step by Step
Let us paint a simple profile — a face in three-quarter view — using three colors: a soft peach for the skin, a warm coral for the blush, and a dusty rose for the lips.
Step 1: Sketch the Face Lightly
Using a pencil, draw a very light outline of a face in profile. Keep it simple: a curved forehead, a nose bridge, closed eyes, and a gentle jawline. The features do not need to be detailed — just enough to guide your paint. Erase any heavy lines so only faint pencil marks remain.
Step 2: Paint the Skin Wash
Mix a very dilute wash of peach — barely tinted water. Using your size 6 brush, paint the entire face area. Work quickly so the wash stays even. Blot any puddles with a paper towel. Let this dry completely.
Step 3: Add the Cheek Blush
Mix a stronger coral wash. Wet a small area on the cheekbone with clean water, then touch the coral pigment into the wet area. Watch it bloom into a soft, diffused blush. Leave the highest point of the cheekbone unpainted so it stays as a natural highlight. Let dry.
Step 4: Paint the Lips
Using your dusty rose color and your size 4 brush, paint the upper and lower lip shapes. Leave a small highlight on the lower lip by either leaving the paper white or lifting pigment with a damp brush after painting. Let dry.
Step 5: Add Eyes and Brows
With concentrated peach or warm brown pigment and a nearly dry size 2 brush, paint a soft curved line for the closed eyelid crease. Add a row of fine, delicate eyelashes along the lash line. For the eyebrow, use light, feathery strokes in the direction of hair growth. The key is restraint — too many strokes will make the face look harsh.
Step 6: Final Highlights
Once everything is completely dry, use a white gel pen or white gouache to add tiny highlights: a dot on the tip of the nose, a gleam on the lower lip, a sparkle on the cheekbone. These small touches bring the painting to life.
More Blush Art Ideas to Try
Once you have mastered the basic profile, here are a few variations to keep your blush studies fresh and engaging.
Close-Up Eye with Pink Eyeshadow
Paint a large eye in the center of your page. Use a wet-on-wet wash of rose gold or dusty pink around the eye socket, extending out past the natural eye shape like a dramatic eyeshadow. Add fine, fluttery lashes and a tiny highlight in the corner of the eye. This is one of the most popular blush art formats and looks stunning on its own.
Lip Study in Three Shades
Paint three sets of lips across your page, each in a different blush shade: pale petal pink, warm coral, and deep berry. Vary the shapes — full lips, thin lips, asymmetrical smile. This makes a beautiful triptych that showcases your range.
Floral Blush Face
Instead of painting realistic hair, let the hair blend into flowers. Paint a profile and then extend the back of the head into a cascade of loose watercolor flowers in matching blush tones — roses, peonies, cherry blossoms. The flowers and the face share the same palette, creating a cohesive, dreamy composition.
Minimalist Line Art with Blush Wash
Paint a minimalist face using only thin, continuous lines — one line for the profile, a curve for the eye, a swoop for the eyebrow. Then add a single generous wash of blush on one cheek only. The contrast between the precise line art and the soft, uncontrolled wash is striking.
Tips for Developing Your Style
As with any art practice, the more you paint, the more your personal style will emerge. But here are a few things I have learned from my own blush art journey.
Do not overwork your washes. The most beautiful blush effects come from letting the water and pigment do their own thing. If you keep brushing and re-brushing, you will lose the soft, ethereal quality that makes this art form special. Apply the wash, let it bloom, and walk away.
Save your favorite blush color combinations. When you mix a shade you love — the perfect peachy pink, the ideal dusty rose — write down the proportions or save a swatch. Over time, you will build a personal palette that feels like yours.
Experiment with non-traditional colors. While blush art traditionally uses pink and coral, do not be afraid to try lavender, peach-gold, or even a soft mint green as an accent. The trend is still young, and there is plenty of room for innovation.
Share your work. Blush art is a remarkably welcoming community on social media. Posting your studies, even the imperfect ones, invites encouragement and connection. You may be surprised at how many people resonate with the soft, feminine beauty of these paintings.
Conclusion
Watercolor blush makeup art is more than a trend. It is a return to tenderness — to softness, to color, to the quiet joy of painting something simply because it is beautiful. Whether you are capturing the memory of your grandmother's vanity drawer or simply exploring what pink can do on paper, this practice offers a gentle, forgiving space to create.
Pick up a brush, squeeze out a bit of rose, and let the water do the rest. You may find, as I did, that the most beautiful art comes not from control, but from letting go.