Introduction
When I was nine, my family drove two days west to see real mountains, and for the first hour I was quietly disappointed.
From the car they looked like paper cutouts stacked one behind the other, each ridge paler than the one in front of it.
My mother explained that distance was doing that, not the mountains being shy. It took me twenty years to understand what she meant.
Watercolor understands it instinctively. Softening a color as it recedes is what this medium does better than any other.
That is why mountains make the kindest first landscape for a beginner. You are never asked to paint rock and scree.
You are asked to paint air, and air is a wash.
Three ridges from back to front, a dark foreground, and a sky that fades as it falls. That is the whole recipe, and it fits into one quiet afternoon.
What You'll Need
Nothing on this list is expensive, and nothing needs to be artist grade. A student pad and three tubes will carry you a long way.
- Cold-press watercolor paper, 140 lb / 300 gsm. One sheet, roughly 9 by 12 inches. The gentle tooth holds a wash and forgives a wobbling hand.
- Masking tape. Low-tack tape holds the sheet flat and lifts cleanly once the painting is bone dry.
- A round brush, size 6 to 10. Size 8 is the workhorse. It carries enough water and still keeps a fine point for ridgelines.
- One flat brush, half an inch to an inch. Useful for the first sky band and for the dry-brush foreground at the very end.
- Ultramarine blue. The backbone of every mountain mix here. Its granulation is what makes rock look like rock.
- Burnt sienna. Warm and earthy, and the perfect partner for ultramarine. Together they make grey in any temperature.
- A touch of alizarin crimson, or any warm red. Half a brush-load warms the closest ridge and stops it turning dead.
- White gouache, optional. For a flick of snow spatter at the finish. You will not need more than a pea-sized squeeze.
- Two jars of water. One stays clean, one is for rinsing. Mixing them up turns every colour grey.
- A paper towel. For blots, for testing mix strength, and for drying the brush to a thirsty state.
- A hairdryer. The most impatient tool in the box, and the one that lets you finish a landscape in one sitting.
Set everything out before you wet the paper. Watercolor rewards a tidy table and punishes a frantic reach.
Keep the paper towel beside your painting hand. You will use it more often than you expect.
Three Mountain Mixes From Two Tubes
Almost every beginner mountain painting lives or dies on three small puddles, and all three come from the same two colours.
Ultramarine blue and burnt sienna are made for each other. Blue alone reads cold and candy-bright; sienna alone turns muddy orange.
Mix them and you get grey in every temperature you could want, from a whisper to a near-black.
Make the mixes in three separate wells, and keep these ratios in mind.
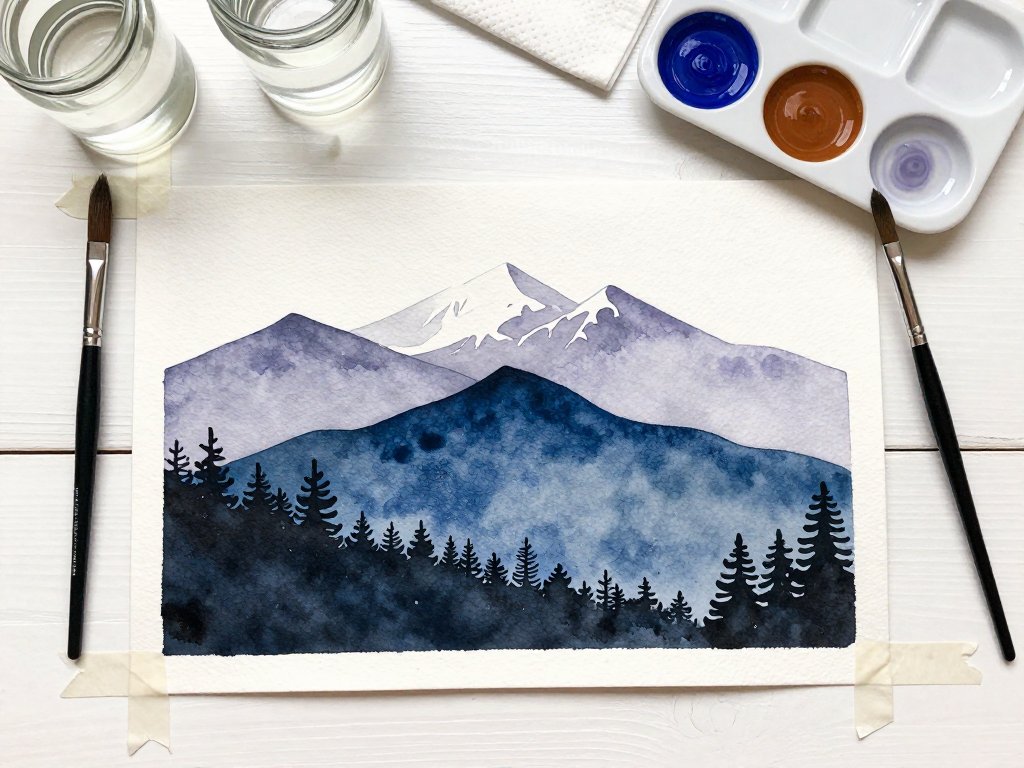
- Farthest ridge: mostly water, a touch of ultramarine, and a breath of burnt sienna. Aim for a pale grey-violet barely darker than the sky.
- Middle ridge: more pigment, with blue and sienna closer to equal. A soft blue-grey with a faint green undertone.
- Closest ridge: strong ultramarine with just enough burnt sienna to kill the brightness. A deep, near-black blue that still reads as blue.
If the closest mix looks flat, add the smallest speck of alizarin crimson. Warmth at the front makes the cool ridges behind it feel farther away.
Mix each puddle bigger than you think you need, and judge it on paper rather than in the well. Watercolor always dries paler than it looks when wet.
A quick test stroke on scrap paper tells you more than a minute of squinting at the palette.
Why Distant Mountains Look Cooler and Paler
Air is not empty. It carries moisture and dust, and every mile of it stands between you and the mountain.
That haze scatters light, so contrast flattens and colour drifts toward the blue end of the spectrum.
Distance mutes saturation, cools the temperature, softens the edges, and swallows small detail completely.
So the ridge you are painting should lose every bit of texture it might have had. Only the shape survives.
Nearer ridges show sharper edges, deeper values, and a little more variation along their tops.
Painters call this atmospheric perspective, and it is the single rule that turns flat shapes into miles.
Taping Down Before You Touch a Brush
Lay the sheet on a board and tape all four edges, overlapping the tape onto the board by about half an inch.
All four sides matter. Tape only the top and the paper will flare into a shallow bowl the moment the washes go on.
Press the sheet flat with your palm as you go, working from the middle outward so trapped air can escape.
Then tilt the board slightly, maybe ten degrees, with a book under the top edge. A gentle slope helps the sky wash travel downward instead of pooling.
Fill one jar with clean water and leave the other empty for rinsing. Load the round brush and plan to work from the top of the sheet downward.
Step One: A Graded Sky
Every landscape starts in the air, and this sky is one continuous wash that fades as it falls toward the horizon.
- Wet the sky area with clean water. Use the round brush or the flat and wet the top half of the sheet with clear water only.
- Load the brush with pale ultramarine. Not too strong. You want a soft, letter-writing blue, not a navy.
- Touch the colour into the wet paper at the very top. Let the water pull it down. Do not brush it back and forth.
- Rinse, reload with clean water, and sweep the lower edge. That keeps the blue fading naturally as it approaches the horizon.
- Lift clouds with the paper towel. Press a dry corner into the damp wash and peel it away. That soft grey ghost is your cloud.
Leave the sky completely alone now. Touching it while it is half dry is what causes cauliflower blooms and stray hard edges.
Let it air-dry, or run the hairdryer on low, held a foot away, until the shine leaves the paper.
Test with the back of your hand. Cool and dull means dry. Cool and slightly tacky means wait a little longer.
This is the hardest instruction in the whole project, and also the most important one.
Step Two: Mountains, Back to Front
Now the good part, and the part that goes wrong fastest if you hurry it. Paint the farthest ridge first, because closer ones overlap it.
Each ridge must be completely dry before the next one goes on. That is what keeps edges crisp and layers readable.
- Load the round brush with the palest mix. The brush should be damp, not dripping. A soaking brush floods the paper and loses the shape.
- Drag the brush along the ridgeline. Start at one edge of the sheet and pull the tip across in a single unhurried stroke, letting it dip and rise.
- Fill down to where the middle ridge will sit. Work quickly, then stop and leave that lower band as your palest tone.
- Dry the sheet, then paint the middle ridge. Slightly stronger mix, slightly sharper peaks, overlapping the pale ridge where it drops behind.
- Dry again, then paint the closest ridge in the darkest mix. This one gets the most shape and a little shadow on one side of each peak.
Keeping the Peaks Jagged
Straight, even lines look like paper cutouts. Real ridges lean, break, and change direction as they travel.
Move your whole arm rather than your wrist, and let the brush change speed along the line.
Pause at the top of a peak, then flick down. Those small changes in speed create sharp points and shallow saddles.
If the mix is right, the edge stays exactly where you leave it. Go back over a line and it softens into a hill instead of a peak.
Snow Caps Come From White Paper
Do not reach for white paint. The brightest white in watercolor is always the paper you never touched.
Paint around the shape you want to keep: stop the brush a little short of the summit and let dry paper stand as the cap.
It helps to decide which peaks are snowy before you mix the colour. Then leave them empty as you go.
If a cap comes out too small, widen it later by lifting a touch of colour with a clean damp brush and a dry towel.
Step Three: The Dry-Brush Foreground
A landscape without a foreground floats. You need one dark anchor, and it should be the darkest thing in the painting.
Wait until everything above it is dry. A dark shape touching a wet ridge will bleed upward and spoil both.
Load the flat brush with your strongest mix, then drag it across the paper towel until the bristles are almost dry.
Press the brush down and pull sideways. Pigment catches only the raised tooth of the paper, which gives you a broken, grainy edge.
Short vertical pulls along the bottom make a fringe of pines. Longer, flatter drags make a shore.
Leave plenty of pale paper between the foreground and the closest ridge. That gap of light is what lets the distance breathe.
Salt, Plastic Wrap, and a Little Gouache
Three small additions can make granite look like granite instead of felt.
Salt. Scatter a pinch of table salt into a still-damp ridge, then brush it off once dry. It leaves tiny starry pits that read as rock texture.
Plastic wrap. Lay cling film over a wet wash, crumple it, and leave it to dry. Peeling it away leaves veins and ridges in the wash. Keep it to one ridge so the effect stays a surprise.
White gouache. Load an old brush and flick tiny dots of white across the peaks. It reads as blowing snow or mist. Practise the flick on scrap first.
When Something Goes Wrong
Almost every problem in a beginner watercolor mountain is a timing problem, and timing is something you can learn.
Muddy Colours
Mud comes from stirring. Paint the middle ridge while the far one is still wet and the two mixes blend into flat grey-brown.
The fix is patience and fewer strokes. Let each layer dry, then lay paint down rather than working it in.
Move the brush less. Three deliberate passes beat twenty fussy ones every single time.
Hard Edges Where You Wanted Soft
If a cloud landed with a crisp outline, the paper underneath was dry before the paint arrived.
The cure is to wet the paper first and drop colour in while it is still shiny. Wet paper blurs; dry paper holds a line.
A Flooded Ridge
If too much water lands and the shape runs, do not scrub at it. Scrubbing damages the paper surface and leaves a grey scar.
Blot instead. Touch a dry brush or a towel corner to the puddle and let it drink the water back out.
Then walk away and let it dry. Half the floods you panic over turn into a soft shadow that looks deliberate.
Paper That Buckles
Cockled paper rises into ridges that catch the light and cast small shadows across your painting.
Tape all four sides before you begin, and use 140 lb or heavier. Once a sheet floods, the tape is the only thing holding it.
A finished painting can be flattened under a heavy book overnight, or pressed with a warm iron between two sheets of paper.
Imperfect Edges Look Like Weather
Here is the thing nobody tells beginners. A mountain painting is not judged on tidiness.
A wobbly ridgeline is a ridge that has been weathered. A slightly ragged edge is mist coming down the valley.
My mother's mountains were never neat. There was always one peak leaning too far and one cloud clearly overworked.
She never fixed them. She made tea, taped down another sheet, and painted the same view twice more.
If you want a little more help with the soft layers, the technique underneath all of this is the wash itself, and the guide to Watercolor Washes: Flat, Graded and Variegated explains all three properly.
Then keep this painting, even the parts you dislike. In a month it becomes a record of how far your hands have come.
Try the Same Three Ridges at Sunset
The recipe does not belong to blue. Once the three-ridge structure is in your hands, you can change its mood entirely.
Mix a pale peach for the farthest ridge with a whisper of alizarin and plenty of water, and let it stay almost pink.
The middle ridge can lean toward violet, mixing ultramarine with warm red instead of burnt sienna.
Bank the closest ridge in a deep purple-brown, keep the sky as a graded wash of orange fading to pale gold, and leave the snow caps white.
Same three shapes, same drying rule, entirely different feeling. That is the quiet pleasure of this medium.
So tape down a sheet this afternoon, mix three greys, and paint the view my mother showed me from a car window all those years ago.
Then paint it again at sunset, and see what the light does to it.