Introduction
The first time I watched my grandmother paint, I thought she was cheating. She wet a strip of paper, touched it once with blue, and put the brush down.
What appeared a minute later was a sky. Not a sketch of one. A sky.
I asked her how she did it. She said the water did most of the work, and she was telling me the truth.
That is all a wash is. Water carrying color across paper and settling it evenly, without any fuss from you.
It is also the single most useful skill in watercolor. Every sky, every sea, every soft shadow in nearly every painting you have admired started as a wash.
Learn three of them and you can paint far more than you expect. You do not need talent for this. You need a patient hour and paper that behaves.
What a Wash Is
A wash is a thin, even layer of pigment and water laid across the paper in one flowing pass.
You are not drawing with the brush. You are guiding a shallow puddle and letting it level itself.
Water always seeks its own level, so it spreads flat and dries flat, as long as you leave it alone.
Three variations cover almost everything a beginner needs.
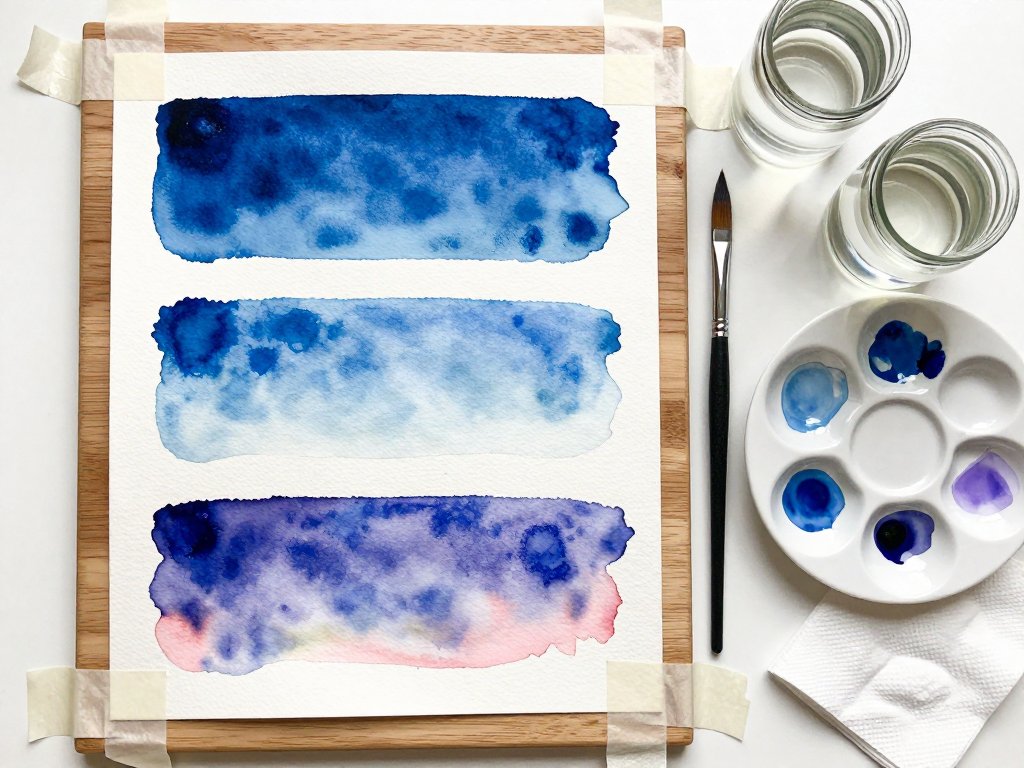
- Flat wash: one color, one even tone from edge to edge. Lovely for skies and calm backgrounds.
- Graded wash: one color fading smoothly from strong to pale. This is how you paint light and depth.
- Variegated wash: two or three colors side by side, softening only where they meet. Wonderful for skies, sunsets, and seas.
Washes are the foundation because watercolor is built in layers. The first layer decides how everything above it reads.
A clean, even base makes a simple painting look considered. A streaky base makes careful detail look nervous.
Get the wash right and the rest of the painting becomes mostly a matter of knowing when to stop.
What You'll Need
You can do all three washes with a small, modest kit. Nothing on this list is expensive, and nothing needs to be professional grade.
- Cold-press watercolor paper, 140 lb / 300 gsm. The slightly bumpy surface holds water generously and forgives wobbles. Cotton is lovelier, but a decent student pad will teach you fine.
- A round brush, size 8 to 12. A round holds a good point and carries plenty of water. This is your workhorse.
- A 1-inch flat brush. The wide straight edge lays even horizontal bands and lifts the bead of paint at the end of a wash.
- Two cups of clean water. One for clean water, one for rinsing. Mixing them up turns every color grey.
- A paper towel. For blotting, testing consistency, and drying your brush to a thirsty state.
- A mixing palette. A white ceramic plate works beautifully. White lets you judge the true strength of a color.
- Masking tape. Low-tack tape holds the sheet flat and lifts cleanly when the painting is dry.
- A board. A lightweight drawing board or a sturdy clipboard supports the paper and lets you tilt it.
Set everything out before you wet the paper. A wash moves quickly, and reaching for supplies mid-pass is how bands turn into bruises.
Keep the paper towel within reach of your painting hand. You will use it far more often than you expect.
Setting Up So the Paper Can Cooperate
Lay the paper on the board and tape down all four edges, overlapping the tape onto the board by about half an inch.
Tape does two jobs. It stops the sheet from buckling as it takes on water, and it leaves you a clean white border at the end.
Press the paper lightly with your palm so it lies flat. Any gap between paper and board will fill with water and swell.
Then tilt the board slightly. A gentle slope is plenty, maybe ten or fifteen degrees, with a book or a rolled towel under the top edge.
Tilted this way, the wash flows downward in even bands instead of pooling in the middle of your sheet.
Last, mix your color. Use a well on your palette big enough to hold a real puddle, not just a smear.
How to Paint a Flat Wash
A flat wash is one color at one strength across an area. It is the calmest thing you can do with a brush.
The trick is pace and consistency. You are laying paint down, not blending it, not correcting it, not planning the next stroke.
- Mix a generous puddle. Load more paint and water than you think you need. A skimpy puddle runs out halfway and leaves a patchy finish.
- Load the brush fully. Dip the round or the flat into the puddle and let it drink. Do not tap too much off on the rim.
- Tilt the board slightly. A small slope keeps the wet edge moving downward on its own.
- Lay the first band. Draw the brush across the top of your area in one steady, unhurried stroke.
- Lay the next band touching the previous band's bottom edge. Overlap the seam so the paint merges. The bead from the first band carries down into the second.
- Do not go back over a band that is already drying. Going back lifts pigment and leaves streaks that dry darker.
- Stop before the puddle runs. Finish while your brush still carries paint. Running dry creates a ragged edge and a hard line.
- Lift the bead at the end. Take a dry brush, squeeze it against the towel, and touch it to the pool of paint collecting at the bottom. It drinks the excess away.
Then walk away. The wash levels itself as it dries, and that quiet settling is where the evenness comes from.
If your first attempt dries a little unevenly, that is not a failure. It means your puddle or your pace needs adjusting, and both improve quickly.
How to Paint a Graded Wash
A graded wash fades smoothly from strong color to almost nothing. It is how you paint light.
The whole technique lives in one idea. Each band carries more water and less pigment than the one before it.
- Start with strong color. Load the brush with your full-strength mix and lay the first band across the top.
- Add clean water to the brush each band to dilute. Dip into clean water and pick up no new paint. The color already in the bristles thins as the water joins it.
- Overlap each band into the last one's bottom edge. Keep the seam wet so the transition stays invisible.
- Keep the bead moving. Never let the pooled edge sit and stiffen, or it dries as a hard line across your fade.
- Finish pale. The final strokes should be barely tinted water. That last pale band is the light in your painting.
If your fade looks striped when it dries, you worked too slowly. The bands dried before they could merge.
Try again with a bigger puddle, a wetter brush, and a slightly lower tilt. Speed is not sloppiness here. Speed is what keeps a wash alive.
Graded washes go everywhere. A sky meeting a horizon, a wall turning away from a window, the shadow side of a folded scarf.
How to Paint a Variegated Wash
Variegated means several colors in one continuous wash. It is the most forgiving of the three, and often the most beautiful.
The colors meet on the paper and blend only where they touch. Everywhere else, each one keeps its own voice.
- Mix two or three colors side by side on your palette. Choose colors that look pleasant together. Blue and violet behave nicely, as do rose and gold.
- Lay the first color in a broad wet band. Give it room, since the neighboring color needs something to flow into.
- Drop the second color beside it. Touch the loaded brush to the paper right next to the first band and let the two edges find each other.
- Tilt the board so they blend where they meet. A gentle tilt lets the wet edges creep together, leaving a soft, uncertain seam.
- Add a third color if you like. Leave some of the earlier bands untouched so each color still reads clearly.
- Leave the edges soft. Do not outline, tidy, or flatten. The charm lives in the blurred boundary.
This is the wash for skies at dusk, sunsets over the sea, and the deepening blue of a harbor in the evening.
Because the colors meet on the paper rather than in the palette, the mixtures you get are ones you could not have planned. That is the point.
Once a variegated wash dries, the seams soften even further. What looked uncertain while wet quietly becomes atmospheric.
Drying and Layering Without Ruining Your Work
Layering is where watercolor becomes interesting. Your second wash sits on top of the first, and the two together create depth.
Which means the hardest skill in the whole medium is simply waiting.
The Back-of-the-Hand Test
The most reliable dryness test is your skin, not your eyes. Press the back of your hand gently against the paper.
If the paper feels cool, it is still damp inside, even when it looks matte. Paint applied now will lift the layer underneath.
When the paper feels the same temperature as the room, it is dry. That is the moment to layer.
A helpful trick: paint a small test stripe on scrap paper the moment you begin a wash. Touch the scrap instead of your painting.
Never Scrub a Damp Wash
Damp paper fibers are soft and fragile. A scrubbing brush drags them, pills the surface, and mixes pigment into mud.
Once the surface is damaged, paint dries darker and blotchier there for good. It is the one mistake you cannot undo.
So lay the stroke down and leave it. If you must adjust, do it with a single light touch rather than a scrub.
Lifting a Mistake Gently
If you want some color gone, damp a clean brush and touch it to the area without scrubbing.
Then blot with a paper towel, pressing lightly and lifting straight up. Work in small doses instead of one heavy pass.
On dry pigment, lifting will only lighten the color, not erase it. On a damp wash, you can remove quite a lot.
Test a corner first if you are unsure. Lifting is gentle by nature, but only when your approach is gentle too.
Common Beginner Mistakes
Nearly every wobbly first wash comes from one of a few familiar causes, and none of them are about talent.
- Too little water. A stingy puddle drags, skips, and dries patchy. Mix more than you need. You can always leave some behind.
- Working too slowly on a hot day. Warm air and low humidity dry a wash in seconds. Close the window, sit in shade, or paint a smaller area.
- Painting on thin paper. Paper under 140 lb buckles under a wet wash and never lies truly flat again. Use the heavier sheet.
- Reworking wet passages. Touching a drying wash lifts pigment and leaves streaks. Lay the paint and trust it.
- Letting the puddle dry as a hard edge. Water carries pigment to the edge of the wet area, where it dries as a tide line unless you lift it.
If you notice any of these mid-painting, resist the urge to fix it instantly. Often the drying stage softens what your eyes are complaining about.
Note which one happened, then change one thing on the next sheet. One variable at a time is how washes improve.
Troubleshooting: Blooms, Streaks and Buckling
Problems in a wash are almost always timing problems, and timing is learnable.
Blooms and Cauliflower Backruns
A bloom looks like a pale, cauliflower-shaped flare pushing outward through the color. It happens when water meets a drying wash.
Blooms are dramatic, and sometimes gorgeous. When you did not ask for one, though, they are simply frustrating.
Prevention is simple. Do not disturb a drying wash, and avoid dropping extra water onto a half-dry edge.
Either keep the whole area evenly wet while you work, or leave it completely alone until it is dry. The middle ground is where blooms live.
Streaks and Banding
Streaks appear when one band starts to dry before you lay the next. The seam hardens and never merges.
The fix is to work faster and keep the bead alive. Lay bands in quick succession so each one meets a wet edge.
A bigger puddle helps too. A generous bead of paint at the bottom of each band gives the next stroke something to travel into.
Paper Buckling
Paper cockles because water swells the fibers unevenly. The sheet rises into ridges and casts small shadows across your wash.
Tape the paper down on all four edges before you begin. Use heavier paper, 140 lb or 300 gsm, which resists the pull far better.
If a sheet still buckles once dry, lay it flat under a heavy book overnight. It will not be perfect, but it will be flat enough to paint on again.
A Short Practice Plan
You can learn all three washes in a single sitting. Ten or fifteen minutes of practice is genuinely enough.
Start by taping one sheet down and dividing it mentally into three horizontal strips.
- Top strip, flat wash. Mix one color, load generously, and lay smooth touching bands from left to right. Lift the bead with a dry brush at the end.
- Middle strip, graded wash. Same color, but add clean water to the brush with every band. Watch the tone fade as you travel downward.
- Bottom strip, variegated wash. Lay two or three colors side by side, then tilt the board so they meet. Leave the edges soft.
- Let all three strips dry completely. Walk away, tidy your palette, and come back when the paper feels room temperature.
- Paint a simple scene. Use a flat wash for a calm sky, let it dry, then paint a graded wash for the foreground, fading toward the bottom of the sheet.
That small study teaches nearly everything: consistency, dilution, blending, and patience.
Keep the sheet, even if it looks uneven to you. Next month it becomes a record of how far your hands have come.
Repeat the exercise with a different color each time. Pigments behave differently on paper, and your hands will learn faster than your notes.
Where to Go From Here
Once your washes dry evenly, the natural next step is wet paper, where the color moves on its own.
My guide to wet-on-wet watercolor blending picks up exactly where these three washes leave off, with the timing and dampness cues spelled out.
In the meantime, keep a small pad and a loaded brush nearby. Five minutes of practice on a Tuesday afternoon counts for more than you think.
Imperfect Washes Are Normal
Here is the thing nobody tells beginners. Washes are for softness, not precision.
Watercolor dries lighter than it looks when wet. It also dries in its own time, moving according to physics rather than instructions.
If your flat wash has a faint streak, someone admiring it will read that as sky. If your graded wash fades a little quickly, that is light arriving early.
My grandmother's skies were never tidy. They had wandering edges and one stubborn bloom in nearly every corner.
She never fixed them. She mixed a cup of tea, wet another sheet, and painted the same sky again.
That is the whole method. Wet the paper, lay the color, and let the water decide.