Introduction
If you have ever longed to paint but felt nervous about holding a brush, watercolor pencils are the gentle doorway you have been looking for. You draw first. You add water later. You decide how much of that drawing melts.
That is the whole idea, and it is exactly why so many busy moms start here. You can work for ten quiet minutes at the kitchen table, walk away to make dinner, and come back without losing anything.
This is a beginner's guide to both halves of the medium: the dry half, where you draw, and the wet half, where actual paint appears out of the pencil marks. There is no wrong way to practise.
What a Watercolor Pencil Actually Is
A watercolor pencil looks exactly like an ordinary coloured pencil, and for good reason. It is a coloured pencil with one quiet change inside: the wax binder that holds the pigment together has been swapped for a water-soluble binder.
Used dry, that pencil behaves almost like coloured pencil. It lays down pigment, builds up as you press harder, and blends with a paper stump. Nothing surprising happens at this stage.
Touch it with a damp brush and everything changes. The soluble binder dissolves, the pigment releases, and you are suddenly pushing real watercolour paint around on real paper.
That is the hook, and it is worth pausing on. You get to decide how much of the drawing melts. Keep some areas crisp and dry, melt others into soft washes, and one pencil does two very different jobs.
For a beginner, that is an unusually forgiving setup. You are drawing and painting in the same piece, and you can stop and rest between the two stages.
Paper Comes First: The Deal-Breaker
Before anything else, buy watercolour paper. This is the one place where I will be a little bit firm with you, kindly.
You need roughly 140lb / 300gsm or heavier, cotton or a good cotton-blend. That weight is what lets the surface drink water without warping, rippling or pilling.
Sketch paper and printer paper will not survive the wet stage. They pill — tiny bobbles of fibre lift off under the brush — and they buckle into a potato chip. That is a sad way to lose a Sunday afternoon.
A pad of decent watercolour paper costs less than a takeaway dinner and will last months of practising. Cold press, sometimes called NOT, has a slight tooth that suits pencil beautifully. Hot press is smooth and shows fine lines with real clarity.
If you already own a cheap pad, keep it for dry practice and swatches only. Save the good paper for pieces you actually plan to finish and keep.
Dry Techniques: Drawing Before Water
The dry stage is where your drawing is built, and it is the part most beginners rush. Slow down here and the wet stage becomes much easier.
Start With a Gradient Scale
Before you draw anything you care about, make a gradient scale on scrap paper. Draw a row of small squares, then fill each one with a few more passes of the same single colour.
The first square gets the lightest touch you can manage. Each following square gets slightly more pressure. By the last square the colour is at full strength.
This one exercise teaches your hand the pressure range of the pencil. Most beginners press far too hard, and the scale shows them exactly how much lighter they can go. It is also an easy first win.
Layer Light First, Never Dark First
Build every drawing from light layers upward. A pale green goes down first. Then a mid-green over parts of it. Then a deep green only in the darkest shadow shapes.
Leave the highlights completely blank. Let the white of the paper be your brightest value, because you cannot get that white back once pigment is there.
Each layer should be laid with a light hand. Five gentle passes give a richer, cleaner colour than one hard, shiny, waxy one.
Dry Blending
Because the pencil is still dry at this point, you can soften it without any water at all. A paper stump — a tightly rolled paper blender — or a plain cotton swab will smudge pigment into a smooth transition.
Work in small circles along the edge where two colours meet. Blend a little at a time and keep the paper clean between passes.
This is useful for soft skies, gentle skin tones and the curve of a leaf. It is also the technique that makes a beginner drawing look deliberate instead of scratchy.
Cross-Hatching and Scumbling
For texture, let your pencil marks stay visible. Cross-hatching means laying parallel strokes in one direction, then a second set across them at an angle. Where the strokes cross, colour deepens.
Scumbling is more playful: small, scribbly, chaotic strokes that build a broken and grainy texture. Try it on tree bark, stones, or the dry edge of a garden path.
Both are recognised techniques, not mistakes. When water finally touches them, the strokes bleed into one another in ways worth watching.
Wet Techniques: Adding Water
Now the second half of the medium. Keep your water jar clean and your brush blotted, and the whole thing becomes calm rather than risky.
The One-Stroke Rule
Here is the workhorse move of the entire medium. Load a brush with water, then blot it once on a cloth so it is damp, not dripping. Damp is the goal. A dripping brush floods places you never intended.
Draw that damp brush across your dry pigment in one confident stroke. Go in one direction and let the water do the dissolving for you.
Never scrub. Scrubbing lifts pigment back off the paper and fuzzes the surface into little pills that no amount of layering will repair. One stroke, then look, then decide.
Tip-Dipping for Crisp Accents
Some lines need to stay dark and sharp. For those, dip just the tip of the pencil into water and draw directly with it. The damp tip releases pigment in a strong, defined line.
This is how to add a leaf's centre vein, a bare twig, or the dark rim of a petal at the very end of a piece. Use it sparingly. It is a strong card to play.
Wet-On-Wet for Soft Blooms
Wet-on-wet is the gentler cousin of the damp-brush stroke. Brush clean water onto the paper first, then draw into that damp surface with the pencil. The pigment blooms outward on its own, soft and diffuse.
Skies, distant hills, and blurred backgrounds love this treatment. If you want to understand the effect properly before your first real project, there is a clear explanation of wet-on-wet watercolor blending that pairs beautifully with pencil work.
Timing decides everything. If the paper is shiny and pooling, pigment will run away from you. If it has gone matte and dry, nothing will bloom at all. The sweet spot is a soft, even sheen.
Softening Just One Edge
You rarely want a whole shape melted. A common and very useful trick is to wet only one side of it.
Take your damp brush and stroke along a single edge of a drawn petal, pulling colour slightly outward into clean paper. Every other edge stays crisp pencil. The shape gains volume almost instantly.
This is the technique that makes flat beginner drawings start to look three-dimensional, and it takes only seconds.
Tissue Dabbing for Dappled Texture
While a wash is still wet, press a crumpled tissue onto it and lift straight up. The tissue drinks some pigment away and leaves a soft, mottled patch behind.
Repeat with a fresh area of tissue for dappled light through leaves, lichen on a stone, or pale foam on water. Do not rub. Dab, lift, and move on.
Pencil Shavings for Foliage and Grit
Sharpen a pencil over a piece of scrap paper and keep the shavings. Scatter a few onto a still-wet wash and then leave them completely alone.
The shavings release pigment into the water and settle into speckled, organic marks. It is a wonderfully loose way to suggest foliage, moss or gravel without drawing every single leaf.
Brush the dry shavings away once the paper is bone dry. What remains is texture you could not have drawn on purpose.
The Colour Order Rule
When you activate pigment with water, work from shadow to highlight. When you layer dry colour, work light to dark. Both rules exist for exactly the same reason.
Dark pigment bleeds into light areas with almost no effort. Light pigment drifting into a dark area barely shows at all. The flow only runs one direction.
That means starting dark locks your mistakes in permanently, because every following layer gets swallowed by it. Start light and you keep your options open to the very end.
If you are unsure what to do next, stop and let the paper dry fully before adding anything else. Judging colour on wet paper is guesswork. Dried paper tells you the truth.
Colours Change When Water Hits Them
Expect shifts, and do not panic when they arrive. A dusty olive green can bloom into something forest-dark. A soft rose may turn surprisingly vivid. Nearly every colour changes tint and intensity the moment water touches it.
This is completely normal, and it is not a sign that you bought the wrong pencils. It is simply the pigment fully waking up on the page.
Make Your Own Dry/Wet Swatch Chart
Do this before you begin a real piece. Take a sheet of your watercolour paper, draw a small swatch of every colour in your set, and label each one with the pencil's name or number.
Then wet half of every swatch and let the sheet dry. Now you can see the dry colour and the wet colour side by side, on the exact paper you will be painting on.
Keep that chart tucked inside your pencil tin. It is the single most useful reference a beginner can own, and it takes about twenty minutes to make once.
A Note on Inktense and Permanent Pencils
Some pencil ranges, such as Derwent Inktense, are formulated to become permanent once dry. They behave differently from standard watercolor pencils in one important way: you cannot lift them again with water.
That is a genuine advantage for layering, because a dried layer will not smudge or shift beneath the next one. It becomes a disadvantage the day you decide to soften a mistake.
Worth knowing before you try to fix something, not afterwards. Standard watercolor pencils stay re-wettable, which makes them the more forgiving place to start.
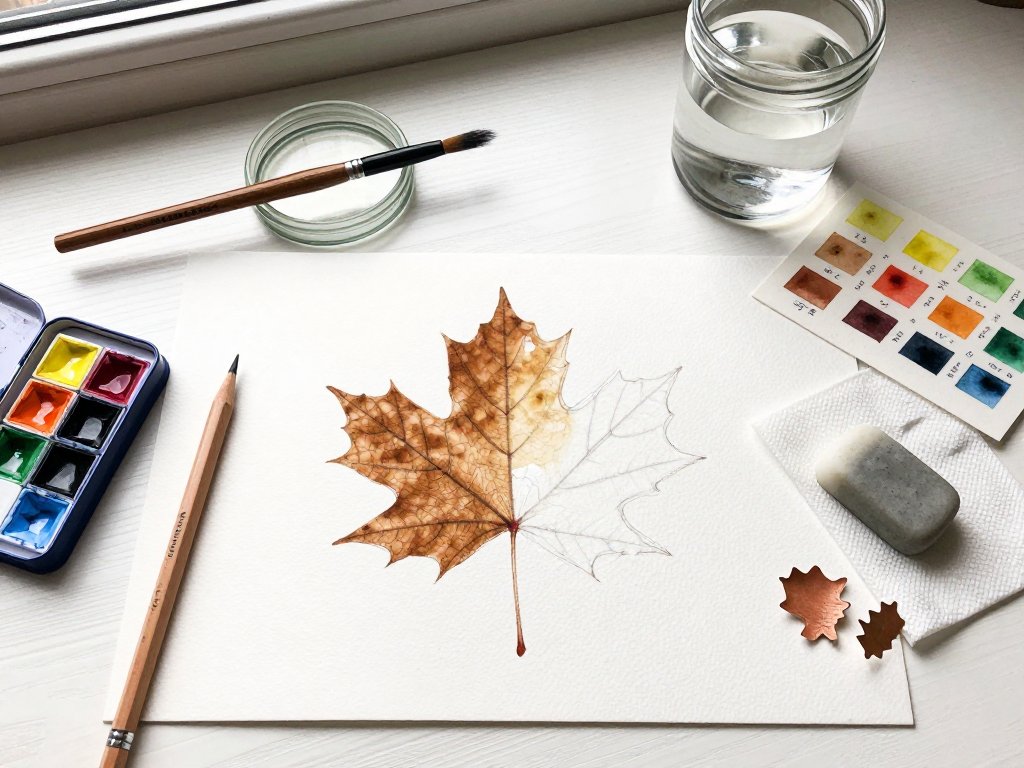
Your First Project: One Leaf, Step by Step
For a first finished piece, resist the whole landscape. A single leaf is a far better teacher and it is finishable in one sitting, which matters when your time comes in small pieces.
Choose one with an interesting shape and a clear light-to-dark range. A maple, a sycamore, or a broad ivy leaf all work beautifully.
- Draw a light outline in a soft neutral pencil. A pale grey-green or a light brown works far better than graphite, which can grey down your colour.
- Lay a light green over the whole leaf, leaving the highlights and the veins blank white. Keep your pressure gentle, even and unhurried.
- Add a darker green in the shadow areas only, where the leaf curves and where it meets the stem. Let the light green remain as your mid-tone.
- Wet the shadows first with a damp brush, one confident stroke for each. Watch the dark green melt and settle into the shape you drew.
- Now wet the mid-tones, working outward from the shadow edges so the two zones blend at their border. Leave the highlights dry and white.
- Finish with the centre vein. Dip the pencil tip in water and draw one clean line, plus a few faint side veins, while everything else is dry.
Lay the leaf flat to dry and leave it alone. When you come back to it, that little study will look remarkably like a painting — and it took one afternoon, not one weekend.
When Things Go Wrong: Troubleshooting
Something will go sideways on your first attempt, and that is genuinely fine. Here are the four problems beginners meet most often, and what actually fixes them.
Muddy, Murky Colour
Muddy colour almost always means too much water and too much working back and forth over the same area. The fix is less water and lighter strokes, never more pigment.
The correction is easy: blot the excess with a clean paper towel or tissue, then stop touching it entirely. If the area is still too heavy once dry, dampen a clean brush and gently lift some colour away.
Harsh, Un-Dissolved Lines
If pencil lines refuse to melt, you pressed too hard while the paper was dry. The pigment has been burnished into the tooth of the paper and water alone will not move it.
The fix is more water and a bigger, softer brush, not more pigment. Try a size 8 round instead of a size 4, and float water across the lines rather than scrubbing at them.
If the lines are truly set, they may simply become part of the drawing. Many artists leave them on purpose, for texture and a little handmade character.
Buckling and Wavy Paper
Paper that ripples and waves is either too wet or too thin. Both have the same remedy: use less water next time.
If the paper buckles mid-piece, set it aside and let it dry completely before deciding anything at all. Damp paper looks ruined in ways dry paper almost never is.
Too late to save the sheet? A stack of heavy books will flatten it overnight, and heavier cotton paper solves the problem permanently.
Lifting Mistakes Before Water
This is the beginner's best-kept advantage, so use it. Before any water goes on, all of your dry pencil work is still removable.
Press a kneaded eraser onto the area and lift straight up. It takes colour off gently, without scuffing or damaging the paper the way a hard eraser will.
Work in small presses rather than rubbing, and lift the pencil off when you see the tone fading. Once water has locked the pigment in, that option is largely gone.
Keep Your Scrap Paper Close
Test grids and scrap paper are the real secret of this medium. Every colour you plan to use, try it on the offcut first, both dry and then wet.
It costs you two minutes and saves you a finished piece. The artists whose work looks confident are usually the ones who tested the most, not the ones who got lucky.
And remember the one rule that never changes: you can always add more water, but you can never take it back. When in doubt, add a little and wait.
Conclusion
Watercolor pencils are gentle with beginners in a way that few mediums manage. Your drawing waits for you on the page. Nothing has to be decided all at once.
Start with a gradient scale. Make a swatch chart of your own set. Then draw one easy subject — a single leaf — and let half of it melt into something soft.
Perfection is not the point here, and it never was. A slightly muddy wash or a stubborn line is simply part of learning how to handle water and pigment together.
Your next piece will feel calmer, and the one after that calmer still. Take your time and enjoy the slow part — that is where the real pleasure of this craft lives.