Introduction
The first silhouette I ever painted was a thank-you card I made at the kitchen table one October evening. The sky outside had gone that deep amber that only lasts about ten minutes, and a bare maple branch cut across it like a scratch on a photograph.
I tried to copy it with a cheap brush and two colors. It wasn't very good, honestly. The branch looked more like a spider. But the sky behind it glowed, and everyone who saw that little card said the same thing. It felt like the evening.
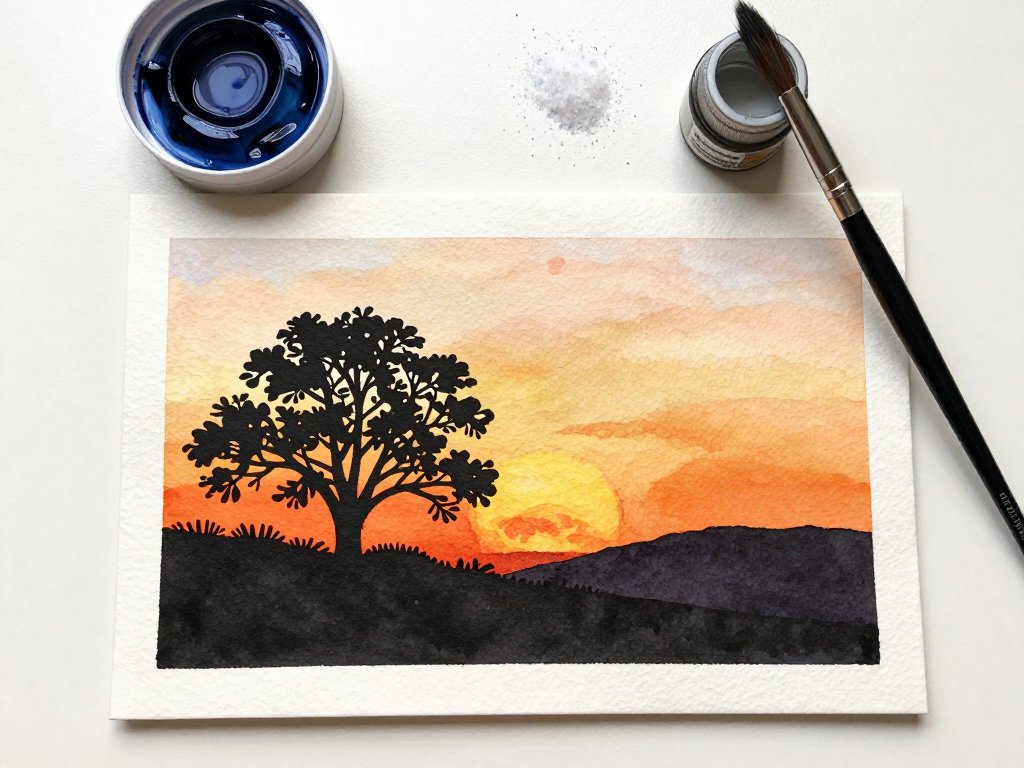
That is the whole secret of silhouette painting. You do not paint the tree. You paint the light, then you paint one very dark shape in front of it, and the eye does the rest of the work.
This project takes an evening and uses two colors, one round brush, and a bit of patience while things dry. It is forgiving enough to do with children beside you, and it is the kind of painting that looks far harder than it is.
Why a Silhouette Reads as Drama
A silhouette works because of contrast, and almost nothing else. One deeply dark shape against one bright sky creates an instant mood — quiet, warm, a little wistful.
Your brain does the heavy lifting. When you see a dark mass with two small branches, you do not see a blob. You see a tree. You fill in the leaves, the bark, the details that were never painted.
That is why a beginner can produce something that looks genuinely dramatic. You are not being asked to render detail. You are being asked to get one dark value right and keep your edges clean.
The whole painting is really about that decision. Bright paper above, near-black shape below, and a horizon line low enough to give the sky room to glow.
What You'll Need for Your First Scene
You do not need much, and you likely have most of it. Watercolor rewards a short supply list, because every extra color is one more chance to make mud.
- 140 lb cold-press watercolor paper. The weight matters. Lighter paper buckles under wet washes, and a buckled surface pools dark where you least want it.
- Masking fluid, plus its alternatives: low-tack painter's tape, a white wax crayon, or simply painting wet-on-wet and skipping the mask entirely.
- A cheap synthetic brush kept ONLY for masking fluid. Masking fluid dries rubbery inside bristles and will ruin a good brush for good.
- A round brush, size 8 to 12. One brush does the whole painting — the sky wash and the fine branch tips.
- A soft pencil and a kneaded eraser. You want the faintest horizon line you can manage.
- Two colors. Ultramarine or indigo for the dark shape, and a warm trio — a warm yellow, an orange, and a red — for the sky.
- Salt for texture, a hairdryer for impatience, and a spare jar of water so you always have clean water to rinse with.
If your palette is small, this is a lovely project to start with. A single yellow, a single red, and one dark blue can carry the entire scene.
Cold-press paper has a slight tooth, and that texture does quiet work here. It gives the finished silhouette a soft, grainy edge instead of a hard digital one.
Nothing on this list needs to be expensive. Student-grade paint and one good sheet of 140 lb paper will look better than artist-grade paint spread too thin on flimsy paper.
Setting Up the Paper and the Sky
Begin with a soft pencil horizon, about one third of the way up the paper. A low horizon gives you more sky, and more sky means more drama.
Keep the line barely visible. Graphite sits under watercolor and will show through a thin wash, so draw lightly or barely at all.
The Graded Wash
Wet the sky area with clean water first, right down to that pencil line. Then load your brush with warm color and start at the horizon.
Paint the warmest, brightest color low down — yellow tipping into orange. As you move upward, let the color cool toward a paler red or a soft pink.
Work quickly and let the wet paper blend for you. If you have never done a graded wash, it is worth a few minutes with my Wet-on-Wet Watercolor: Soft Blending for Beginners guide, because this entire sky depends on it.
Clouds While the Paper Is Damp
Before the sky dries, drop in a few clouds using the same sky colors. You are not painting clouds, you are suggesting them with soft, slightly darker touches near the horizon.
Touch, don't scrub. Scrub and you will lift the color you just laid down and leave a pale blotch.
A Pinch of Salt
While the wash is still shiny, scatter a small pinch of salt where you want starlight or texture. It will pull little blooms of color away from the paper.
Walk away and let the sky dry completely. This is the hardest instruction in the whole article, and the most important one.
No dark paint touches this paper until the sky is bone dry — not damp, not cool to the touch, dry to the eye. Salt brushes off once the paper is dry.
Mixing One True Dark and Laying Down the Shape
Mix one deep puddle: indigo with a little burnt sienna. The sienna warms the blue and keeps it from looking flat and inky.
You want it thick enough to be almost black, but still fluid enough to move off the brush. Test it on scrap paper. If it dries grey, add more pigment, not more water.
Then paint the silhouette shape in one confident pass. Land the brush at the top of the tree or roofline and pull downward in a single stroke rather than dabbing at the outline.
Lift Out a Sun or Moon
If you want a sun or moon sitting in the sky, do it while the dark is still damp. Use a clean, damp brush and a light touch on dry sky to lift the pigment back out.
Rinse the brush, blot it, lift again. Two or three gentle touches give a soft, hazy glow that a painted white circle never quite matches.
Foreground Details
Once the mass is dry, add the small things with a fine, damp brush — reeds leaning into the water, a few birds, fence posts, or thin tree branches.
Keep these marks spare. Three birds say more than a flock, and a single fence post sets the whole scale of the scene.
Finish with a touch of white gouache for highlights, or simply leave the white paper showing. On this kind of painting, restraint reads as confidence.
The Whole Sequence, Start to Finish
If it helps to see the order in one place, here is the entire painting as a single list. Tape it inside a cupboard door until it becomes habit.
- Sketch a light horizon about one third up the paper.
- Wet the sky and paint a graded wash, warmest at the horizon and cooler above.
- Drop in clouds with the same sky colors while the paper is still damp.
- Scatter a pinch of salt for texture, then let the sky dry completely.
- Mix one deep puddle of indigo and burnt sienna, thick and almost black.
- Paint the silhouette in one confident pass with that darkest mix.
- Lift out a sun or moon while the dark is still damp.
- Add foreground reeds, birds, or fence posts with a fine damp brush.
- Touch in white gouache highlights, or leave the bare paper showing.
The Masking Fluid Method
If you would rather not freehand a shape, masking fluid does the work for you. Paint the silhouette shape with the fluid first and let it dry fully.
Then paint your sky over and around it. The sky does not care what is underneath, and you can be as loose and generous with the wash as you like.
Once the sky is completely dry, peel the rubbery film away with a clean finger. It lifts in one satisfying sheet and leaves crisp white paper in the shape you drew.
From there you have two choices. Either paint the dark shape inside the mask, or leave it untouched as a bright cut-out for an inverted look — light figure, dark sky.
Two warnings, both learned the hard way. Never leave masking fluid on paper for more than a day or two, and never apply it to damp paper.
Left too long it bonds, and it can pull a layer of paper fibres with it. On damp paper it sinks in, and it will tear the surface when you peel it.
A Clean Edge, and How to Save a Wobbly One
Silhouettes live or die on the edge. A single loaded stroke gives you a clean, deliberate line; lots of little strokes give you a fuzzy, anxious one.
Keep your hand off the paper, too. Resting a palm on a wash lifts moisture and leaves a patchy mark that no amount of dark paint will hide.
If the edge wobbles — and it will, at first — let it dry completely. Then come back with a slightly darker mix and tidy the line, extending the shape rather than correcting it.
Whatever you do, do not scrub at a wet edge to fix it. Scrubbing lifts the paper surface and leaves a grey bruise that reads as a mistake.
When the Sky Argues Back
Almost every problem with this painting has a cause you can name, which means it has a fix. Here are the ones that show up most.
The Sky Went Muddy
Too many colors were dropped in while the paper was wet, and they mixed into grey-brown. Next time, limit yourself to two or three sky colors.
If it is already muddy, let it dry and glaze a thin warm wash over the top to restore some glow. You can also lean into it and call it a storm sky.
The Silhouette Went Grey Instead of Dark
The mix was too watery. Water dilutes the value and the pigment dries lighter than it looks when wet.
The solve is always the same: more pigment, less water. Load the brush properly and paint one strong layer rather than two thin ones.
A Hard Line Appeared in the Sky
This happens where a wet layer meets a dry one. You painted back into a partially dried wash and left a tide line.
Leave it if it reads like a cloud edge. Otherwise, go over it with clean water to soften the seam before it fully sets.
The Sun Lift-Out Re-Wet the Whole Sky
Your lifting brush held too much water. Blot it much drier next time — damp, not dripping — and touch the paper without sweeping across it.
Masking Fluid Tore the Paper
It was applied to damp paper, or it stayed on too long. Either way, the fibres lifted with the film.
Repair is simple. Paint over the torn area with your darkest mix so the roughness disappears inside the silhouette, where texture looks intentional.
The Dark Went Patchy and Streaky
This usually means the brush was too dry, so the paint broke up as you dragged it. Reload fully and work the shape in one pass.
If you have already finished and it looks uneven, add a second thin glaze of the same dark over the whole shape. One even layer hides streaks that a hundred small touch-ups create.
Blooms Appeared in the Dried Sky
A water droplet landed on a drying wash and pushed pigment outward, leaving a cauliflower ring. They are hard to remove without lifting the color around them.
Try to enjoy them. In a sky, a soft bloom reads as weather, and most viewers will assume you meant it.
A Kid-Friendly Version, and a Whole Evening of Ideas
This is one of the best watercolor projects to share with children, because the dark shape does all the work and success is almost guaranteed.
Tape a paper shape — a tree, a castle, a cat — to the middle of their paper with low-tack tape. Let them sponge the sky over and around it, mixing orange and yellow freely.
Peel the tape away together, and there is their silhouette, crisp and bright against a sky they painted themselves. Then hand them a fine brush and let them add birds.
Their edges will be uneven. That is fine, and worth saying out loud: a slightly uneven silhouette edge looks hand-made, not careless. It is the mark of a painted object rather than a printed one.
Keep the masking fluid for your own paper, though. It needs a dry surface and a clean fingertip to peel, and small hands tend to apply it too thickly and then rub at it.
If you would rather skip tape altogether, paint the sky wet-on-wet and let them drop in clouds instead. There is no wrong outcome, and the colors do something lovely on their own.
When your own scene is finished, try it once more at blue hour. Swap the warm trio for a purple sky — violet tipping into mauve — and paint the same shape in the same dark mix.
The mood changes completely, and you will see how much of this craft lives in the color of the light rather than in the object itself.
Small finished scenes also make lovely cards. Trim one to a square, mount it on folded card stock, and you have something to send that carries a whole evening inside it.
That is what I think of now when I look at that first clumsy little card — the spider branch and the amber sky behind it. What stayed with everyone who saw it was not the drawing.
It was the light, and the fact that someone had sat at a table and tried to hold onto a ten-minute sky. Paint yours this week, and let the dark shape do the rest.