Introduction
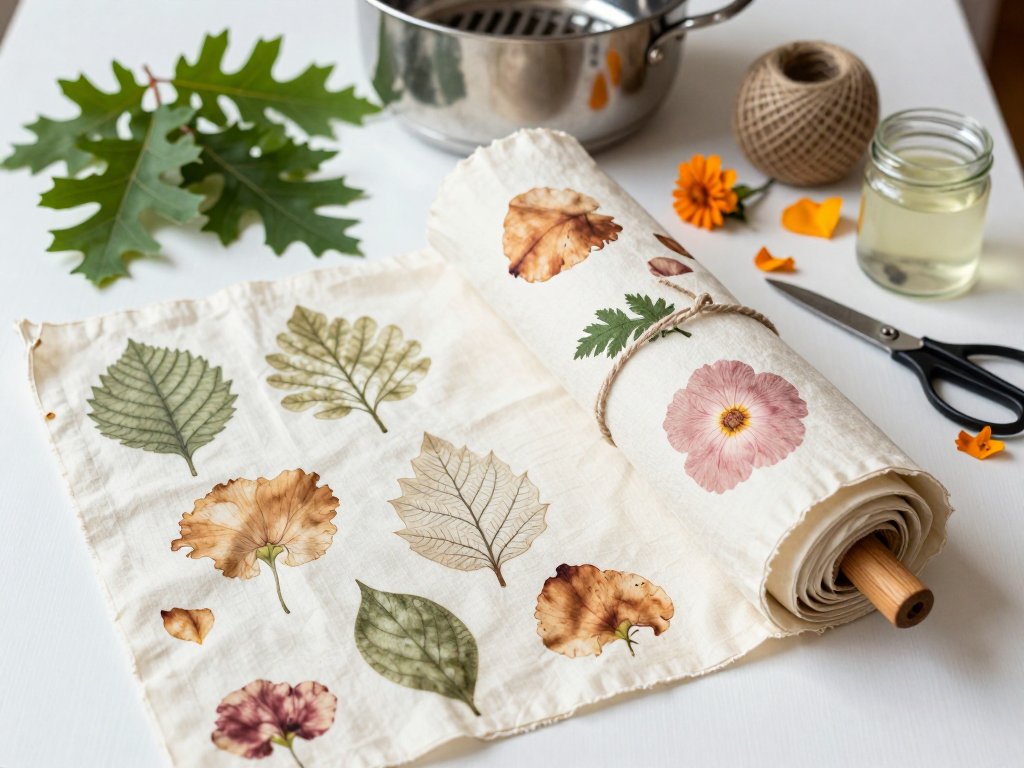
Eco printing takes a leaf, lays it against cloth, wraps everything tight, and steams it. When you open the bundle, the leaf has left its own shape behind — veins, edges, sometimes colour. Nothing is painted on. The plant does the work.
If you have ever pressed a leaf in a book and wished it stayed greener, this is the craft for you. Eco printing is how to get those shapes onto fabric you can actually use: a scarf, a tea towel, a pillow cover.
It is a slow craft, which is exactly why it suits an unhurried afternoon. You gather plants, wrap a bundle, and let a pot of water do the rest. The results are never identical twice, and that is the whole point.
What Eco Printing Actually Is
Eco printing transfers two things from plant to cloth: pigment and shape. The pigment moves by contact, the shape by pressure. A leaf trapped tightly against fibre under steam releases colour exactly where it touched.
Contrast this with bundle dyeing, its close cousin. Bundle dyeing gives blended, fluid colour — soft washes that bleed into one another across the cloth. It is about atmosphere rather than form.
Eco printing aims for something more specific: a recognisable leaf outline, a petal silhouette, the ghost of a fern frond. You want to see the oak. You want to see the marigold.
Both techniques use the same tools and the same bundle. The difference is intent. Bundle dyeing paints a mood; eco printing takes a botanical portrait. If a leaf prints as a clear outline, you have eco printed.
Why Contact Matters So Much
Plant pigment does not travel far. It moves only a millimetre or two into damp fibre. That is why the leaf must lie flat, veins down, pressed against the cloth with no gap between them.
Any air pocket becomes a pale patch. Any loose fold becomes a blur. Pressure is the entire mechanism, so wrapping is not a chore — it is the craft.
The Fibre Rule: Natural Fibres Only
Eco printing works only on natural fibres. This is not a preference; it is chemistry. Synthetic fibre has no chemical places for plant pigment to attach, so colour rinses away or never lands at all.
Polyester, nylon and acrylic will not take the print. You can hammer a leaf onto a polyester shirt for an hour and get nothing but a bruised leaf and a sore arm.
Cellulose Fibres
Cellulose fibres come from plants: cotton, linen, hemp, bamboo. They take eco prints beautifully, especially with a tannin pre-treatment, and they hold up well to repeated washing.
Linen and hemp give the crispest leaf outlines because their weave is open and slightly irregular. Cotton is the workhorse — cheap, widely available, and forgiving of a wobbly first bundle.
Protein Fibres
Protein fibres come from animals: silk and wool. Their protein structure bonds readily with plant pigment, which makes them the easiest fibres to print on.
Wool takes colour deeply, but its fuzzy surface softens fine detail. Silk keeps every vein. If you want to see what a leaf can really do, silk is the cloth to use.
Why Silk Is the Best Place to Start
Silk prints most easily and most forgivingly of all. It accepts colour without a heavy mordant, shows crisp outlines, and kindly hides small wrapping mistakes.
There is also a useful rule for testing any new plant: a plant that will not print on silk will not print on cotton either. Silk is the fair test bed.
So test on silk first. If your maple leaf leaves nothing on silk, no amount of extra mordant or longer steaming will rescue it on cotton. Move on to a different plant instead.
Gathering and Preparing Your Fabric
Before any plant touches cloth, the cloth needs two things: a wash and a mordant. Skip this and you may get a beautiful print that fades in three washes. The prep is unglamorous, and it is the difference.
Step One: Scour the Fabric
Scouring means washing out the sizing and spinning oils left in new fabric. Those invisible coatings block pigment from reaching the fibre. A print on unscoured cloth sits on the surface and washes straight off.
Use hot water and a little pH-neutral soap or soda ash, simmer gently for an hour, then rinse until the water runs clear. Old, well-washed fabric may need only a short scouring.
Step Two: Mordant With Alum
A mordant is a metal salt that fixes pigment to fibre. Alum — aluminium sulphate or potassium aluminium sulphate — is the beginner mordant. It is gentle, nearly colourless, and widely available.
Use about 10% of the dry weight of your fabric. A 100 g silk scarf therefore needs roughly 10 g of alum. Dissolve it in hot water, add the wet fabric, and hold it just below a simmer for an hour.
Let the fabric cool in the bath, then squeeze it out. Do not rinse the alum away; you want it sitting in the fibre when the leaves go on.
Iron: Powerful and Very Easy to Overdo
Iron — ferrous sulphate — darkens and sharpens leaf shapes. A dip after printing turns pale green into deep olive, charcoal and near-black, and makes veins snap into focus.
It only needs a tiny amount. Around 1% of the fabric weight is plenty, and less is safer. Too much iron saddens everything to a flat, muddy dark grey, and there is no way back.
Keep iron in a separate jar, add it to the mordant bath rather than the steam pot, and wear gloves when you handle it.
The Two-Step Tannin Then Alum Treatment
For clearer, longer-lasting prints, pre-treat with tannin before the alum. Tannin is a natural plant compound that gives pigment extra places to bond, which matters most on cotton and linen.
Oak galls, black tea, sumac leaves or pomegranate rind all make a strong tannin bath. Simmer the scoured fabric in it for an hour, then move it straight into the alum bath as usual.
The difference is visible. Cellulose fabrics that printed faintly on their own suddenly hold a defined, darker leaf. It is worth the extra hour even on a first attempt.
Kitchen Equipment You Keep Separate
All of this can be done with ordinary kitchen equipment — a pot, a spoon, a measuring jug. The rule is simple: once it dyes, it never cooks again.
Set aside one dedicated old pot for dye work. It will stain, the stain is harmless, but you will not want that pot back on the stove for soup.
Gathering Leaves and Flowers That Print Well
Not every plant gives up its colour. Some print strongly, some faintly, some not at all. The lists below are reliable starting points rather than guarantees.
Leaves That Give Reliable Shapes
Oak, maple, walnut, eucalyptus, rose leaves and ferns are the dependable six for shape. They have strong structure, and their tannins often print without any extra help from you.
Eucalyptus is generous and gives warm rusts and browns. Ferns are delicate and offer fine frond detail. Rose leaves print deep green-black and smell wonderful while steaming.
If you pick leaves on a walk and want to keep some for a later session, the technique is the same one used to preserve fall leaves for crafts — press them flat and dry, then re-dampen before printing so they sit tight against the cloth.
- Oak — bold lobed outlines, warm brown.
- Maple — crisp silhouette, soft grey-green.
- Walnut — dark and strong, near black with iron.
- Eucalyptus — rust and amber, prints easily.
- Rose — deep green-black, finely serrated edges.
- Fern — intricate frond detail, best on silk.
Flowers That Give Strong Colour
Cosmos, marigold, geranium, pansy, nasturtium, dahlia and rose petals all deliver colour. Where leaves give you outlines, petals give you soft blooms of pink, orange, gold and purple.
Marigold is the beginner favourite: generous, orange, and almost impossible to fail with. Geranium petals give deep magenta. Nasturtium flowers print a warm apricot that fades gently toward cream.
Flowers Need Less Steam Than Leaves
Petals are thin and release their pigment quickly. Leaves are thick and need time. Steam flowers for the shorter end of the range and leaves for the longer end, or the flowers turn muddy.
If you are printing both in one bundle, place flowers where they meet slightly cooler steam, or simply accept that they will darken. It is a compromise every printer makes.
Test on a Scrap First
A pink flower can print yellow. A dark leaf can print pale grey. Plant colour inside a bundle rarely matches what you see in the garden, and surprise is normal.
So test on a scrap of the same cloth before printing a garment you care about. Same fabric, same mordant, same steam time — a small bundle of three leaves tells you what to expect.
The Complete Method, Step by Step
Once your fabric is scoured and mordanted, the rest is one long, satisfying sequence. Read through it once before you begin so nothing catches you halfway through a bundle.
- Dampen the fabric. Soak your pre-treated cloth in water and squeeze it out so it is evenly damp, not dripping. Damp fibre accepts pigment; dry fibre resists it.
- Smooth it flat. Lay the fabric on a sheet of plastic or a tray and stroke out every crease with your hands. Creases dampen the print.
- Arrange plants face down. Place leaves and flowers vein-side against the cloth. The veins hold the pigment, so they must touch the fibre directly.
- Work on one half or the whole piece. Folding gives a mirror print; laying plants across the full width gives a single-sided one. Decide before you start placing.
- Add a barrier layer. Lay paper or plastic sheeting over the plants before folding. The barrier stops ghost prints and keeps pigment from bleeding through.
- Fold or roll. Fold the fabric over for mirror prints, or roll it tightly around a dowel, a bamboo rod or a piece of heater hose for an eco printed band.
- Wrap snugly. Bind the bundle with cotton string or an elastic bandage. A bandage gives even pressure across the whole bundle and is kinder to your hands than string.
- Steam above simmering water. Set the bundle on a rack over simmering water, cover, and steam about 25 minutes to 1 hour. Longer for leaves, shorter for flowers.
- Cool completely before unwrapping. Take the bundle off the heat and let it cool fully. Opening it hot can set a smeared print. Leaving it overnight gives stronger results.
- Unwrap and remove the plant material. Peel the leaves away gently. A knife tip helps lift fine petals that stick to the cloth.
Then rinse the fabric in cool water and let it dry in the shade. The print you see wet is very close to the one you will keep, though it softens a little as it dries.
What the Bundle Looks Like Inside
Unwrapping is the moment the whole craft pays off. You will see dark leaf shadows, blurred petal bursts, and the faint brown halo where moisture carried colour sideways.
Some prints will be perfect. Some will be a smear. Nearly every bundle contains both, and that is not a sign you did it wrong.
Hapazome: Flower Pounding Without Steam
Hapazome is the Japanese name for flower pounding, and it is the no-steam route to a print. You hammer a leaf or petal into cloth until the pigment transfers by impact alone. It takes minutes.
Sandwich the plant between the fabric and a barrier cloth, then tap steadily with a hammer or a rubber mallet. Work over a cutting board or a paved path — this is not a carpet activity.
Hapazome is fast, needs no pot, and is the method to reach for with kids on a sunny afternoon. An adult should supervise the hammering, and safety glasses are a sensible addition.
The prints are softer and less defined than steamed ones, with a lovely watercolour blur. Fresh, juicy petals work best; dry leaves barely register at all.
The No-Mordant Tote Bag Variation
If mordanting sounds like too much for a first attempt, there is a faster door in. Press petals directly onto a pre-washed cotton tote with the back of a spoon or a rolling pin.
Rub firmly and evenly until the colour transfers, then peel the petal away. No alum, no iron, no steam pot, no thermometer. You need a tote, some flowers and five minutes.
The result is soft, faded and deliberately imperfect. It will fade further with washing, which suits the look. Treat it as a sketch rather than a permanent print.
Finishing and Care
Once a print is dry, rinse it with pH-neutral soap in cool water and hang it out of direct sun to dry. Sunlight bleaches plant pigment faster than anything else.
Wash finished pieces by hand, cold, with a gentle soap, and keep them out of the dryer. Iron on the reverse, or not at all, since heat can shift a delicate print.
Be honest with yourself about time: natural prints do soften and shift over the years. They are not a commercial dye. That fading is part of the charm, not a failure of technique.
Troubleshooting: When the Bundle Disappoints
Almost every problem in eco printing has one of six causes. Work through this list before you blame your plants or your luck.
Pale or Missing Prints
Four usual suspects: plants too dry, the bundle not rolled tightly enough, not enough steam time, or no mordant at all. Dry leaves simply have no moisture to carry pigment.
Fix it by picking plants the same day you print, wrapping with real tension, steaming closer to the hour mark, and pre-treating with alum every single time.
Ghost Prints and Transferred Muddiness
If you see a faint duplicate of your leaves on the other side of the fold, your barrier layer was missing or too thin. Pigment migrated through the damp fabric.
Use a sheet of baking paper, a plastic bag or a piece of freezer paper between the folded halves. It costs nothing and solves the problem outright.
Muddy Brown Background
A dull, grey-brown haze across the whole cloth almost always means too much iron. Iron is powerful and unforgiving, and a heavy hand flattens every colour into the same tone.
Reduce iron to about 1% of the fibre weight, or skip the iron bath entirely on your next bundle and compare the two results side by side.
Prints That Wash Out
If your print looked wonderful dry and vanished in the first wash, the fabric was not scoured. Sizing and spinning oils kept pigment on the surface where water lifted it away.
Scour thoroughly, mordant properly, and give the print a few days to settle before the first wash. A little patience helps the bond.
Mould or Smell After Storing Damp Bundles
Leaving a bundle overnight is a good technique. Leaving it for a week in a warm room is not. Damp cloth and plant matter will grow mould and smell sour.
An overnight rest is fine at room temperature. Beyond that, refrigerate the bundle or unwrap it and dry it. If mould appears, let the print go rather than trying to wash it out.
Keep Notes, Expect Surprises
Every bundle is a surprise, and the first one rarely looks like the photos online. That is not a flaw in your technique. It is the honest nature of working with plants.
Keep a small notebook. Record the plant, the fabric, the mordant, the steam time and the date. After a season you will have your own reliable list, better than any published one.
Half the fun is opening the bundle without knowing exactly what you will get. Let it be imperfect. The leaf shape you did not plan for is often the one you love most.
Try the easy version first: a small silk scrap, three leaves, forty minutes of steam. Then try again with different plants. That is how this craft quietly teaches you.
One Afternoon, One Bundle
Eco printing is a beginner-friendly craft with a short supply list and a long, generous learning curve. You need cloth, a pot, and plants from a walk. Everything else is time.
Start with silk, test on a scrap, and write down what you did. Then wrap another bundle and see what the garden gives you this time.
