Introduction
There is something quietly wonderful about finding a painted pebble on a path you walk every day.
Someone you have never met took the time to paint a tiny flower, write a kind word, and leave it where you would find it. For a moment, the world feels a little friendlier.
That is the whole idea behind kindness rocks. It is a craft you can start this afternoon, with supplies you probably already own, and it leaves a trail of small smiles behind you.
Whether you paint a single pebble for your desk or tuck a whole basket of them into your bag for a weekend walk, this guide will walk you through design ideas that look lovely even on your first try, plus the sealing tips that keep your hard work safe from rain, sun, and time.
Why Painted Pebbles Make Such Good Gifts
Kindness rocks have spread around the world since the movement began on a Cape Cod beach in 2015. The idea is simple: paint a rock, hide it somewhere public, and let a stranger find it.
Part of the magic is how personal each stone is. No two pebbles are shaped alike, and no two painters hold a brush the same way. A hand-painted rock carries a little piece of the person who made it.
They are also wonderfully low-pressure. A pebble is small, so mistakes are small too. You can finish one in fifteen minutes, and there is no giant canvas staring back at you demanding perfection.
For busy moms especially, that is the best kind of project. It fits between school pickup and dinner, uses up odds and ends from the craft drawer, and gives kids something gentle and generous to do together.
What You Need to Start Painting Pebbles
Here is the good news: you do not need much. Most of this is probably already in your craft box.
- Smooth pebbles. River rocks, landscape pebbles, or stones from a beach walk. Flat, oval shapes are easiest for beginners.
- Acrylic craft paint. A basic set of colors will do. White and black are the two you will use most.
- Flat and round brushes. A small flat brush for base coats and a tiny round brush for details.
- Paint pens. These are the secret weapon of rock painting. Oil-based paint pens write cleanly on stone and make lettering feel almost effortless.
- Toothpicks, dotting tools, or q-tips. Perfect for dots and flower centers.
- A pencil. For sketching a light outline before you commit to paint.
- A sealer. More on this in the sealing section, but plan for it from the start.
If you are shopping on a budget, a bag of landscaping pebbles from a garden center costs a few dollars and will keep you painting for months.
Finding and Preparing Your Pebbles
Half the fun is the hunt. Take the kids on a pebble-collecting walk and let everyone choose their favorites.
Look for stones that are smooth, free of deep cracks, and roughly palm-sized or smaller. Flat pebbles give you a nice surface, while rounder ones are fun for designs that wrap around the stone.
Before you paint, wash your pebbles in warm, soapy water to remove dirt and oils. This matters more than people think. A clean stone lets the paint grip properly instead of beading up.
Dry them completely, then give each one a base coat. Two thin coats of white or cream acrylic paint create a bright, even canvas, and they make every color you add afterward pop. Let each coat dry fully before the next.
If you are in a hurry, you can skip the base coat and paint directly on the stone. The colors will just be a little darker and more muted, which can look lovely too.
Message Rocks: What to Write
Sometimes the simplest rock is the most powerful. A single kind word can change someone's whole day.
Short messages work best because pebbles are small. Try one or two words that fit the stone's shape:
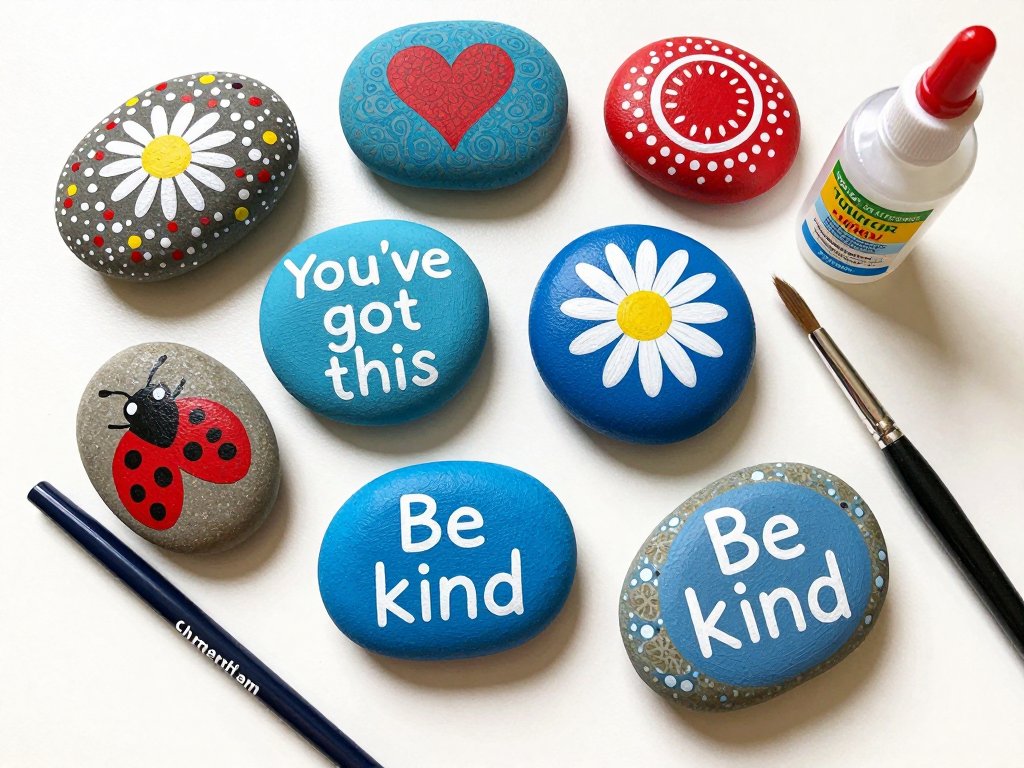
- You've got this
- Be kind
- You matter
- Keep going
- Smile
- You are loved
Paint pens are ideal for lettering. Hold the pen at a slight angle, write slowly, and do not worry about perfect handwriting. Quirky, handmade letters have their own charm.
For an extra touch, add a small heart next to the words or paint the back of the rock with a tiny scene. The front stays simple, and the back is a little surprise.
Easy Pattern Ideas: Dots, Hearts, and Flowers
If you are new to painting pebbles, patterns are your best friend. They look impressive but forgive wobbly lines.
Dotted pebbles. Use a dotting tool, toothpick, or the tip of a paint pen to make rows of dots. Start with one color, let it dry, then add a second row in another color. You can build lovely mandala-style designs this way.
Hearts. Paint a solid heart with a small brush, or try the two-dot trick: press two dots of paint side by side, then drag the tip of a toothpick down through the middle to pull them into a heart shape.
Flowers. Five dots around a center dot is a classic daisy. Add a green stem and a leaf, and you have a garden on a stone.
Stripes and half-and-half. Mask off sections with washi tape for crisp lines, or paint one half of the pebble in one color and the other half in another.
For deeper pattern work, including layered mandalas, our rock painting mandala guide takes you through dot-by-dot designs that are calming to make and stunning to find.
Picture Pebbles: Tiny Scenes and Animals
Once you are comfortable with patterns, try painting a tiny picture on a stone. The small size actually works in your favor, because a few simple shapes read as a whole scene.
Ladybugs. Paint the pebble red, let it dry, then add a black head, a line down the middle, and a few black dots. Everyone recognizes a ladybug.
Turtles. A green oval body with a darker shell pattern, plus a little head and legs, makes an adorable turtle.
Bees. Black and yellow stripes, two tiny white wings, and you are done. Bees are cheerful and easy to identify from across a path.
Sunrises and sunsets. Paint a wash of yellow near the bottom, orange in the middle, and blue at the top, then add a small sun. Blend the colors while they are still wet for a soft effect.
Birds and butterflies. A simple bird silhouette in black or white looks elegant on a bright base. Butterflies work well as two overlapping triangles with dots for wings.
Sketch your idea on the pebble with a pencil first. If you do not like it, wipe it off with a damp cloth and start again. No harm done.
Seasonal Kindness Rocks
Painting pebbles for the season is a wonderful way to keep the hobby fresh all year.
Spring. Tulips, rainbows, and pastel hearts. Hide them near playgrounds as the weather warms up.
Summer. Sunshine, ice cream cones, and beach scenes. Little seashells painted on stones are a sweet touch for coastal walks.
Fall. Pumpkins, leaves, and warm orange and gold tones. A tiny owl pebble is a favorite for autumn.
Winter. Snowflakes, mittens, and evergreen trees. A red berry or a simple star brings holiday cheer to a neighborhood trail.
Seasonal rocks are also lovely gifts. Tuck a painted pebble into a card, use one as a paperweight on a desk, or place a small bowl of them on your front porch for visitors to take.
Painting Techniques That Make Designs Pop
A few small habits will make your pebbles look polished, even when you are just starting.
Let each layer dry. Acrylic paint dries fast, but it is worth waiting between colors. Painting wet paint over wet paint smears your design and muddies the colors.
Two thin coats beat one thick coat. Thin layers dry smooth and even. Thick layers can pool and leave brush marks.
Start with light colors, then dark. Paint your light base and light details first, then add darker outlines and accents on top. Dark paint covers light much more easily than the reverse.
Use the right tool for the job. Paint pens for lettering and dots, a fine brush for details, a flat brush for base coats. Switching tools saves you from fighting the wrong one.
Clean up edges while paint is wet. If a line wobbles, dip a q-tip in water and gently wipe the mistake away before it dries. It is much harder to fix after.
Practice on paper first. A quick sketch of your design on scrap paper builds confidence and helps you plan where everything goes.
Sealing Your Kindness Rocks
Here is the step that separates rocks that survive a rainy season from rocks that end up faded and peeling. Sealing is not optional if you want your kindness rocks to live outdoors.
Unsealed acrylic paint is water-resistant once dry, but it is not waterproof. Rain, humidity, and frost will eventually lift and crack it. A good sealer protects your design and keeps the colors bright for months.
You have a few good options:
- Outdoor Mod Podge. Easy to brush on, dries clear, and it is made for weather exposure. Use two or three thin coats.
- Spray-on acrylic sealer. Look for a clear, outdoor or UV-resistant formula. Spray sealers give an even, invisible finish and are wonderful for textured designs with dots.
- Brush-on polyurethane or varnish. Very durable and great for rocks that will live in gardens. It has a stronger smell, so use it in a well-ventilated space.
Whichever you choose, apply thin coats rather than one heavy one. Thin coats dry clear and smooth; a thick coat can turn cloudy or tacky.
Let the sealer dry completely between coats, and give the final coat a full day to cure before the rock goes outside. Patience here pays off.
How to Keep Your Rocks Weatherproof
Sealing is the biggest step, but a few extra habits will keep your painted pebbles looking fresh even longer.
Choose a UV-resistant sealer. The sun fades paint faster than rain damages it. A sealer with UV protection keeps colors vivid through the summer.
Seal the whole rock, not just the design. Water can sneak in around the edges and lift the paint from underneath. Turn the rock over and give the back and sides a light coat too.
Keep them out of standing water. A sealed rock can handle rain, but it will not enjoy living in a puddle or a planter that floods. Tuck rocks into spots with good drainage.
Store extras indoors. If you paint a big batch for a special occasion, keep the spares in a box indoors and only set out a few at a time.
Refresh when needed. If a beloved rock starts to fade after a long season, a quick new coat of sealer often brings it back to life.
Where to Hide Kindness Rocks
Once your pebbles are painted and sealed, the fun begins: finding them a home.
Good spots are public, safe, and easy for people to notice:
- Park benches and trail markers
- Near library entrances and community notice boards
- By playgrounds and school gates
- On windowsills of local shops and cafes
- Along sidewalks near bus stops
Use your judgment about each spot. Avoid hiding rocks in places where they could be mistaken for litter, on private property, or in delicate natural areas like flower beds and stream banks. A rock is a gift, not litter, so place it where it looks intentional.
Write the hashtag #thekindnessrocksproject on the back of each rock with a fine paint pen. That small detail lets finders learn about the movement and join in themselves.
Making It a Family Activity
Kindness rocks are one of the most family-friendly crafts there is, because there is no wrong way to do it.
Little hands can wash pebbles, choose colors, and paint dots and hearts while you handle the lettering and sealing. Older kids can paint their own designs and learn the hiding etiquette as part of the fun.
Turn the hiding into a family walk. Each person carries one or two rocks, and you take turns choosing where they go. It turns an ordinary stroll into a small adventure, and the kids get to imagine who will find their rock.
If you want to keep the kindness going, start a small rock garden of your own. Line a path or a planter with your favorite painted pebbles, and add to it whenever the mood strikes.
Keeping the Kindness Going
The beauty of kindness rocks is that they multiply. One person paints one pebble, a stranger finds it, and a week later that stranger is painting three of their own.
So start small. Paint one rock this afternoon, with one simple word and one small heart. Seal it, hide it, and let it do its quiet work.
When you are ready for more, the pebble is waiting. Patterns, pictures, seasons, and stories, all in the palm of your hand.
And if you love working with paint on a small surface, you might enjoy exploring other textured painting projects, like our palette knife painting guide for beginners for your next creative afternoon.